
In a past blog article I explained how to upgrade to Cyanogenmod 6.1.2 (Froyo 2.2), but now I upgraded my Motorola Milestone (A853) to Cyanogenmod 7 based on Android Gingerbread (2.3). The steps were pretty much the same so the howto can be used, just with the new Cyanogenmod 7 file instead of the 6.1.2 file. It's definitely worth it, my Milestone is super fast now (Froyo was really much slower)!
But it happened to me, that after the upgrade to Cyanogenmod 7 my SMS and MMS were not shown anymore. An empty list appeared - as if I never received an SMS before. Of course I made a backup of mmssms.db (as written in my howto) and copied the file back to its original folder once upgraded. But no SMS...
Panic? Of course not =). The reason for this is a slight change in the structure of mmssms.db. Actually Android uses SQLite databases. Simply explained this is like a database in one file - structures, data, etc. It seems that the database structure between Froyo and Gingerbread has changed so we need to adapt a bit.
This step-by-step guide will help you to recover your SMS/MMS on your Motorola Milestone running now on Gingerbread.
Once again, if you still didn't get it: You need to backup your SMS/MMS database file BEFORE upgrading to Gingerbread. Duh!
1. Boot/Restart into Recovery menu. If you're already on Gingerbread 6.1.2 you can select this when you reboot your phone. If you're still on the 'original' Android version from Motorola, follow steps 1-5 of my tutorial or - my advice for free - complete the whole tutorial by installing CM 6.1.2/Froyo.
2. Now we launch the Console and launch the following command. This copies our SMS/MMS database to the SD card:
cp /data/data/com.android.providers.telephony/databases/mmssms.db /sdcard
Type exit to leave the Console. Then activate the USB Mass Storage Mode and copy the mmssms.db file from the SD Card to your computer. This is important!
3. You may now upgrade to Gingerbread....
4. Once Gingerbread is finished, reboot once more to Recovery and launch once more the Console. We - once more - copy the SMS/MMS database to the SDCard, with a slightly different name:
cp /data/data/com.android.providers.telephony/databases/mmssms.db /sdcard/mmssms-cm7.db
Activate USB Mass Storage Mode and copy the file mmssms-cm7.db to your computer.
5. To work with an SQLite database, you need to install a program to handle it. I recommend the Firefox Addon SQLite Manager. Install and then launch the program (from the Firefox menu -> Tools).
Open (Connect Database) the file mmssms.db which you have saved on your computer (note: this is the OLD mmssms.db, before you made the Gingerbread installation!).
6. On the left side is the table overview of this database, on the right side you can browse the content, see the structure, do actions, etc.
Select the first table called 'addr' and on the right side click on 'Export':
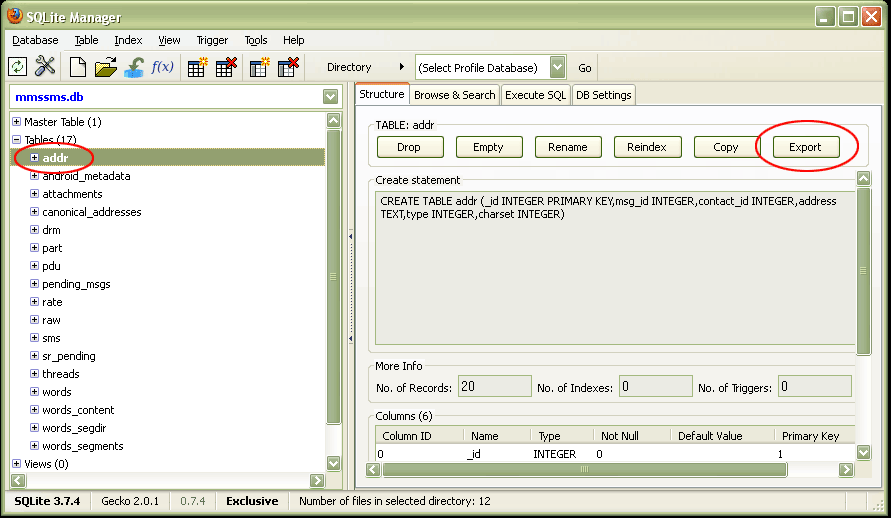
The Export Wizard should open and the window should look like the following image. On top the database (main) is active and the first table (addr) is selected in the field Name of the table.
Select the tab XML and then click on OK to save the table as an xml file:

7. Do the same with every table now. Select the table, click on Export, select XML and save the xml file.
Personal note: I exported addr, canonical_addresses, part, pdu, sms, threads, words, words_content, words_segdir and words_segments. I didn't care about attachments.
Once you have exported all tables, click on the "Open" icon (Connect Database) and this time select the file mmssms-cm7.db (yes, the empty database file from the Gingerbread installation).
8. Right-click on each table name and click on 'Empty table'. Otherwise the next step (Import) will not work!
9. In the SQLite Manager menu, click on 'Database' and then on Import. The Import Wizard will be shown on the right side where you select the tab XML:
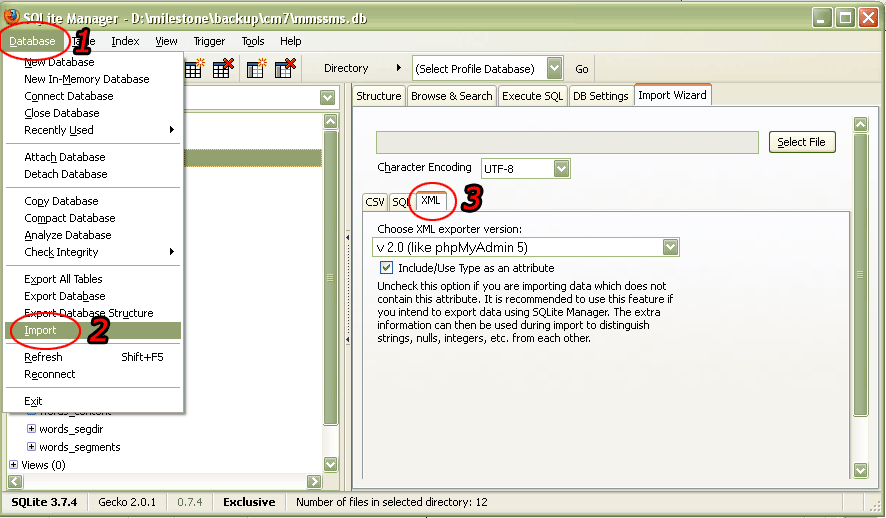
Click on the 'Select File' button and load the just before exported XML file 'addr.xml' (for the 'addr' table) and then click on OK at the bottom:

Click on OK to confirm you want to import to an existing table.
Continue the same with all XML files. It's possible that on some XML files an error will appear (I got errors on words_content and words_segdir but we don't care about these tables). This is due to the different structure. But it will work on the most important tables (addr, canonical_addresses, sms, threads) which are necessary for SMS/MMS.
10. Close the database (Menu Database -> Close Database). Your file mmssms-cm7.db has now the Gingerbread structure but with all your old SMS and MMS.
Rename the file to mmssms.db and place it back on your SD Card of your Android phone (at Step 4 we didn't disconnect the USB Mass Storage Mode, so you should still be connected!!).
Once copied to the SD Card, we have to restore the file from the SDCard to the original place. Launch the Console and enter the following commands:
cp /sdcard/mmssms.db /data/data/com.android.providers.telephony/databases/
chown radio:radio /data/data/com.android.providers.telephony/databases/mmssms.db
chmod 664 /data/data/com.android.providers.telephony/databases/mmssms.db
Reboot your phone and voilà, your SMS and MMS are back!
ck from Switzerland wrote on Mar 29th, 2015:
Hi pidi, sorry but no idea. I am meanwhile not on CM anymore and cannot test.
pidi from wrote on Mar 29th, 2015:
and any way to do the same but comming from CM7 (downgrade to gingerbread)?

AWS Android Ansible Apache Apple Atlassian BSD Backup Bash Bluecoat CMS Chef Cloud Coding Consul Containers CouchDB DB DNS Database Databases Docker ELK Elasticsearch Filebeat FreeBSD Galera Git GlusterFS Grafana Graphics HAProxy HTML Hacks Hardware Icinga Icingaweb Icingaweb2 Influx Internet Java KVM Kibana Kodi Kubernetes LVM LXC Linux Logstash Mac Macintosh Mail MariaDB Minio MongoDB Monitoring Multimedia MySQL NFS Nagios Network Nginx OSSEC OTRS Office PGSQL PHP Perl Personal PostgreSQL Postgres PowerDNS Proxmox Proxy Python Rancher Rant Redis Roundcube SSL Samba Seafile Security Shell SmartOS Solaris Surveillance Systemd TLS Tomcat Ubuntu Unix VMWare VMware Varnish Virtualization Windows Wireless Wordpress Wyse ZFS Zoneminder