Three years ago I bought a cheap notebook (a Toshiba Satellite C660D running with an AMD V140 single core processor) for my wife. Main purpose: Typical office work (the whole MS Office suite) and browsing the net. Back in the days when all CPU's only had one core this was no problem at all. But the newer Windows operating systems (in this case Windows 7) seem to be bloody slow on a single core CPU. Working on this machine was just a pain in the ... butt.
After a first attempt to increase memory (see Continuous reboot loop after RAM upgrade in Notebook (solved)) I finally decided to risk a CPU replacement (of course with the promise of buying a new notebook if I brick the thing). I have replaced processors several times but only in desktop computers and servers, never in a notebook...
To find a replacement processor for the AMD V140 turned out to be a bit tricky, because:
Thanks to the very helpful description of Socket S1 on cpu-world.com, I finally decided for the AMD Turion II P560.
The following table shows the key values of both CPU's compared (see full details here: AMD Turion II P560 vs. V Series V140).
| |
V Series V140 |
AMD Turion II P560 |
| # of cores |
1 | 2 |
| # of threads | 1 | 2 |
| Clockspeed | 2300 MHz |
2500 MHz |
| L1 cache | 64 KB |
128 KB |
| L2 cache | 512 KB |
2 MB |
| TDP | 25W | 25W |
Before I replaced the V140, I launched Novabench (a simple CPU benchmarking tool) to get the current values. NovaBench Score: 288
I also watched a couple of Youtube videos before and during opening the notebook, which helped a lot:
https://www.youtube.com/watch?v=-NLWLIZd434
https://www.youtube.com/watch?v=fhIHfBy0khY
OK, let's get it on!
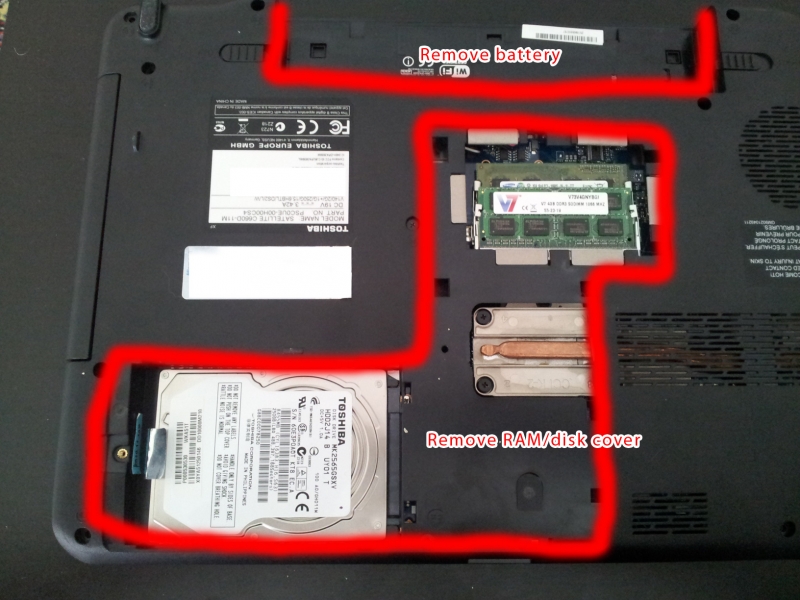
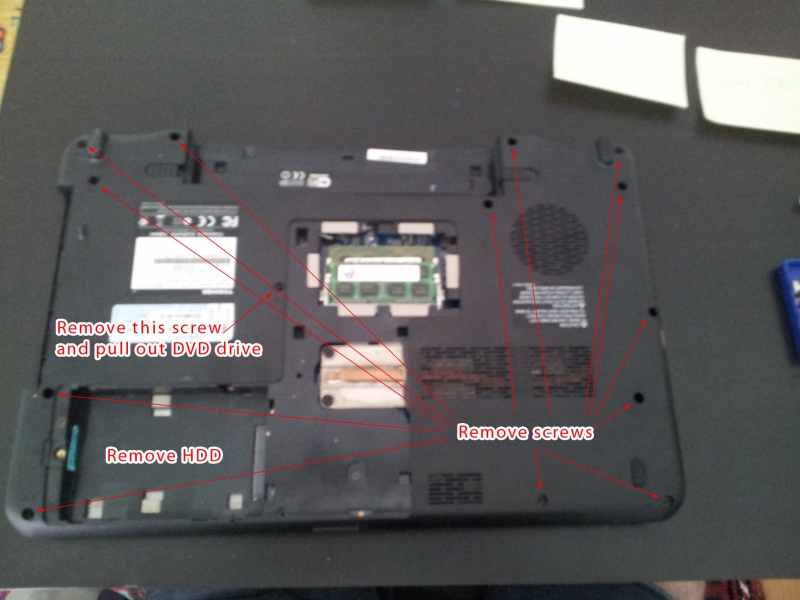
Unplug the notebook and remove the battery. Also remove the RAM/disk cover which is held by one screw. Then remove the hard drive. I decided to let the RAM in place. Remove all the screws holding the notebook cover together (they should be tagged as F8). Also remove the screw holding the DVD drive in place and pull out the DVD drive.
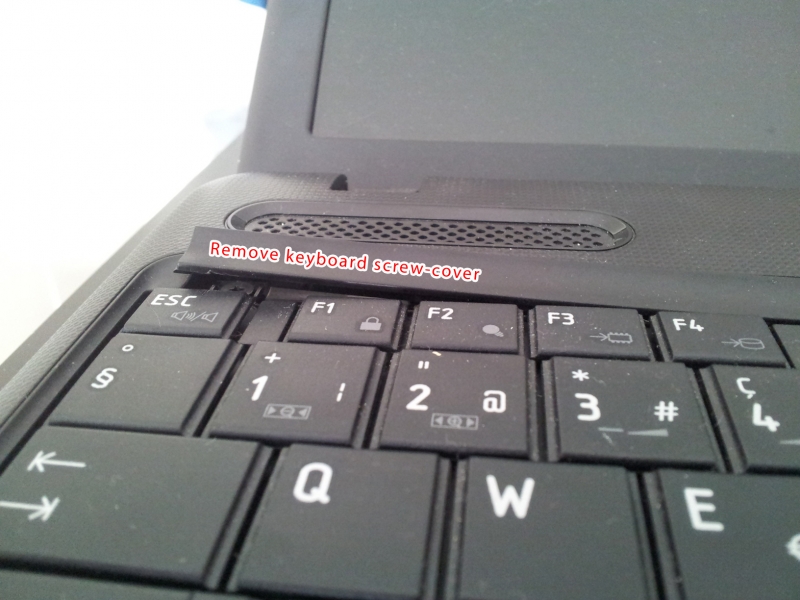
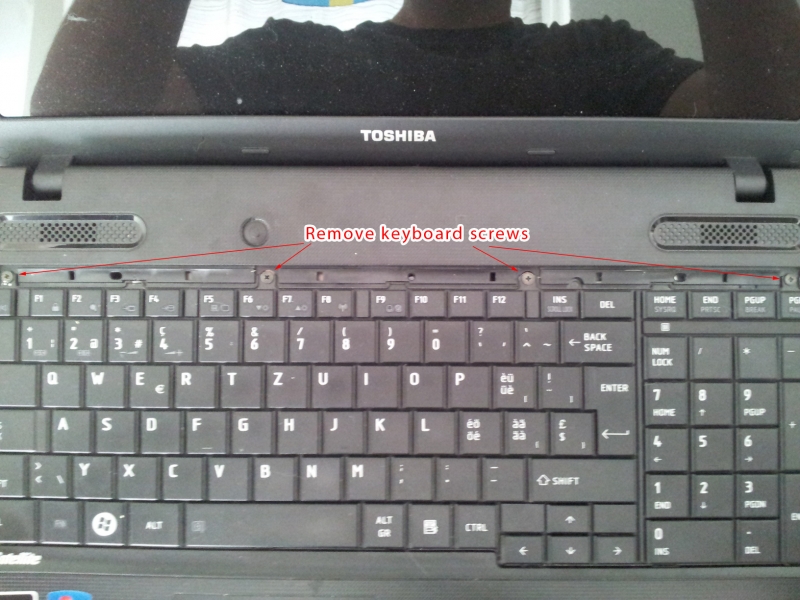
The keyboard can be removed by removing the keyboard screws. They're hidden under a small cover which you can pull out with a simple flat screwdriver. Next to the ESC key there is a perfect space to get under the cover and pull it up.
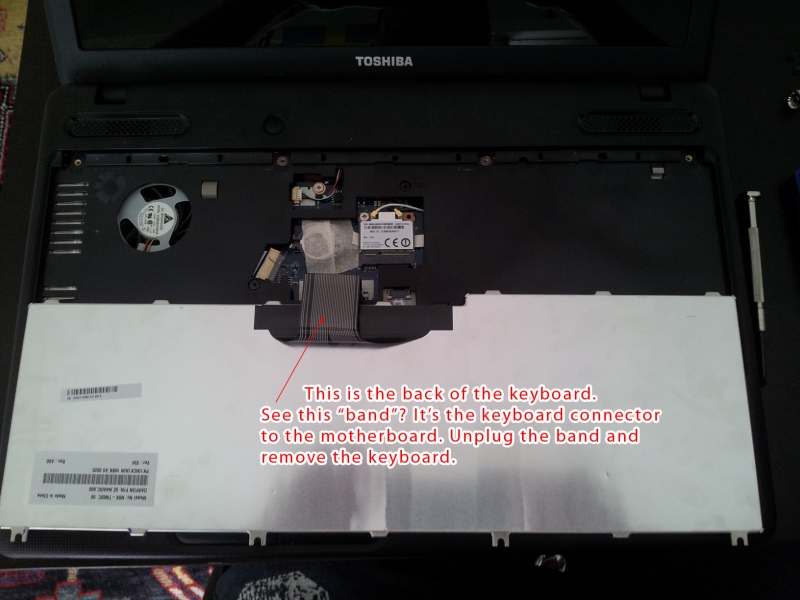
Once you have done that just pull out the cover all the way. You will then see the screws you remove. After that you can lift the keyboard and you will see that it is attached to the motherboard with a connection "band". Unplug this band by gently pulling (pushing towards the screen) the white plastic holders (they're holding the band in place). You can then remove the band and completely remove the keyboard.
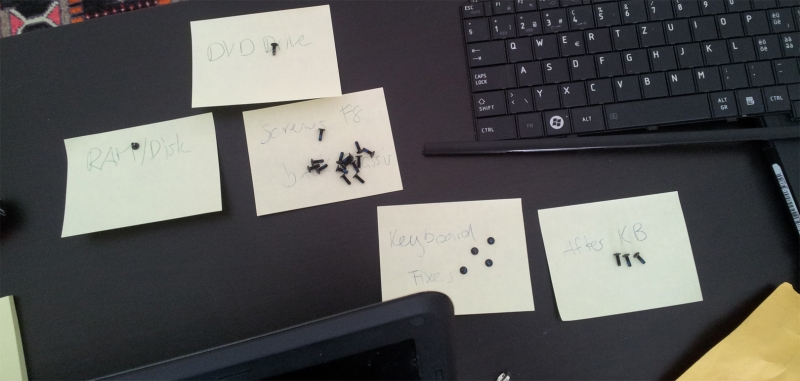
By the way... if you haven't done this already, I suggest to organize your workspace where you sort and label your screws. Not that you mix them up...
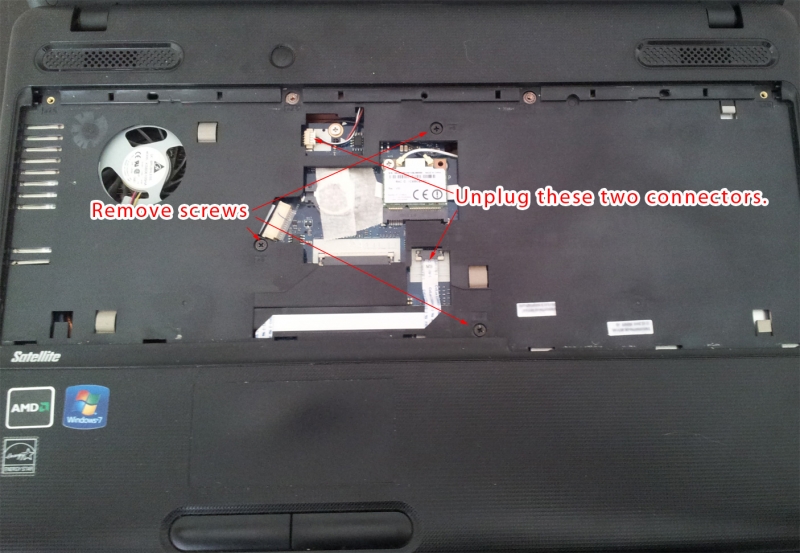
With the keyboard removed, we're just one step away from the interior. There are three screws which need to be removed after the keyboard. You also need to disconnect two connectors. One is the touch panel connector (bottom) and the other the screen connector (top). I needed to pull a bit more on the screen connector to get it out... Don't pull too strong though. Now you can remove the notebook cover. I used a flat screwdriver again, placed it somewhere near the left-mouse-button of the touch panel to lift up the cover.
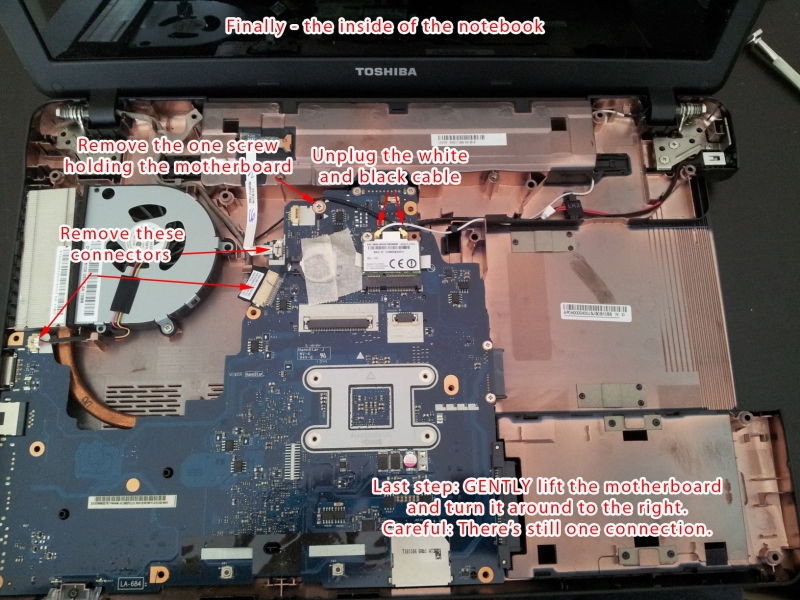
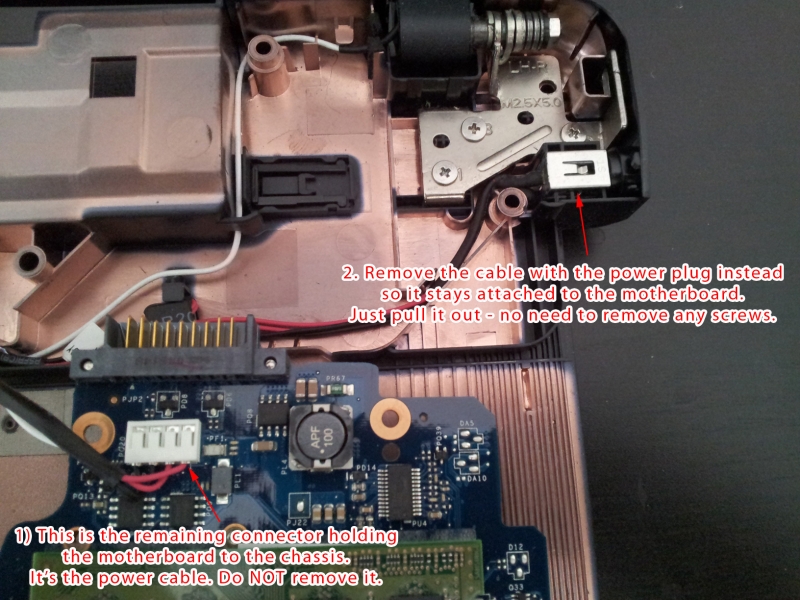
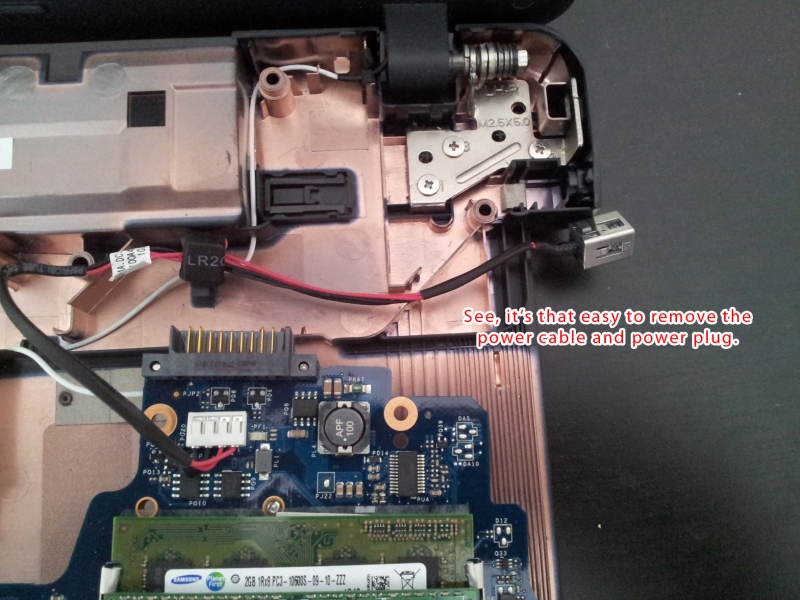
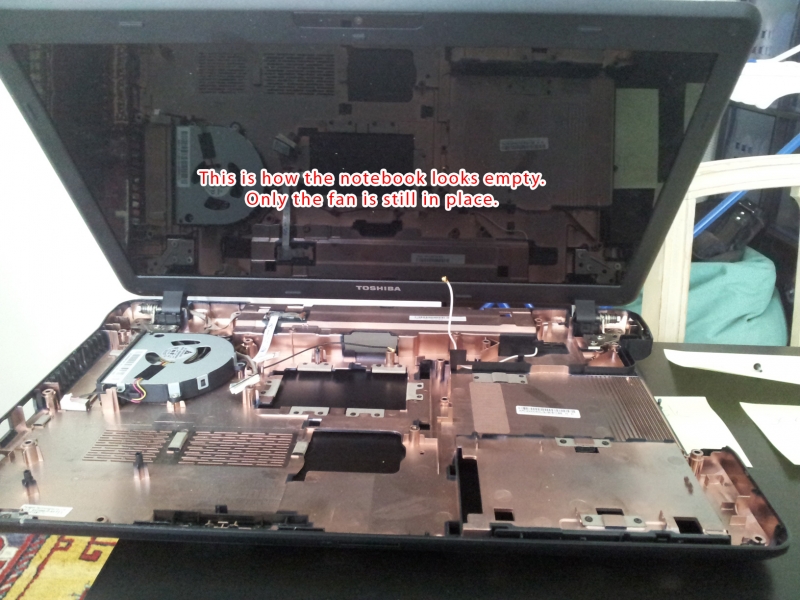
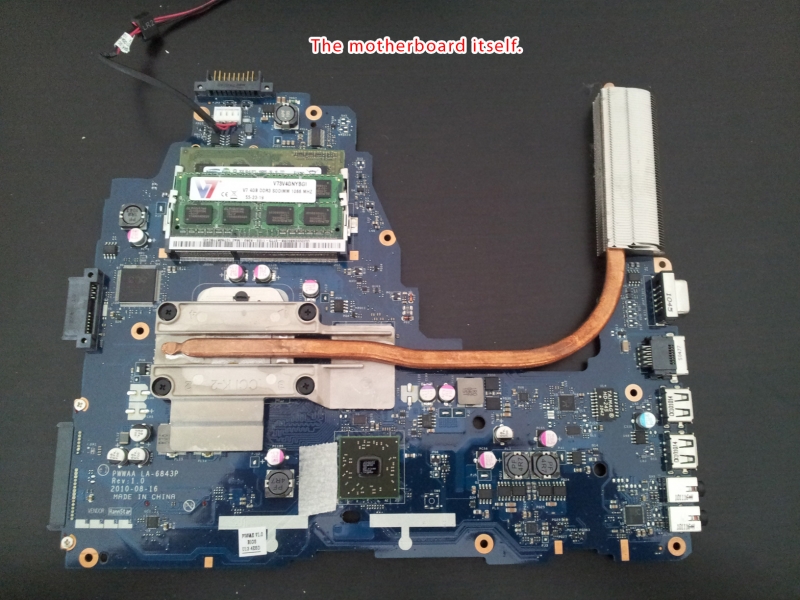
Finally we see the inside. What? There's no CPU?! That was my first reaction, too. The CPU is on the other side of the motherboard, so we need to get the motherboard out of the "chassis". There are several cables/connectors to disconnect and one main screw to remove (see the picture for details). Once that's done, lift the motherboard at the left side (under the fan) and gently and slowly turn it around (yes, the heat sink/pipe comes with it). You will see that there's still one connector on the other side, it's the power connector to the motherboard. DO NOT remove this from the motherboard. We can simply remove the power plug itself from the chassis (see pictures above for more details).
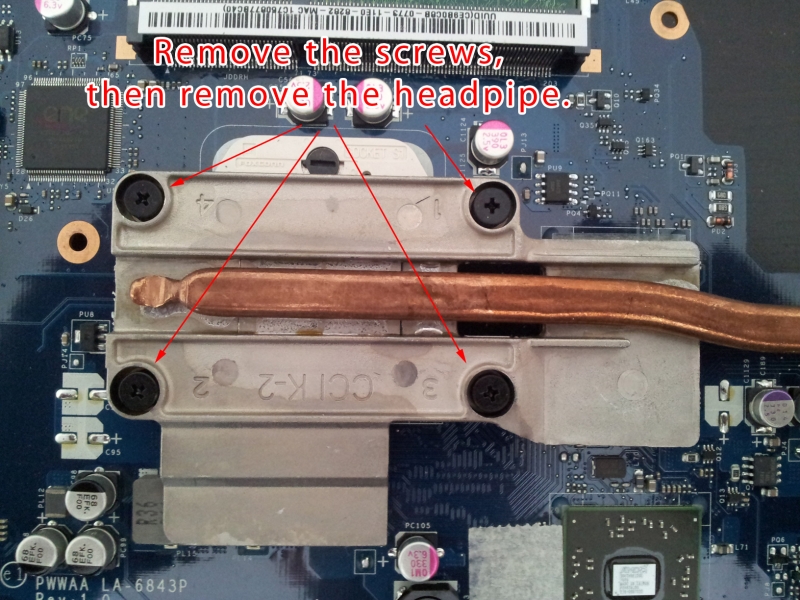
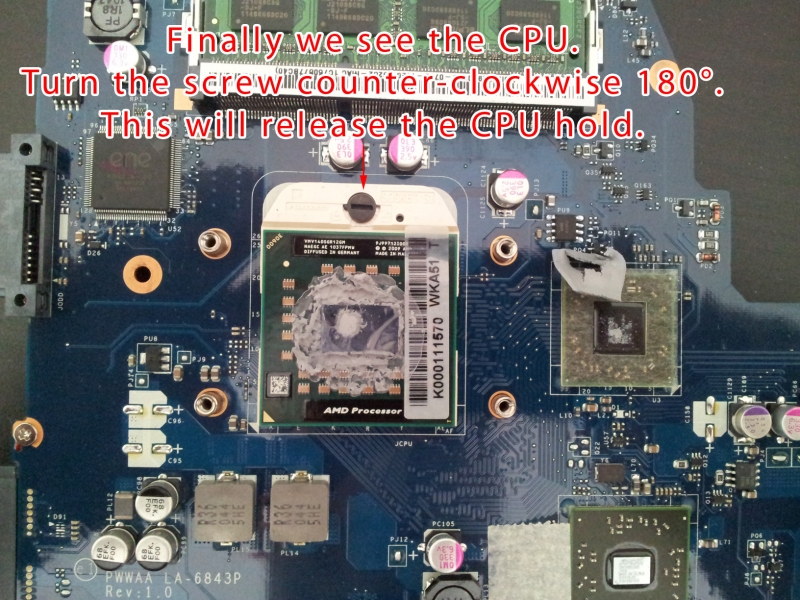
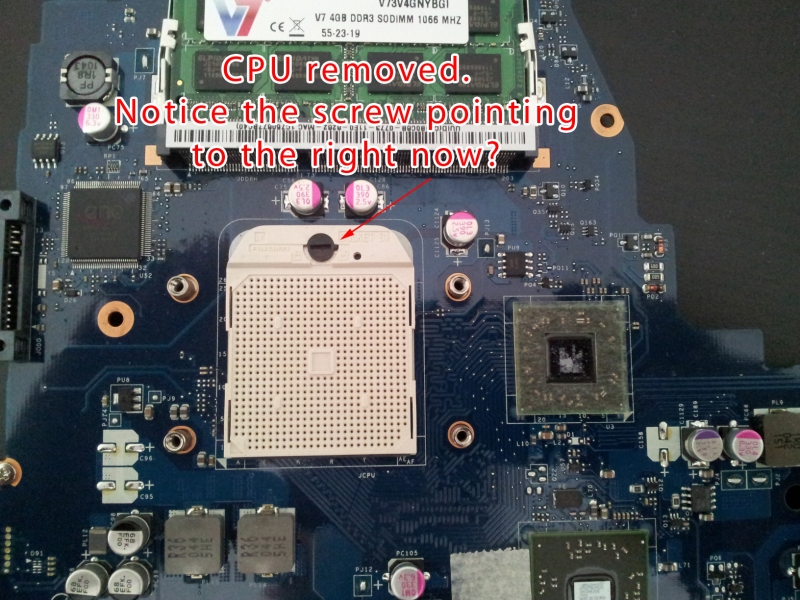
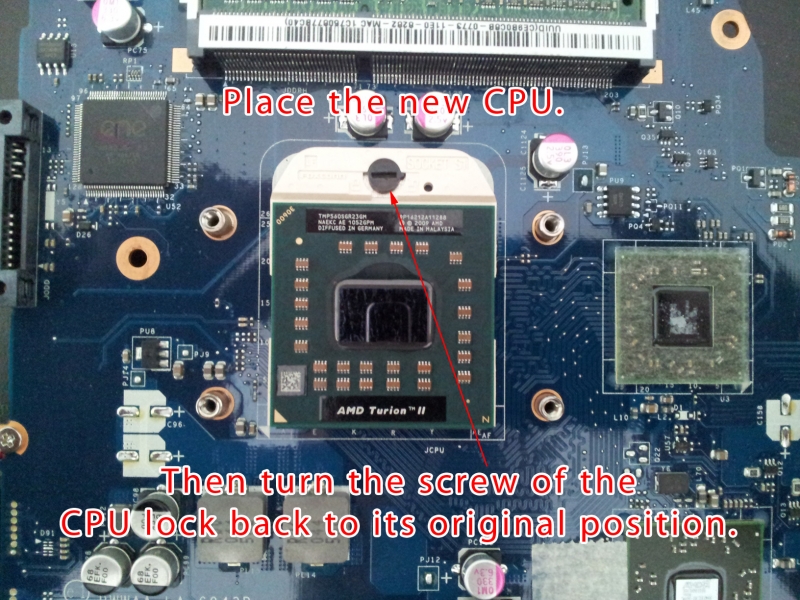

Now we have the motherboard separated and we can finally exchange the CPU. First remove the screws which hold the heat pipe on top of the CPU socket. We then finally see the V140 in front of us. To release the "lock" of the socket, gently turn the black screw counter-clockwise 180 degrees. You will see that the processor jumps a little bit (it was released). You can then take the CPU and place the new CPU on the socket (make sure you place it the same way because the pins on the CPU need to match the socket!). In my case it was simple because both "branding tags" were at the bottom. Once the new CPU is placed on the socket, turn the black screw again (this time clockwise) to lock the processor on the socket. My new Turion II came already prepared with thermal grease on it. If that isn't the case with your CPU, you must put some thermal grease on it. Then fix the heat pipe again.
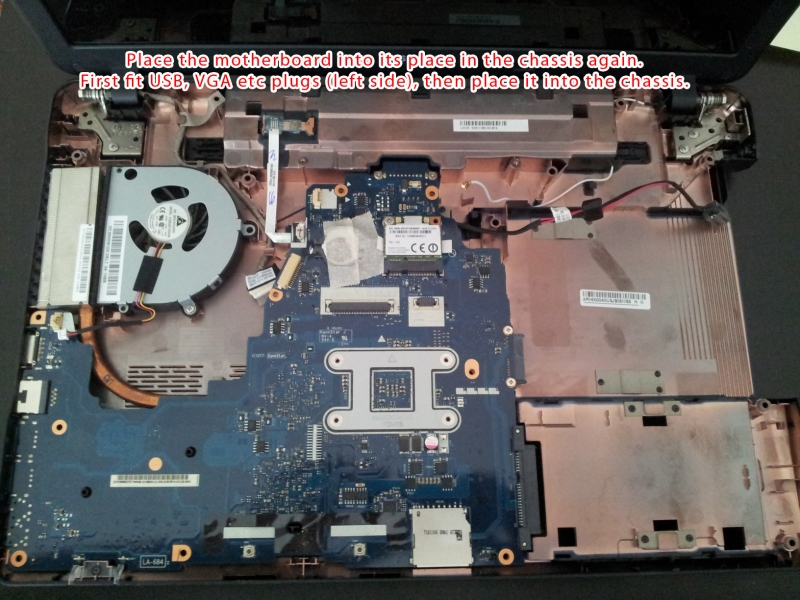

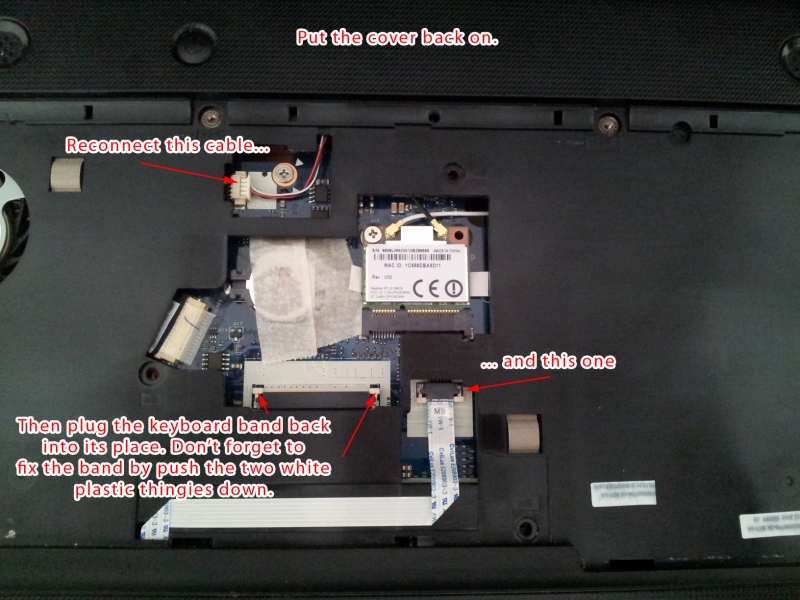
The best way to place the motherboard back into the chassis (don't forget: cpu socket is facing down!) is to first adjust the USB, VGA, etc plugs to the holes of the chassis' left side. Once this looks OK, you can place the motherboard back into place. Make sure it fits everywhere perfectly. Then reconnect all the plugs and fix the motherboard with the one screw. Don't forget to fix the power plug into its place again (right top).
Put the notebook's cover back on and fix the three screws on the inside (where you'll place the keyboard). Don't forget to reconnect the screen and touch panel cables. Then reconnect the keyboard band into its slot. This can be a little bit tricky... It doesn't have to go all the way in, but make sure you fix the band with the two white plastic thingies. Be patient ;-). Then put the keyboard into its place and fix it with the screws. Then put back the screw cover (or actually leave it off so you can test your keyboard first - maybe you'll have to refix the band connector).
The last step is to put back in all the screws on the back of your notebook, fixing the notebook case together. Insert the hard drive and close the drive/disk cover. Insert the DVD drive and fix it with its screw. Basically everything backwards from step 1, but you already knew that.
During the boot process, I pressed F2 to get into the BIOS. I wanted to see that the motherboard has correctly identified the new processor:
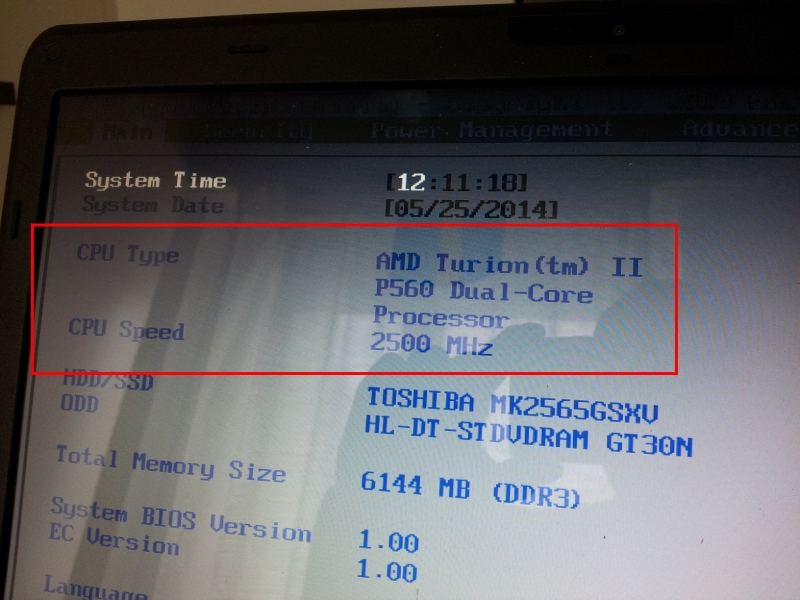
Windows then booted up correctly and installed some new drivers for the new CPU. After a bit Windows asked to be rebooted.
After the reboot, asked for by Windows, I relaunched Novabench. This time with a NovaBech score of 382! Well it didn't double the total performance but taking a look at the "CPU Tests" the number of operations per second have doubled.
Also by opening a browser and simply surfing through the web, it was clearly much faster than before. So I consider this a success (and I didn't break it, either)!
para from Bordeaux wrote on Dec 4th, 2023:
Thank you for your very good DIY about upgrade CPU. I did it on a Toshiba C650D with V120 AMD for an ATHLON dual core P360. Upgrading OK working very well. Thank you very much
PeterBilt from Polska wrote on Sep 12th, 2021:
Thank you so much. I upgraded my CPU to Turion II P560, added 4GB of RAM (6GB total now) and replaced hdd with a ssd. Windows 10 runs smoothly, 1080p videos ALMOST smoothly :D
And no1 advice: clean cooling system regularly. Because it tends to lock with dust etc.
ck from Switzerland wrote on May 13th, 2017:
Hello Lionel, according to CPU-World.com (http://www.cpu-world.com/CPUs/Atom/Intel-Atom%20N450%20AU80610004653AA.html) the Intel Atom N450 processor cannot be upgraded because "BGA processors, like this one, are soldered on a motherboard, for that reason upgrading or replacing them is very very difficult."
Lionel from Paris wrote on May 12th, 2017:
Hi!
Having a Dell Inspiron mini 1012 notebook,I would like to up grade its CPU Intel Atom N450,which is far too slow.
Would you know a suitable CPU ?
Thanks for your good work
Best regards
Ck from Switzerland wrote on Apr 16th, 2017:
Hi Luca. According to cpu-world.com, the P650 should also work. It has also a TDP of 25W and runs on the same socket.
Luca from Italy wrote on Apr 16th, 2017:
Hi, i would upgrade my old Satellite, can i ask you more about cpu compatibility (of course in addition to the P560, maybe the P650?)?
Thank you.
Mark from UK wrote on Apr 1st, 2017:
Although I have a brand new laptop I've kept this old Toshiba because I just love it. It has Win7 and I already upgraded it to 8GB RAM. Now I just found this article which gives a good idea to upgrade the CPU too. I ordered it from China for $12 with free shipping. I think it's well worth it. I use it to for basic tasks such as browsing, downloading etc... Im sure I will be happy with the new CPU. Thanks Claudio for this nice write-up!
ck from Switzerland wrote on Jan 2nd, 2017:
Hi Justin. Meanwhile several years have passed and let alone the chipset of the C660D is outdated. I suggest buying a new laptop - it's 2017. I replaced the mentioned Toshiba C660D of my wife in August 2016 with a new HP 250 G5 and upgraded its HDD.
Justin from Ireland wrote on Jan 2nd, 2017:
Hi I am considering upgrading my toshiba C66D 153 with 8gb ram, an ssd, a new battery and the new cpu which you mentioned. Do you recommend the cpu upgrade instead of buying a new laptop. I know the new laptop would be better but do you think the cpu upgrade allows for a better experience and makes the computer actually usable for web browsing? Thanks so much for this post anyway, would really appreciate a reply. Thanks

AWS Android Ansible Apache Apple Atlassian BSD Backup Bash Bluecoat CMS Chef Cloud Coding Consul Containers CouchDB DB DNS Database Databases Docker ELK Elasticsearch Filebeat FreeBSD Galera Git GlusterFS Grafana Graphics HAProxy HTML Hacks Hardware Icinga Icingaweb Icingaweb2 Influx Internet Java KVM Kibana Kodi Kubernetes LVM LXC Linux Logstash Mac Macintosh Mail MariaDB Minio MongoDB Monitoring Multimedia MySQL NFS Nagios Network Nginx OSSEC OTRS Office PGSQL PHP Perl Personal PostgreSQL Postgres PowerDNS Proxmox Proxy Python Rancher Rant Redis Roundcube SSL Samba Seafile Security Shell SmartOS Solaris Surveillance Systemd TLS Tomcat Ubuntu Unix VMWare VMware Varnish Virtualization Windows Wireless Wordpress Wyse ZFS Zoneminder