
VMware ESXi 4.1 does not use whole disk capacity for VMFS3
Last Update: March 11, 2019
There seems to be a problem with the new version of VMware's ESXi, 4.1. Due to ESXi's automatic installation and disk partitioning,
no advanced parameters can be given, e.g. to manually create vmfs3 partitions. Usually that works fine, the installation creates
the system partitions (HyperVisor) and uses the rest of the disk for a local vmfs3 datastore.
The situation: I installed ESXi 4.1 on a Dell PE 2900 with 8 harddisks on a Raid-5, a total of 2.86 TB of diskspace. The
integrated Raid Controller (PERC 5/i) shows the correct sum of diskspace and the installation of ESXi detects the logical harddisk correctly
with a diskspace of 2.86 TB.
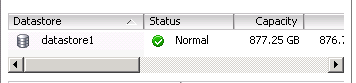
The problem: Once ESXi 4.1 was installed, a local VMFS datastore was created - with a size of 744 GB (on another server model it showed 877GB, see screenshot below). Instead of using the whole diskspace.
The maximum filesystem limit of VMFS3 is 2TB per LUN and ESXi detects the local disk/partition as a LUN so it should have created a 2TB
vmfs datastore. But no.
Reinstallation
Maybe this problem was a coincidence so a complete reinstall could maybe solve the problem. But even after running the ESXi installer
again, the same size of vmfs datastore was there: 744 GB.
Update September 3 2010 (Installation of another ESXi)
It seems that this whole problem only affects servers with a total disk capacity of over 2TB. As I describe in
today's blog post the vmfs3 partition was created fine
with a capacity of 1.4TB.
Update February 23, 2011 (Another installation)
I had to re-use my own tutorial yesterday again, for new installation of an ESXi 4.1 server. This time I also tried the partitioning with ESX (not ESXi) which resulted in a even weirder behavior: ESX didn't even install. The local disk, seen as 2.86TB disk, was gray and could not be selected. At least with ESXi the installation works, even if the partitioning is messed up.
Manual repartitioning - VMFS up to 2TB but not full disk space
Before losing too many words, I let you know from the begin: THIS WORKS. You can continue to read on, hopefully with
big eyes and a smile on your face...
Now to the funny part! The following instructions are advanced system commands. Do not do them on a production machine, only on a newly installed
ESXi 4.1 machine which doesn't host any virtual machines yet.
First we have to find the correct disk, for which ESXi has given a special name. Use the following commands to find your local disk.
Note that I have cut the full output, I only show the local disk information (the full output would also contain CD drive, attached iSCSI or SAN disks, etc.).
To run the following commands, you need to enable SSH. You can do this on the ESXi console in Troubleshooting.
This shows the disk name (naa.6001e4f01c94d50013d852397c7ef00d) and the LUN name (vmhba1:C2:T0:L0):
# esxcfg-mpath -b
naa.6001e4f01c94d50013d852397c7ef00d : Local DELL Disk (naa.6001e4f01c94d50013d852397c7ef00d)
vmhba1:C2:T0:L0 LUN:0 state:active Local HBA vmhba1 channel 2 target 0
With the following command we see even more information and what we need is also here: The device path which we will use as the local disk identifier in the next commands:
# esxcfg-scsidevs -l
naa.6001e4f01c94d50013d852397c7ef00d
Device Type: Direct-Access
Size: 3000704 MB
Display Name: Local DELL Disk (naa.6001e4f01c94d50013d852397c7ef00d)
Multipath Plugin: NMP
Console Device: /vmfs/devices/disks/naa.6001e4f01c94d50013d852397c7ef00d
Devfs Path: /vmfs/devices/disks/naa.6001e4f01c94d50013d852397c7ef00d
Vendor: DELL Model: PERC 5/i Revis: 1.03
SCSI Level: 5 Is Pseudo: false Status: on
Is RDM Capable: false Is Removable: false
Is Local: true
Other Names:
vml.02000000006001e4f01c94d50013d852397c7ef00d504552432035
VAAI Status: unknown
Disk /vmfs/devices/disks/naa.6001e4f01c94d50013d852397c7ef00d: 3146.4 GB, 3146466197504 bytes
64 heads, 32 sectors/track, 3000704 cylinders, total 6145441792 sectors
Units = sectors of 1 * 512 = 512 bytes
Check your current partition table and note down the number of partition which is used for VMFS (by default it should be p3):
# fdisk -l
Device Boot Start End Blocks Id System
/dev/disks/naa.6001e4f01c94d50013d852397c7ef00dp1 5 900 917504 5 Extended
/dev/disks/naa.6001e4f01c94d50013d852397c7ef00dp2 901 4995 4193280 6 FAT16
/dev/disks/naa.6001e4f01c94d50013d852397c7ef00dp3 4996 761728 774894592 fb VMFS
/dev/disks/naa.6001e4f01c94d50013d852397c7ef00dp4 * 1 4 4080 4 FAT16 <32M
/dev/disks/naa.6001e4f01c94d50013d852397c7ef00dp5 5 254 255984 6 FAT16
/dev/disks/naa.6001e4f01c94d50013d852397c7ef00dp6 255 504 255984 6 FAT16
/dev/disks/naa.6001e4f01c94d50013d852397c7ef00dp7 505 614 112624 fc VMKcore
/dev/disks/naa.6001e4f01c94d50013d852397c7ef00dp8 615 900 292848 6 FAT16
The next step is to delete the automatically created vmfs3 partition using the fdisk command:
fdisk -u /vmfs/devices/disks/naa.6001e4f01c94d50013d852397c7ef00d
Command (m for help): d
Partition number (1-8): 3
Command (m for help): w
Now we create a new partition and change its type to VMFS. When fdisk asks for the last sector (=size) of the new partition, we enter +2097152M (which is 2TB):
fdisk -u /vmfs/devices/disks/naa.6001e4f01c94d50013d852397c7ef00d
Command (m for help): n
Command action
l logical (5 or over)
p primary partition (1-4)
p
Selected partition 3
First sector (10229760-1850474495, default 10229760): 10229760
Last sector or +size or +sizeM or +sizeK (10229760-4294967294, default 4294967294): +2097152M
Command (m for help): t
Partition number (1-8): 3
Hex code (type L to list codes): fb
Changed system type of partition 3 to fb (VMFS)
Command (m for help): w
Now we check again the partition table to verify the changes:
# fdisk -l
/dev/disks/naa.6001e4f01c94d50013d852397c7ef00dp1 5 900 917504 5 Extended
/dev/disks/naa.6001e4f01c94d50013d852397c7ef00dp2 901 4995 4193280 6 FAT16
/dev/disks/naa.6001e4f01c94d50013d852397c7ef00dp3 4996 2004996 2047999936+ fb VMFS
/dev/disks/naa.6001e4f01c94d50013d852397c7ef00dp4 * 1 4 4080 4 FAT16 <32M
/dev/disks/naa.6001e4f01c94d50013d852397c7ef00dp5 5 254 255984 6 FAT16
/dev/disks/naa.6001e4f01c94d50013d852397c7ef00dp6 255 504 255984 6 FAT16
/dev/disks/naa.6001e4f01c94d50013d852397c7ef00dp7 505 614 112624 fc VMKcore
/dev/disks/naa.6001e4f01c94d50013d852397c7ef00dp8 615 900 292848 6 FAT16
Now the new partition has to be formatted to a VMFS3. This can be done with the following command where -b is standing for the filesystem blocksize. Here I use 8M which is currently the biggest blocksize and made for big vmdk files. Note that the partition number has to be given, therefore the :3 at the end:
# vmkfstools -C vmfs3 -b 8M -S datastore1 /dev/disks/naa.6001e4f01c94d50013d852397c7ef00d:3
Checking if remote hosts are using this device as a valid file system. This may take a few seconds...
Creating vmfs3 file system on "naa.6001e4f01c94d50013d852397c7ef00d:3" with blockSize 8388608 and volume label "datastore1".
Successfully created new volume: 4c45bc40-6aa5a458-e509-001e4f2a6fac
Congratulations, the new VMFS datastore with a size of 2TB has been created on your ESXi 4.1 machine.
Unfortunately this still doesn't use the whole disk space of 2.86 TB but I figured this out too (see below). However you are taking your own risk and you should be an advanced systems engineer to do it...
If you want to use the whole disk space (2.86TB here), do the following tasks:
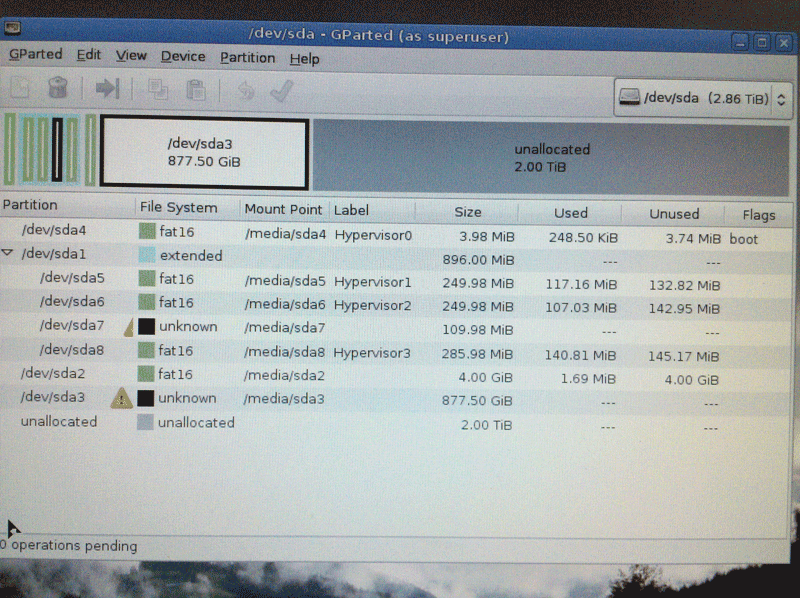
1. Boot with your favorite Rescue CD and launch a partitioning tool (I used Knoppix 6.2 and started Gparted). You will see the graphical partitioning done by ESXi.
2. Copy the data of the partition /dev/sda2 (the one with size 4GB and which is FAT16-formatted) to another partition.
You will find three folders in this partition: downloads, log, var. This is very simple, just mount /dev/sda2 as /mnt and /dev/sda6 as /mnt2 and copy the three folders:
mount /dev/sda2 /mnt
mkdir /mnt2
mount /dev/sda6 /mnt2
cp -Rp /mnt/* /mnt2
umount
/mnt2
umount /mnt
3. Then delete /dev/sda2 in Gparted.
4. Expand/Resize the extended partition up to a size of 1.5TB (you can try to use the full disk space, but it won't work due to a
maximum extended partition size).
4. Expand/Resize the extended partition to a size of 4992 MB (add 4GB).
5. Create a new logical partition within the extended partition with a size of 4GB and format it FAT16 - so we recreate the partition which we deleted before. Click on Apply in Gparted. The new logical partition will have the name /dev/sda9.
6. Restore the files you copied to another partition before back to the new partition:
mount /dev/sda9 /mnt
mount /dev/sda6 /mnt2
cp -Rp /mnt2/downloads /mnt2/log /mnt2/var /mnt
umount /mnt
umount /mnt2
7. Now create another new logical partition within the extended partition and use the rest of the extended partition space,
do not format it (unformatted) - this will be the first vmfs partition.
7. Back in Gparted, create a new primary partition from the unallocated space. Do not format it (select unformatted). Select a size of about 1.45TB (about 50% of what is left).
8. From the rest of the disk, create another new primary partition. As above, do not format (unformatted). Click on Apply in Gparted.
9. Now launch fdisk from your command line, we have to tell that the new created primary partitions (/dev/sda2 and /dev/sda3) are VMFS partitions.
# fdisk -u /dev/sda
Command (m for help): t
Partition number (1-8): 2
Hex code (type L to list codes): fb
Changed system type of partition 3 to fb (VMFS)
Command (m for help): t
Partition number (1-8): 3
Hex code (type L to list codes): fb
Changed system type of partition 3 to fb (VMFS)
Command (m for help): w
10. Once all this is done, restart your machine and boot your installed ESXi. It is likely that ESXi lost network configuration and root password. You will have to reconfigure this.
11. Once logged in back with SSH, you have to format the two new created partitions with the vmkfstools command:
# vmkfstools -C vmfs3 -b 8M -S datastore1 /dev/disks/naa.6001e4f01c94d50013d852397c7ef00d:2
# vmkfstools -C vmfs3 -b 8M -S datastore1 /dev/disks/naa.6001e4f01c94d50013d852397c7ef00d:3
12. Verify your partitions, it should look something like this:
# fdisk -l
Disk /dev/disks/naa.6001e4f01c94d50013d852397c7ef00d: 2997.7 GB, 2997752954880 bytes
64 heads, 32 sectors/track, 2858880 cylinders
Units = cylinders of 2048 * 512 = 1048576 bytes
Device Boot Start End Blocks Id System
/dev/disks/naa.6001e4f01c94d50013d852397c7ef00dp1 5 5004 5120000 5 Extended
/dev/disks/naa.6001e4f01c94d50013d852397c7ef00dp2 5005 1466189 1496253440 fb VMFS
/dev/disks/naa.6001e4f01c94d50013d852397c7ef00dp3 1466190 2858880 1426115584 fb VMFS
/dev/disks/naa.6001e4f01c94d50013d852397c7ef00dp4 * 1 4 4080 4 FAT16 <32M
/dev/disks/naa.6001e4f01c94d50013d852397c7ef00dp5 5 254 255984 6 FAT16
/dev/disks/naa.6001e4f01c94d50013d852397c7ef00dp6 255 504 255984 6 FAT16
/dev/disks/naa.6001e4f01c94d50013d852397c7ef00dp7 505 614 112624 fc VMKcore
/dev/disks/naa.6001e4f01c94d50013d852397c7ef00dp8 615 900 292848 6 FAT16
/dev/disks/naa.6001e4f01c94d50013d852397c7ef00dp9 901 4995 4193264 6 FAT16
You might ask, what happened to the deleted /dev/sda2 (4GB, FAT16) since its partition name changed (in my case to /dev/sda9)? ESXi doesn't seem
to work with a mount file like /etc/fstab and nowhere in the system I could find a mount table. But without doing anything, ESXi started to write
the logs (like messages) into /dev/sda9 into the log folder. So even though this partition name has changed, somehow ESXi still recognizes it as
the log partition. Now there are two local vmfs datastores on the ESXi 4.1 machine, one with 1.41TB, the other one with 1.45TB.
Mission accomplished.

AI AWS Android Ansible Apache Apple Atlassian BSD Backup Bash Bluecoat CMS Chef Cloud Coding Consul Containers CouchDB DB DNS Databases Docker ELK Elasticsearch Filebeat FreeBSD Galera Git GlusterFS Grafana Graphics HAProxy HTML Hacks Hardware Icinga Influx Internet Java KVM Kibana Kodi Kubernetes LVM LXC Linux Logstash Mac Macintosh Mail MariaDB Minio MongoDB Monitoring Multimedia MySQL NFS Nagios Network Nginx OSSEC OTRS Observability Office OpenSearch PHP Perl Personal PostgreSQL PowerDNS Proxmox Proxy Python Rancher Rant Redis Roundcube SSL Samba Seafile Security Shell SmartOS Solaris Surveillance Systemd TLS Tomcat Ubuntu Unix VMware Varnish Virtualization Windows Wireless Wordpress Wyse ZFS Znuny Zoneminder