
While evaluating different backup solutions for KVMs (Kernel based Virtual Machines), we came across the virt-backup.pl script. This backup script, written in Perl, is actually quite old. It was created in 2009 by Daniel Berteaud but is still in active development - which is quite an achievement! It requires libvirt to be able to communicate/manage the VMs.

When virt-backup is launched, the script parses the KVM to be backed up. If necessary, the KVM is suspended and the backup of the block devices starts. This uses dd in the background as the virtual block devices behave as virtual disks without direct access to the filesystem, doesn't matter if these are file-based virtual disks (such as qcow2) or raw (LV) devices.
This results in a dumped disk file with the extension .img. With additional optional --compress parameter the target img file can be compressed with different compression methods. Besides backing up all block devices of a KVM, the VM's config file (xml) is also saved in the backup target directory.
Depending on the kind of block device used by the KVM, the VM suspension can take a while - or it's a matter of a second. When using logical volumes from LVM as raw device, virt-backup detects this and creates a snapshot of the LV. This happens very fast and the KVM is resumed right after the snapshot was created.
As virt-backup is a Perl script, Perl is needed as a requirement. Additional modules might need to be installed, depending on the server environment. In our case we needed to install the following additional Perl modules:
root@host ~ # apt-get install libfile-which-perl libxml-simple-perl libsys-virt-perl liblockfile-simple-perl
As a preparation, a target backup directory should be available. This could be a mounted share from a central backup server, a separate disk or a replicated volume. The target directory should have enough disk space available. As virt-backup uses dd in the background, this means it creates a full backup of the KVM (no differential).
For our evaluation test, we simply created a local LV and mounted it on /backup.
In our test environment we have one KVM called kvmtest running:
root@host ~ # virsh --connect qemu:///system list --all
Id Name State
-------------------------
1 kvmtest running
To see what is happening in the background, virt-backup is launched with the --debug parameter:
root@host ~ # /root/scripts/virt-backup.pl --action=dump --vm=kvmtest --backupdir=/backup --debug
Connecting to libvirt daemon using qemu:///system as URI
Checking kvmtest status
Running dump routine for kvmtest
Locking kvmtest
Saving XML description for kvmtest to /backup/kvmtest/kvmtest.xml
kvmtest is running, suspending
kvmtest now suspended
Analysing disk /dev/vglxc/kvmtest connected on kvmtest as hda
Running: /sbin/lvcreate -c 512 -p r -s -n /dev/vglxc/kvmtest_1625670977 -L 5G /dev/vglxc/kvmtest > /dev/null 2>&1
/dev/vglxc/kvmtest seems to be a valid logical volume (LVM), a snapshot has been taken as /dev/vglxc/kvmtest_1625670977
Adding /dev/vglxc/kvmtest_1625670977 to the list of disks to be backed up
Analysing disk /dev/vglxc/kvmdisk2 connected on kvmtest as sdb
Running: /sbin/lvcreate -c 512 -p r -s -n /dev/vglxc/kvmdisk2_1625670977 -L 5G /dev/vglxc/kvmdisk2 > /dev/null 2>&1
/dev/vglxc/kvmdisk2 seems to be a valid logical volume (LVM), a snapshot has been taken as /dev/vglxc/kvmdisk2_1625670977
Adding /dev/vglxc/kvmdisk2_1625670977 to the list of disks to be backed up
The following disks will be dumped:
Source: /dev/vglxc/kvmtest_1625670977 Dest: /backup/kvmtest/kvmtest_hda.img
Source: /dev/vglxc/kvmdisk2_1625670977 Dest: /backup/kvmtest/kvmtest_sdb.img
We can run a live backup
kvmtest is suspended, resuming
kvmtest now resumed
Starting dump of /dev/vglxc/kvmtest_1625670977 to /backup/kvmtest/kvmtest_hda.img
81920+0 records in
81920+0 records out
21474836480 bytes (21 GB, 20 GiB) copied, 179.441 s, 120 MB/s
Removing snapshot /dev/vglxc/kvmtest_1625670977
Starting dump of /dev/vglxc/kvmdisk2_1625670977 to /backup/kvmtest/kvmtest_sdb.img
40960+0 records in
40960+0 records out
10737418240 bytes (11 GB, 10 GiB) copied, 87.2384 s, 123 MB/s
Removing snapshot /dev/vglxc/kvmdisk2_1625670977
kvmtest is not suspended, nothing to do
Removing lock file for kvmtest
The script nicely detected that logical volumes are used in the background and created a LV snapshot (lvcreate [...] -s) and then resumed the VM:
We can run a live backup
kvmtest is suspended, resuming
kvmtest now resumed
It also detected two virtual disks of this KVM:
The following disks will be dumped:
Source: /dev/vglxc/kvmtest_1625670977 Dest: /backup/kvmtest/kvmtest_hda.img
Source: /dev/vglxc/kvmdisk2_1625670977 Dest: /backup/kvmtest/kvmtest_sdb.img
Once the dd of both virtual disks finished, the target directory now contains two new directories with the name of the KVM:
root@host ~ # ls -la /backup
total 10G
drwxr-xr-x 5 root root 4.0K Jul 7 17:16 .
drwxr-xr-x 24 root root 4.0K Jun 24 08:29 ..
drwxr-xr-x 2 root root 4.0K Jul 8 07:19 kvmtest
drwxr-xr-x 2 root root 4.0K Jul 7 17:20 kvmtest.meta
drwx------ 2 root root 16K Dec 3 2020 lost+found
Inside the kvmtest directory, the backup files can be found:
root@host ~ # ls -la /backup/kvmtest/
total 31G
drwxr-xr-x 2 root root 4.0K Jul 7 17:19 .
drwxr-xr-x 5 root root 4.0K Jul 7 17:16 ..
-rw-r--r-- 1 root root 20G Jul 7 17:19 kvmtest_hda.img
-rw-r--r-- 1 root root 10G Jul 7 17:20 kvmtest_sdb.img
-rw-r--r-- 1 root root 5.0K Jul 7 17:16 kvmtest.xml
Note the large sizes of the virtual disk dumps. The 20G and 10G sizes match exactly the original LVs used by this KVM. If compression would have been used as command parameter, the target files would be smaller. A manual gzip of kvmtest_hda.img results in roughly 1/4th of the size:
root@host ~ # ls -la /backup/kvmtest/
total 16G
drwxr-xr-x 2 root root 4.0K Jul 8 07:19 .
drwxr-xr-x 5 root root 4.0K Jul 7 17:16 ..
-rw-r--r-- 1 root root 5.6G Jul 7 17:19 kvmtest_hda.img.gz
-rw-r--r-- 1 root root 10G Jul 7 17:20 kvmtest_sdb.img
-rw-r--r-- 1 root root 5.0K Jul 7 17:16 kvmtest.xml
But of course additional compression increases the backup time.
Inside the kvmtest.meta directory a file named "snapshots" can be found. It contains a historical data of the LV snapshot names used for the backup.
As dd is used to create the backup of the virtual block devices (LV), a restore of them is the other way around: dd from the img file to the LV.
Note: As an alternative way, the img file could be directly used as virtual block device, but VM suspension would take a much longer time at the next backup run.
In this test environment, we still let our original kvmtest VM running but restore the backup into a separate VM "kvmrestore". For this a new LV was created which holds the OS data of the primary virtual disk (hda) and dd is run:
root@host ~ # lvcreate -n kvmrestore -L20G vglxc
Logical volume "kvmrestore" created.
root@host ~ # dd if=/backup/kvmtest/kvmtest_hda.img of=/dev/vglxc/kvmrestore bs=4096 status=progress
21394608128 bytes (21 GB, 20 GiB) copied, 150 s, 143 MB/s
5242880+0 records in
5242880+0 records out
21474836480 bytes (21 GB, 20 GiB) copied, 154.536 s, 139 MB/s
Then "kvmtest" is replaced by "kvmrestore" in the backed up XML config:
root@host ~ # sed -i "s/kvmtest/kvmrestore/g" /backup/kvmtest/kvmtest.xml
Besides this, the KVM's UUID also needs to be changed - it cannot be the same UUID as the existing kvmtest VM. It can just be a minor change, such as changing the last character. If a VNC port is defined in the XML config, another VNC port must be defined, too.
Note: This is only necessary because a "new" VM is created from the backup. For restoring the original KVM these changes are not necessary.
The new KVM "kvmrestore" can now be created using virsh create:
root@host ~ # virsh create /backup/kvmtest/kvmtest.xml --validate
Domain kvmrestore created from /backup/kvmtest/kvmtest.xml
And the KVM "kvmrestore" is automatically started:
root@host ~ # virsh --connect qemu:///system list --all
Id Name State
----------------------------
1 kvmtest running
3 kvmrestore running
By using the VNC port, the machine's console can now be accessed:
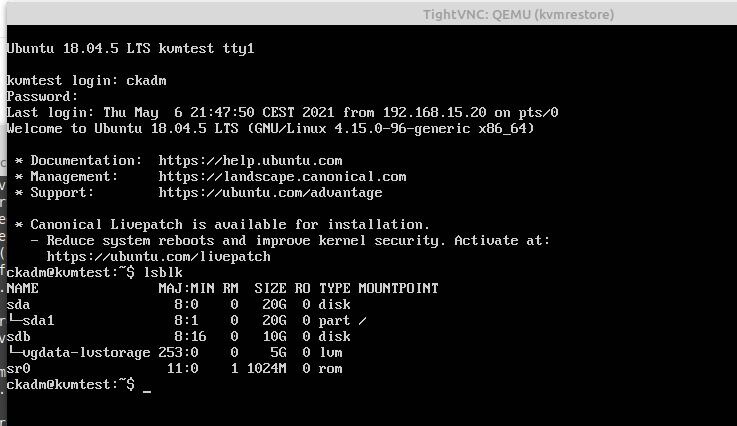
Success!
ck from Switzerland wrote on Nov 17th, 2021:
Hello D E. See the link at the beginning of the article, behind 'we came across the virt-backup.pl script.'.
D E from wrote on Nov 17th, 2021:
Ummm.. Where can I get virt-backup.pl from that this HOWTO uses????? All I find are reallly old virt-backup scripts...
Michael Ablassmeier from wrote on Nov 4th, 2021:
hi,
nice read.
check out a project of mine that aims to create a backup utility for kvm/libvirt and
uses the latest additions to the qemu block layer (dirty bitmaps) to be able to create
incremental backups, too:
https://github.com/abbbi/virtnbdbackup

AI AWS Android Ansible Apache Apple Atlassian BSD Backup Bash Bluecoat CMS Chef Cloud Coding Consul Containers CouchDB DB DNS Databases Docker ELK Elasticsearch Filebeat FreeBSD Galera Git GlusterFS Grafana Graphics HAProxy HTML Hacks Hardware Icinga Influx Internet Java KVM Kibana Kodi Kubernetes LVM LXC Linux Logstash Mac Macintosh Mail MariaDB Minio MongoDB Monitoring Multimedia MySQL NFS Nagios Network Nginx OSSEC OTRS Observability Office OpenSearch PHP Perl Personal PostgreSQL PowerDNS Proxmox Proxy Python Rancher Rant Redis Roundcube SSL Samba Seafile Security Shell SmartOS Solaris Surveillance Systemd TLS Tomcat Ubuntu Unix VMware Varnish Virtualization Windows Wireless Wordpress Wyse ZFS Znuny Zoneminder