
I'm currently working on an internal solution to auto-discover objects to be monitored on a remote Windows server. The goal is to use a web form where the administrator can enter basic information (like IP address) of the remote Windows host and the script auto-detects objects to be monitored; for example services or drives.The script then builds an Icinga2 config which then uses check_nt in the background (NSClient++ installed on the Windows server).
I chose to use WMI for the auto-discovery part. After I successfully compiled and installed the WMI cli (wmic) I was able to launch WMI-SQL/WQL queries on the remote Windows system:
/usr/bin/wmic -U "domain/sa_icinga%passwd" //windowsserver 'select DeviceID from Win32_LogicalDisk where DriveType = 3'
CLASS: Win32_LogicalDisk
DeviceID
C:
D:
However the tricky part was to create a non-administrator user who's able to launch remote WMI calls. Unfortunately the official Windows documentation (Authorize WMI users and set permissions) is somewhat incomplete and simply says:
To perform this task on a remote computer, the account with which you are logged on must be a member of the Administrators group of that computer.
This is actually not true - and I certainly don't want to give administrator privileges to a user just used for monitoring or in this case auto-discovery for objects to be monitored. The simplest way for me turned out to be the following way.
1. Create a new service user in the domain (or as a local user if the Windows server is not part of a domain). In my case this is the "sa_icinga" service account as you see above in the wmic command.
2. Assign this user to the following local groups:
(Start -> Right-Click Computer -> Manage -> Configuration -> Local Users and Groups -> Groups)
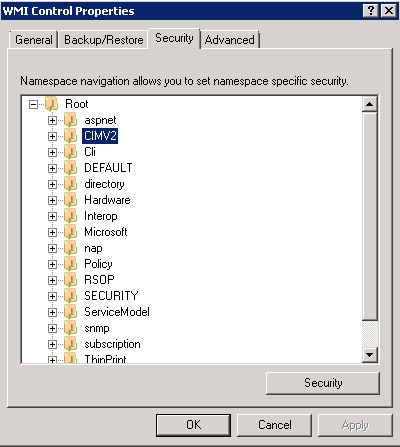
3. Modify WMI remote settings in the WMI Control Properties (Start -> Right-Click Computer -> Manage -> Configuration -> Right-Click WMI Control -> Properties).
Switch to the "Security" tab and expand the "Root" object. Select the "CIMV2" element and click on the "Security" button:
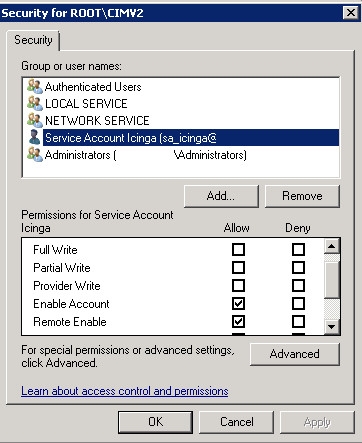
Add the service user and select "Enable Account" and "Remote Enable" in the "Allow column:
This was successfully tested on a Windows 2008 R2 Standard server.
Update January 22nd 2016:
It turns out that with this configuration most of the checks and discoveries can be done, however the sa_icinga user was not able to show a full list of Windows services. Only a fraction of the services list was shown.
So once again I tried to figure out how to give the non-administrator user "sa_icinga" the required permissions and found this howto. So far that's the best HowTo I found for this topic. However the solution is to change the security permissions for each service - in reality this is just not possible and I'm not Windows-hardcore enough to pull a PowerShell script or similar out of my pocket.
Another hint I found was on the OP5 Knowledge base, where it says:
When using a non-administrator user it is not possible to monitor all Windows services.
Some services require that some security settings in Windows is modified which is out of scoop for this how-to.
Yap, that's exactly the issue I'm seeing.
So, as frustrating it is, I added the sa_icinga user to the local Administrators group.
However, I disabled Remote Desktop connections for this sa_icinga user. This can be done in Active Directory Users + Computers: Properties of sa_icinga -> Remote Desktop Services Profile -> Deny this user permissions to log on to Remote Desktop Session Host server.
At least this way nobody can abuse this monitoring service account for anonymous logins.
No comments yet.

AI AWS Android Ansible Apache Apple Atlassian BSD Backup Bash Bluecoat CMS Chef Cloud Coding Consul Containers CouchDB DB DNS Databases Docker ELK Elasticsearch Filebeat FreeBSD Galera Git GlusterFS Grafana Graphics HAProxy HTML Hacks Hardware Icinga Influx Internet Java KVM Kibana Kodi Kubernetes LVM LXC Linux Logstash Mac Macintosh Mail MariaDB Minio MongoDB Monitoring Multimedia MySQL NFS Nagios Network Nginx OSSEC OTRS Observability Office OpenSearch PHP Perl Personal PostgreSQL PowerDNS Proxmox Proxy Python Rancher Rant Redis Roundcube SSL Samba Seafile Security Shell SmartOS Solaris Surveillance Systemd TLS Tomcat Ubuntu Unix VMware Varnish Virtualization Windows Wireless Wordpress Wyse ZFS Znuny Zoneminder