
The Sony Xperia Z2 phone is still a very good phone, although it has some years on it's back. I bought my Xperia Z2 exactly three years ago, in November 2014. It is still a speedy phone, still looks good and still has a good battery life. But of course there must be something negative: The Android OS on that phone never got over Android 6.0.1 (Marshmallow). That's the latest update my phone ever received from Sony, including security patches (Android security patch level: May 1, 2016). What a shame.
A lot of problems have recently became public, some of them pretty bad. For starters there's the Bluetooth vulnerability (BlueBorne) which lets your phone be hacked within a couple of seconds using simply a Bluetooth connection. Then there's also the recently discovered WPA2 vulnerability in wireless networks. This needs to be fixed on the client side (WLAN client), too.
So security alone is already one big reason to update your Sony Xperia Z2 to a newer version. But Sony (and most other Android phone vendors) prefer you buy a new phone than to release updates for old(er) phones. Hey, we're talking about 3 years here. Since when is that too old?
There's a way around that though. It is possible to install a custom Android ROM and ditch the stock (=default) Android ROM from Sony. The tricky part however is to unlock the bootloader first, to be able to install a so-called recovery ROM (imagine it like a computer BIOS) which then is used to install a custom ROM.
I've already done a couple of howto's for other Android devices (see https://www.claudiokuenzler.com/Android) so this step-by-step guide follows the same procedure as the others.
***Step by step guide how to install a custom Android ROM on Sony Xperia Z2 (Model: D6503)***
Warning: Installing a custom recovery image on the Sony Xperia Z2 will void the warranty.
A custom Android ROM is not officially supported by Sony and there can be bugs.
You will lose all your data on the phone. Make a backup of your pictures, videos, etc.
You're doing this at your own risk, this tutorial is only showing how it is possible. I'm not encouraging anyone to take these steps. You're responsible for this and in case something breaks then you're on your own. If you're scared now then close this page, shut down your computer, leave the house, go on the street, stop the next car and ask the driver if he knows how to install a custom Android ROM on your Sony Xperia Z2.
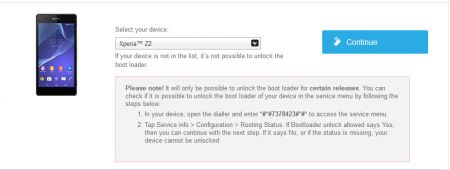
One of the main reasons, why I bought the Sony Xperia Z2 in the first place, was Sony's commitment to Android and to allow the user to unlock the bootloader. This can be done on the official Sony website, using this link: https://developer.sonymobile.com/unlockbootloader/unlock-yourboot-loader/
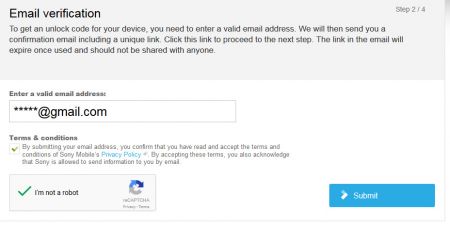
Select your device, then enter your e-mail address and accept the terms and conditions:
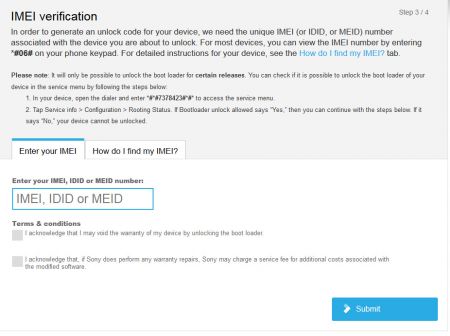
On the next step you need to enter your IMEI.
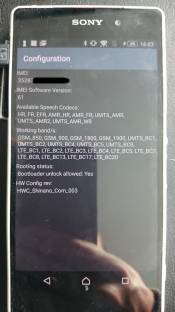
You can show your device's unique IMEI by opening the dialer and enter: *#*#7378423#*#* . This will open up the service menu (be patient, it took quite a while to show up on my device).
Tap on Service info -> Configuration. This will show you the IMEI and also another important information: Rooting status. This will tell you whether your device supports an unlocked bootloader. In my device "Bootloader unlock allowed" is set to "Yes", so I can continue.
Enter the IMEI on the Sony website, check the checkboxes, click on Submit.
After this you should get an e-mail with the instructions and code to unlock the bootloader.
The e-mail from Sony contains a code which needs to be entered in the "fastboot mode". That's kind of a low-level operating system (like BIOS) before the operating system (Android) starts.
To be able to talk to the phone in fastboot mode, you need to have the Android SDK installed. I chose to use my Linux VM for this and installed the necessary Android packages:
mintvm ~ # apt-get install android-tools-adb android-tools-fastboot
Reading package lists... Done
Building dependency tree
Reading state information... Done
android-tools-adb is already the newest version.
The following NEW packages will be installed:
android-tools-fastboot
0 upgraded, 1 newly installed, 0 to remove and 15 not upgraded.
Need to get 46.6 kB of archives.
After this operation, 158 kB of additional disk space will be used.
Do you want to continue? [Y/n] y
Get:1 http://ubuntu.ethz.ch/ubuntu/ trusty/universe android-tools-fastboot amd64 4.2.2+git20130218-3ubuntu23 [46.6 kB]
Fetched 46.6 kB in 1s (31.2 kB/s)
Selecting previously unselected package android-tools-fastboot.
(Reading database ... 173302 files and directories currently installed.)
Preparing to unpack .../android-tools-fastboot_4.2.2+git20130218-3ubuntu23_amd64.deb ...
Unpacking android-tools-fastboot (4.2.2+git20130218-3ubuntu23) ...
Setting up android-tools-fastboot (4.2.2+git20130218-3ubuntu23) ...
Turn off your Xperia Z2 phone if it is still powered on.
Now connect the USB-cable to your computer. Don't plug the micro-USB end into the phone yet!
The tricky part is to get your phone into fastboot mode, which requires a combo:
On your Xperia Z2, press the Volume up button at the same time as you connect the other end of the USB-cable.
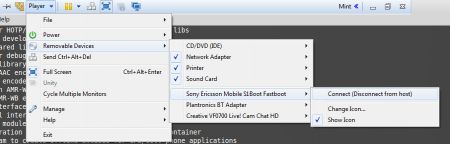
The phone screen went completely black, no way to tell something is running, however the phone is detected on my Linux (once I forwarded the detected Sony Ericsson Mobile S1Boot Fastboot device to my VM):
[ 756.364924] usb 1-1: new high-speed USB device number 8 using ehci-pci
[ 756.624431] usb 1-1: New USB device found, idVendor=0fce, idProduct=0dde
[ 756.624437] usb 1-1: New USB device strings: Mfr=1, Product=2, SerialNumber=3
[ 756.624440] usb 1-1: Product: S1Boot Fastboot
[ 756.624442] usb 1-1: Manufacturer: Sony Mobile Communications AB
[ 756.624444] usb 1-1: SerialNumber: BH90XXXXXX
The fastboot command is now able to detect the device:
mintvm ~ # fastboot devices
BH906S2Q16 fastboot
With the fastboot command the bootloader can now be unlocked with the code received by Sony:
mintvm ~ # fastboot -i 0x0fce oem unlock 0x25A696721AECXXXX
...
OKAY [ 1.493s]
finished. total time: 1.493s
0x25A.... is obviously the code I received in the mail from Sony. It might be a different code for your device (might depend on the IMEI number).
Done. This means the phone's bootloader is unlocked now!
The next step is to install a recovery ROM to be able to backup your device and install a custom Android ROM. This is also done with the fastboot command, but we first need to download a recovery ROM which is made for this device. Important to know here: The Xperia Z2's code name is sirius.
Important Note: Although I found the TWRP Recovery ROM for this phone (on https://eu.dl.twrp.me/sirius/), this recovery never worked - I was unable to boot into the recovery mode.
Whatever I tried, I was unable to boot into TWRP recovery mode. I tried all kinds of combos to no result. I even booted the phone into the stock ROM, made the phone setup, enabled USB debugging and connected with adb to the phone to reboot it to recovery (using "adb reboot recovery"), but even this didn't help! Then I came across https://forum.xda-developers.com/showthread.php?t=2769341&page=3 which points to install an advanced kernel (https://forum.xda-developers.com/xperia-z2/development/kernel-advanced-stock-kernel-multirom-t3005894). This kernel includes a newer/different boot image.
So before a recovery ROM can be installed, we first need to install a newer boot image kernel on the phone. I downloaded Z2_ADVstockKernel_v2.zip (from https://www.androidfilehost.com/?w=files&flid=52180 or see mirror here: https://www.claudiokuenzler.com/downloads/SonyXperiaZ2/), unzipped it and there is a boot.img inside. This "boot.img" file can now be installed (flashed) on the phone's boot partition (still in fastboot mode):
mintvm ~ # fastboot flash boot boot.img
sending 'boot' (11312 KB)...
OKAY [ 1.424s]
writing 'boot'...
OKAY [ 0.770s]
finished. total time: 2.194s
Then launch a reboot of the phone:
mintvm ~ # fastboot reboot
rebooting...
finished. total time: 0.003s
After this I noticed two things:
1) For the first time ever the notification LED turned to pink (was red before) - which was often mentioned on howtos to boot into recovery mode
2) The "normal" boot didn't work anymore. The phone rebooted after the Sony logo.
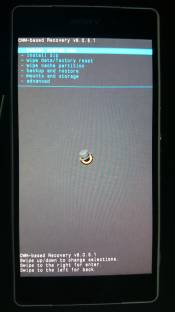
So when I saw the pink LED, I pressed [Volume Down] and kept pressing on the button until - finally - recovery mode was launched:
Now it's time to download your new custom Android ROM of choice for your Sony Xperia Z2. When I was doing these steps on my phone, I chose "Resurrection Remix OS" with Android 7.1. The relevant zip file for the Xperia Z2 (remember, the phone's code name is sirius) can be downloaded at: https://sourceforge.net/projects/resurrectionremix/files/sirius/ (or in case link is gone, try here: https://www.claudiokuenzler.com/downloads/SonyXperiaZ2/).
You also need to install the Google Apps, without them you won't be able to use Resurrection Remix OS (Android) once it booted.
Download them from http://opengapps.org/ select Platform ARM, Android 7.1, Variant: full.
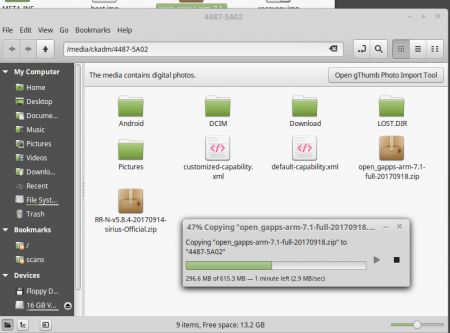
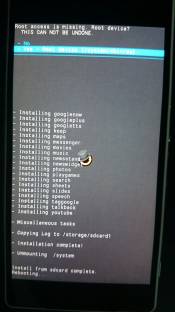
In CWM (which is short for ClockWorkMod's recovery ROM) I enabled the USB Mass Storage device (mounts and storage -> mount USB stoage) and transferred the Resurrection Remix zip and Gapps zip on the phone:
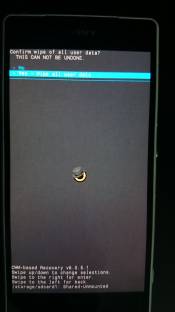
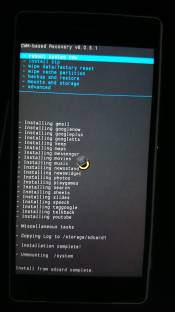
After the transfer I went back to the main menu in CWM and selected "wipe data/factory reset":
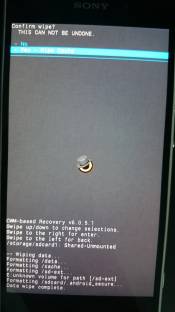
Followed by "wipe cache partition":
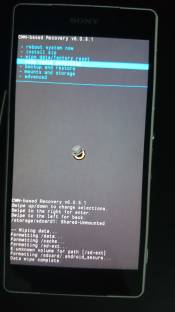
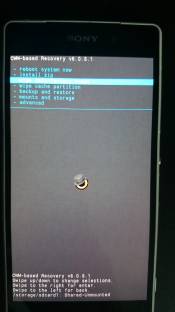
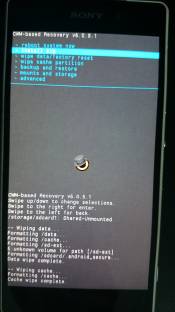
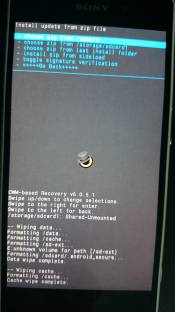
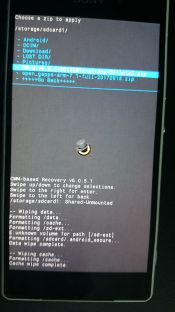
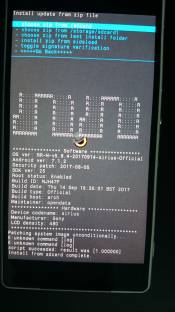
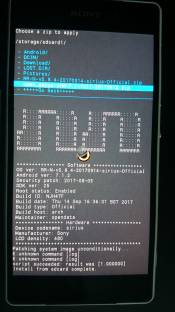
Finally it's time to install the RR and Gapps! Select "install zip" -> choose zip from storage/sdcard1:
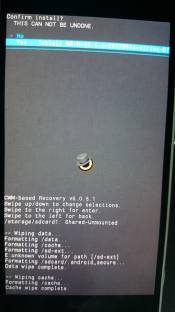
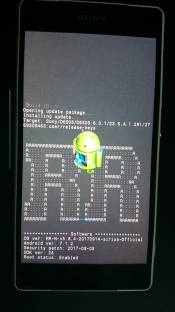
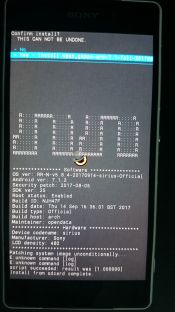
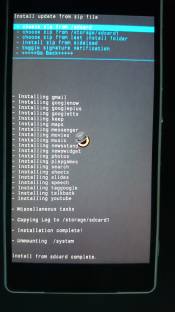
Now the big moment: After both zip files were successfully installed, reboot the device...
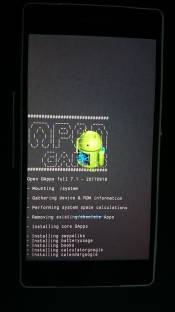
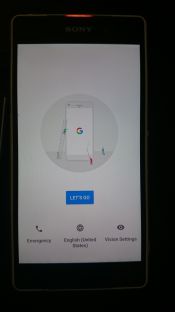
And finally, after a very long first boot time of several minutes, the Android setup screen appeared! Hurraaaayy!
rezachester from wrote on Oct 28th, 2019:
Hi,
thank you very good and fine;
goodluck
Tester from wrote on Aug 9th, 2019:
Hi!
It works! Thanks!

AI AWS Android Ansible Apache Apple Atlassian BSD Backup Bash Bluecoat CMS Chef Cloud Coding Consul Containers CouchDB DB DNS Databases Docker ELK Elasticsearch Filebeat FreeBSD Galera Git GlusterFS Grafana Graphics HAProxy HTML Hacks Hardware Icinga Influx Internet Java KVM Kibana Kodi Kubernetes LVM LXC Linux Logstash Mac Macintosh Mail MariaDB Minio MongoDB Monitoring Multimedia MySQL NFS Nagios Network Nginx OSSEC OTRS Observability Office OpenSearch PHP Perl Personal PostgreSQL PowerDNS Proxmox Proxy Python Rancher Rant Redis Roundcube SSL Samba Seafile Security Shell SmartOS Solaris Surveillance Systemd TLS Tomcat Ubuntu Unix VMware Varnish Virtualization Windows Wireless Wordpress Wyse ZFS Znuny Zoneminder