
CouchDB comes with a nice and (mostly) intuitive user interface called Fauxton. It can be accessed when adding "_utils" to the CouchDB URL, for example https://mycouchdb.example.com/_utils.
For a standalone CouchDB you can check the whole config, create new admin users, etc in the UI, however when you run a clustered CouchDB, these pages do not open:
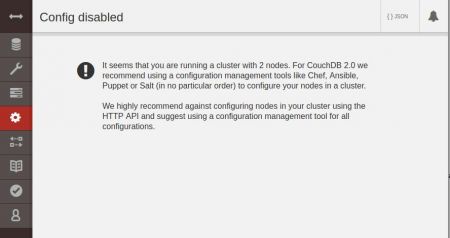
Config disabled: It seems that you are running a cluster with 2 nodes. For CouchDB 2.0 we recommend using a configuration management tools like Chef, Ansible, Puppet or Salt (in no particular order) to configure your nodes in a cluster.
We highly recommend against configuring nodes in your cluster using the HTTP API and suggest using a configuration management tool for all configurations.
Technically speaking this "blockage" makes sense because it prevents you to make wrong configuration changes in the wrong places.
Note: With some trickery in the URI you can still access the config on a per-node-level. For example: http://localhost:5984/_utils/#_config/couchdb@couchdb01.example.com will show the config for the cluster node couchdb01.example.com. But use with caution!!
In order to create a new server admin user in the cluster, one needs to:
1) Figure out the cluster members
2) Add this new server admin to each cluster member
Finding the members of the cluster is pretty easy, just go to /_membership on your CouchDB:
$ curl -s "http://localhost:5984/_membership" -u admin:XXX
{"all_nodes":["couchdb@couchdb01.example.com","couchdb@couchdb02.example.com"],"cluster_nodes":["couchdb@couchdb01.example.com","couchdb@couchdb02.example.com"]}
This means we need to add the new server admin into the nodes couchdb@couchdb01.example.com and couchdb@couchdb02.example.com.
To create the new server admin, we can use curl with the PUT method to create the new user. Important here is the URI which contains the cluster node's local configuration:
$ curl -s -X PUT "http://localhost:5984/_node/couchdb@couchdb01.example.com/_config/admins/newadminuser" -d '"secret"' -u admin:XXX
This creates a new local server admin called "newadminuser" on node "couchdb@couchdb01.example.com" with a password "secret".
The user should now appear in the list of admin users:
$ curl -s "http://localhost:5984/_node/couchdb@couchdb01.example.com/_config/admins/" -u admin:XXX
{"newadminuser":"-pbkdf2-XXX,XXXX,10","admin":"-pbkdf2-XXX,XXXX,10"}
All server admins are now shown. The newly created "newadminuser" and the default "admin" user which I used to create the new user.
Now don't forget to create the new user on the other cluster node(s), too. This data will not be synced in the cluster as it is part of the local (node) configuration.
$ curl -s -X PUT "http://localhost:5984/_node/couchdb@couchdb02.example.com/_config/admins/newadminuser" -d '"secret"' -u admin:XXX
Now your new server admin can be used on the cluster.
You don't want to worry about privileges, backups, file system growth, memory allocation etc and just want to focus using CouchDB? Check out the dedicated CouchDB server hosting at Infiniroot!
No comments yet.

AI AWS Android Ansible Apache Apple Atlassian BSD Backup Bash Bluecoat CMS Chef Cloud Coding Consul Containers CouchDB DB DNS Databases Docker ELK Elasticsearch Filebeat FreeBSD Galera Git GlusterFS Grafana Graphics HAProxy HTML Hacks Hardware Icinga Influx Internet Java KVM Kibana Kodi Kubernetes LVM LXC Linux Logstash Mac Macintosh Mail MariaDB Minio MongoDB Monitoring Multimedia MySQL NFS Nagios Network Nginx OSSEC OTRS Observability Office OpenSearch PHP Perl Personal PostgreSQL PowerDNS Proxmox Proxy Python Rancher Rant Redis Roundcube SSL Samba Seafile Security Shell SmartOS Solaris Surveillance Systemd TLS Tomcat Ubuntu Unix VMware Varnish Virtualization Windows Wireless Wordpress Wyse ZFS Znuny Zoneminder