
Those who are of age 30 and older probably still remember the days when a movie or a series would be on the TV and you wanted to record it. Back in the days we probably all used the same method: A VHS recorder.
In the present, the VHS days are long gone. When VHS was replaced by DVD, then HD-DVD and Blu-ray (the latter eventually won the title industry standard after a long battle) and finally streaming, the "easy recording" days were gone, too. I know there are or were DVD recorders available but I have never met a single person who ever used one of these.
At the same time, Internet connection speeds increased so streaming and downloads would be possible. This also gave rise to so-called digital TV recording sites, such as OnlineTVRecorder (which I personally used for a couple of years).
But is TV recording so much more complicated now than in the VHS days? Let's put this to the test!
When I moved to another canton (state) in Switzerland a couple of years ago, the local provider would send the television signal via DVB-C. But my (meanwhile old) TV only had a DVB-S antenna built-in. This had worked fine for the old location where the provider there used to send the signal via DVB-S. But in the new location, the TV would not pick up any signals due to an incompatibility between DVB-S and DVB-C - or better said: The TV's antenna only picked up DVB-S.
I didn't want to buy a new TV just because the antenna wouldn't pick up the signal so I decided to give it a shot with Openelec and Kodi. At first I wanted to build my own system using a Raspberry Pi and a TV mutex/antenna but by chance (ad on the OpenELEC website) I came across the Wetek brand and bought the Wetek Openelec box (aka Wetek Play 1), which already had a DVB tuner (antenna) included.
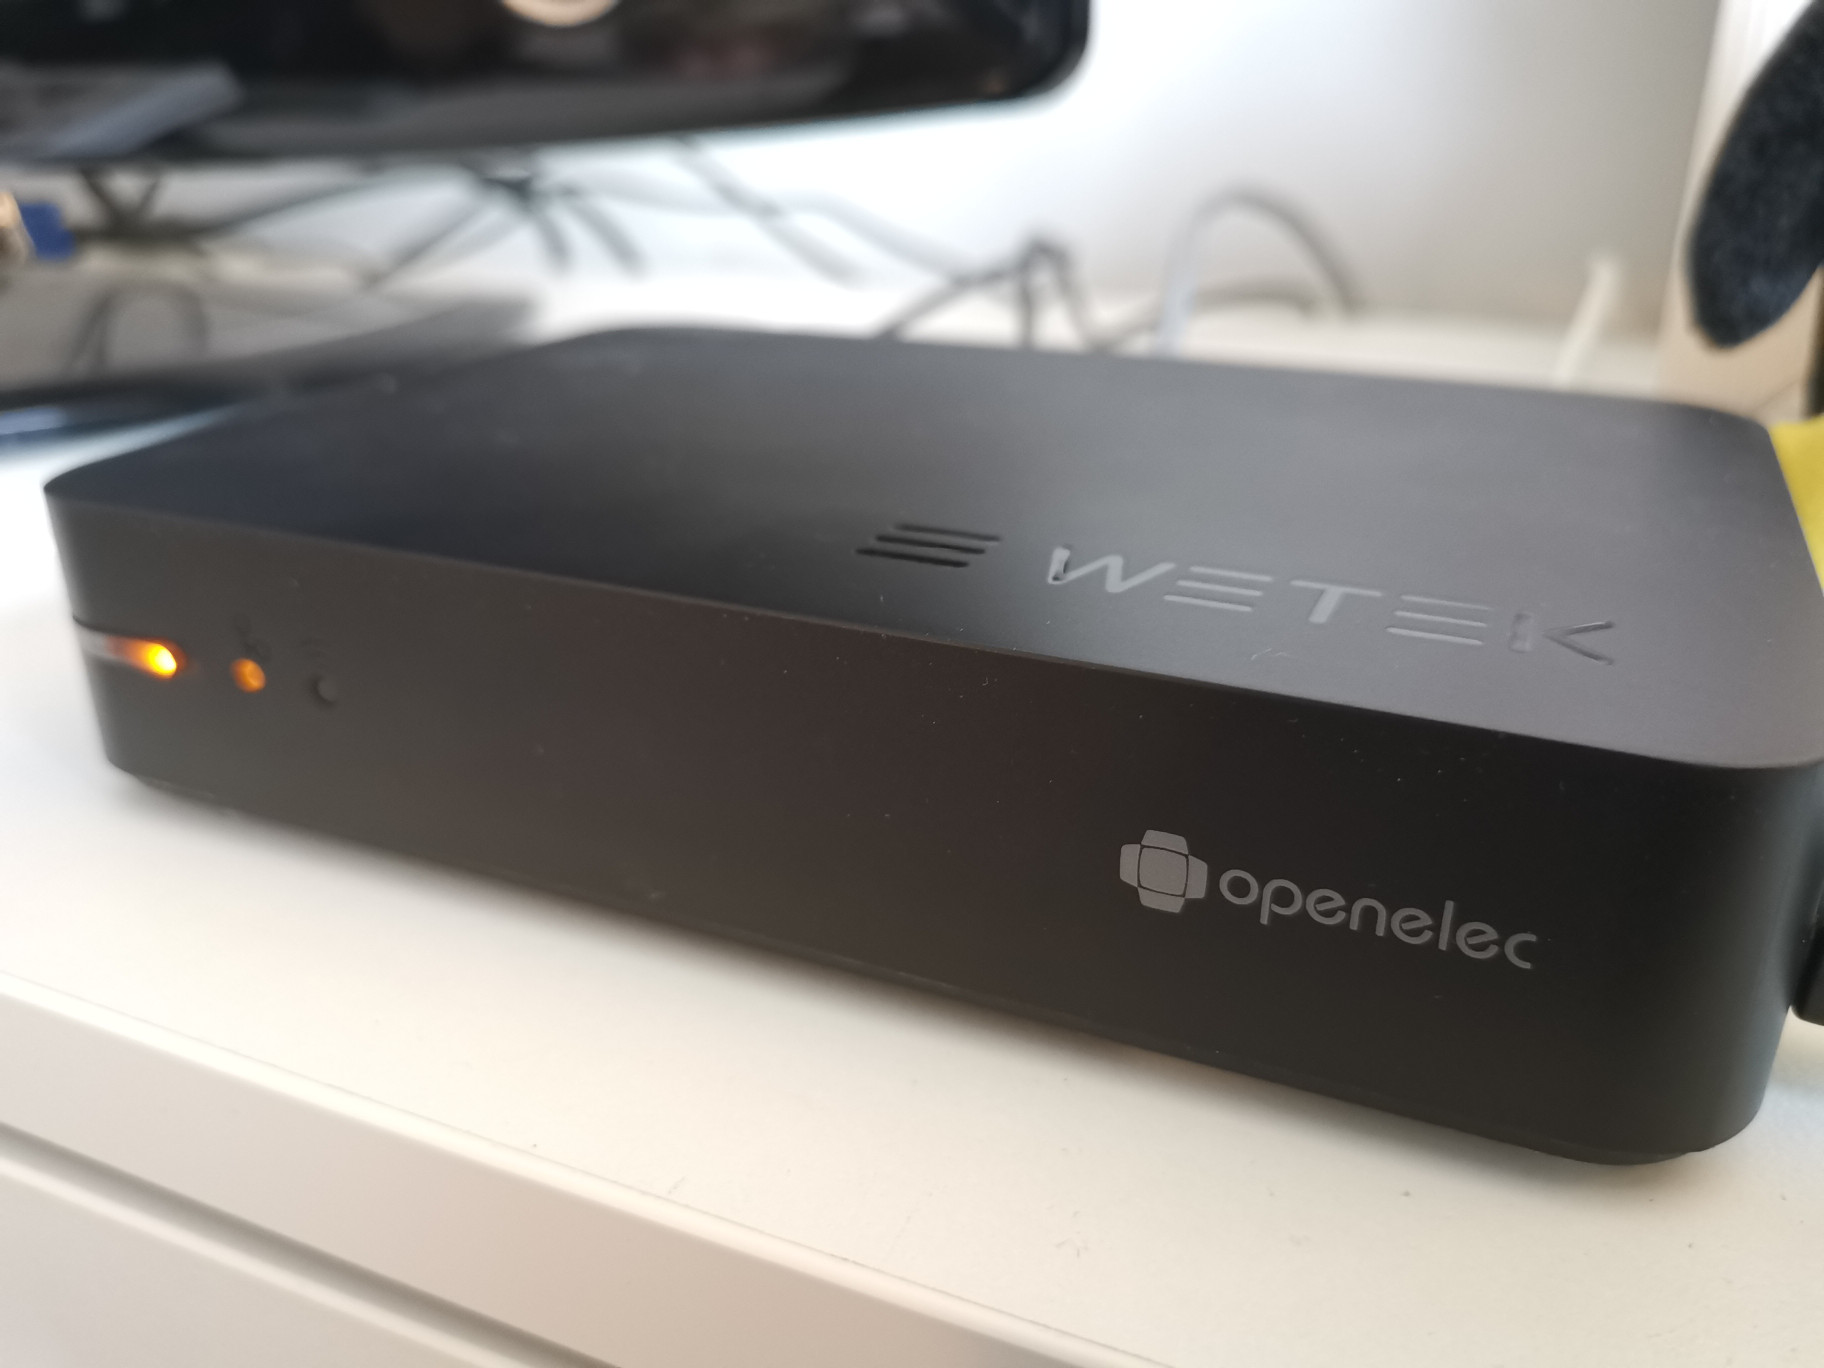
Note: As of this writing in August 2020, Wetek does not seem to produce any multimedia boxes anymore. This is a real bummer, because the devices were pretty cool, looked nice, were resiliant and the Wetek support (forums) was very helpful all the time.
To use the TV tuner (antenna) inside Kodi, two add-ons need to be installed:
Both programs are part of the OpenELEC and the LibreELEC addons and can be installed directly from within Kodi.
As you can tell from the device name (Wetek Openelec Box / Play 1), I've had this multimedia streaming box for a couple of years already. The old LG TV got meanwhile replaced by a much larger Samsung TV (with a DVB-C tuner). The old TV and the old Openelec box moved to my office. I wasn't in need of the Openelec box to watch TV anymore.
But very recently my wife asked me if I could record an episode of a TV series she'd miss on a certain evening and I remembered the Openelec box in the office with Tvheadend. It's geek time!
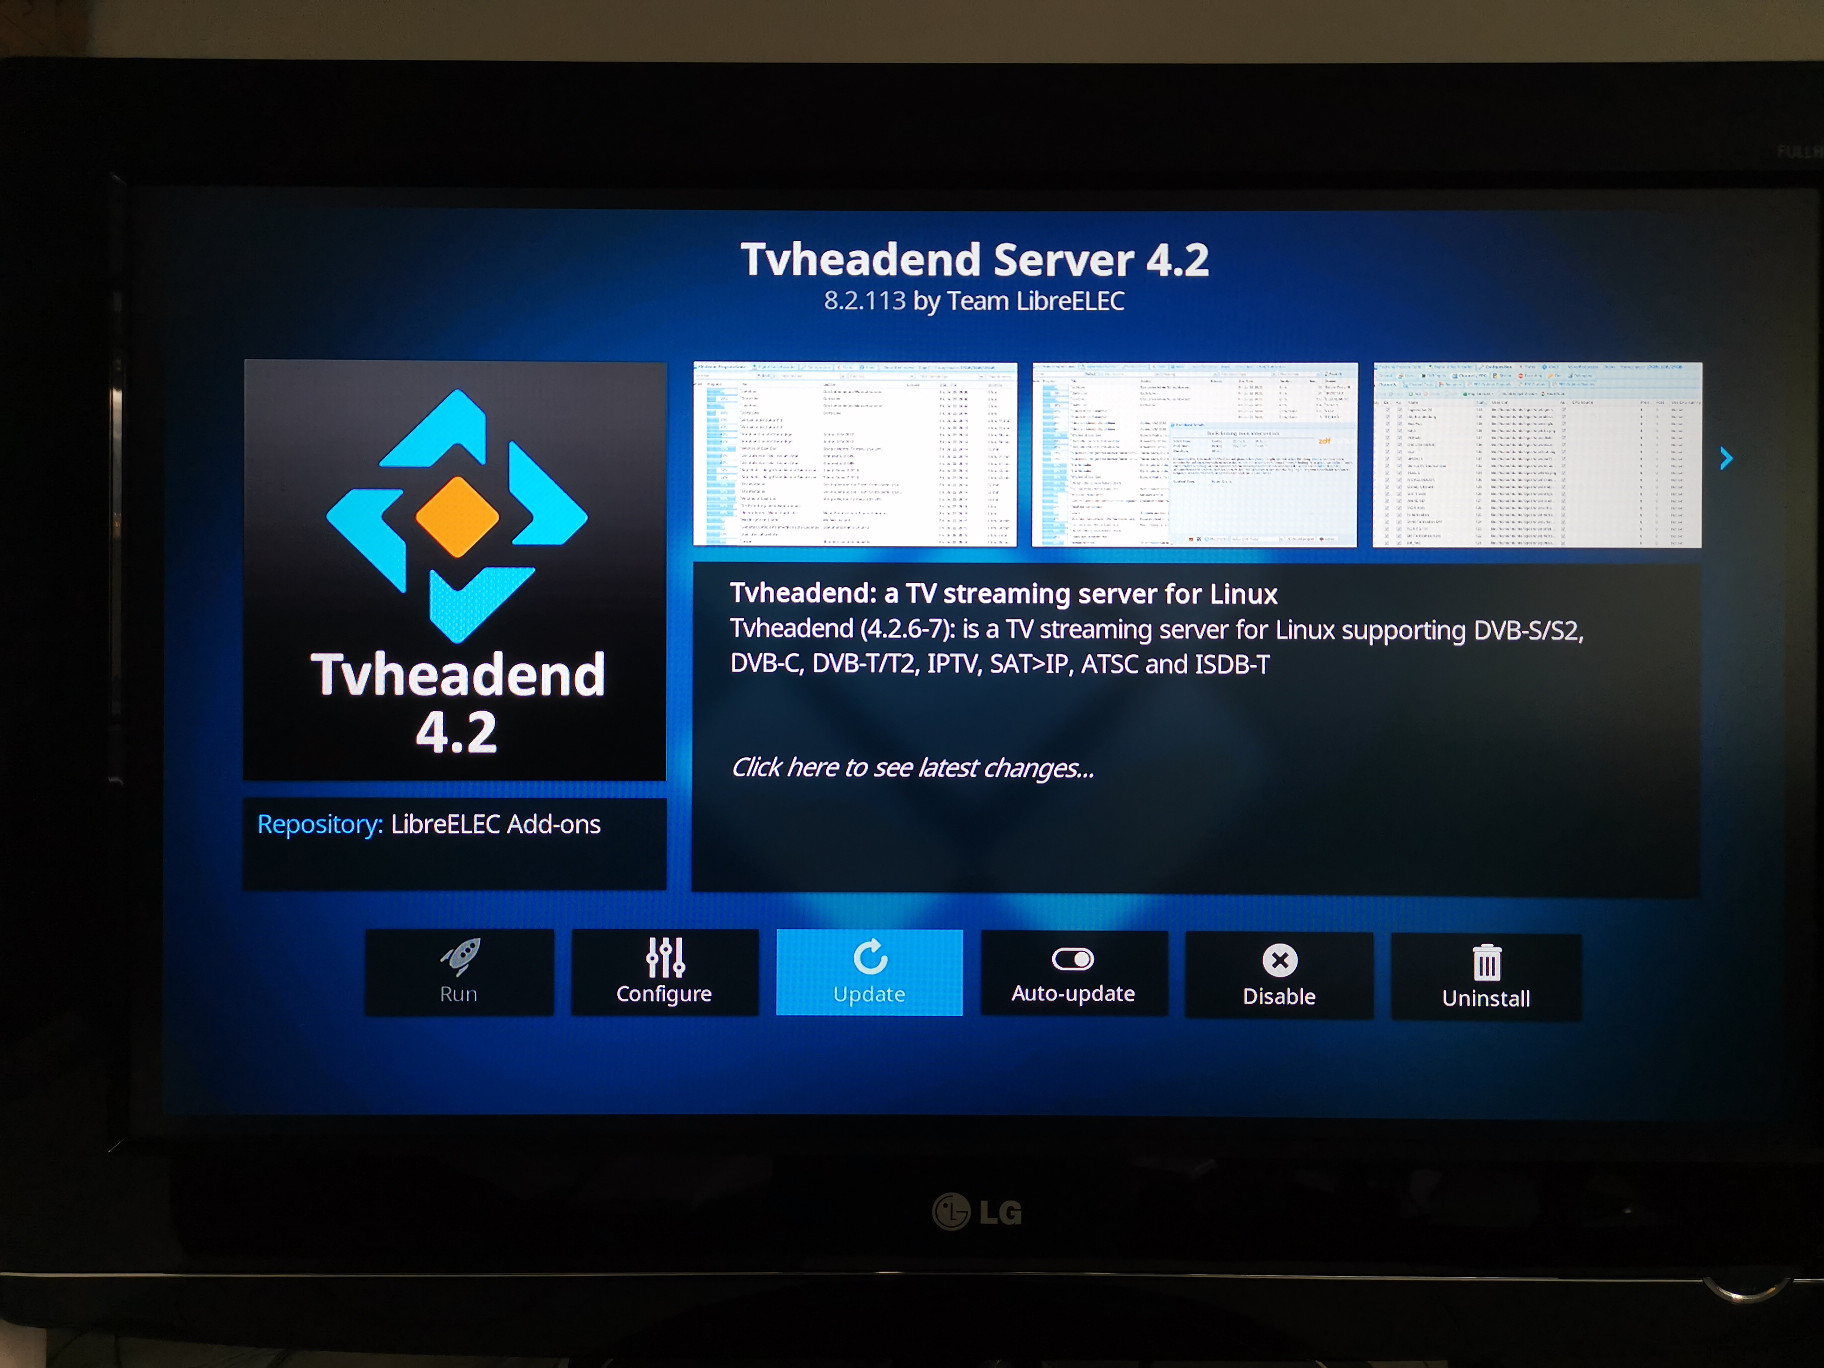
Meanwhile running LibreELEC on the box, I first had to make sure Tvheadend was running correctly. I checked and the current installed version is the latest Tvheadend Server 4.2 (version 8.2.113) and Tvheadend HTSP Client 3.4.27.1.
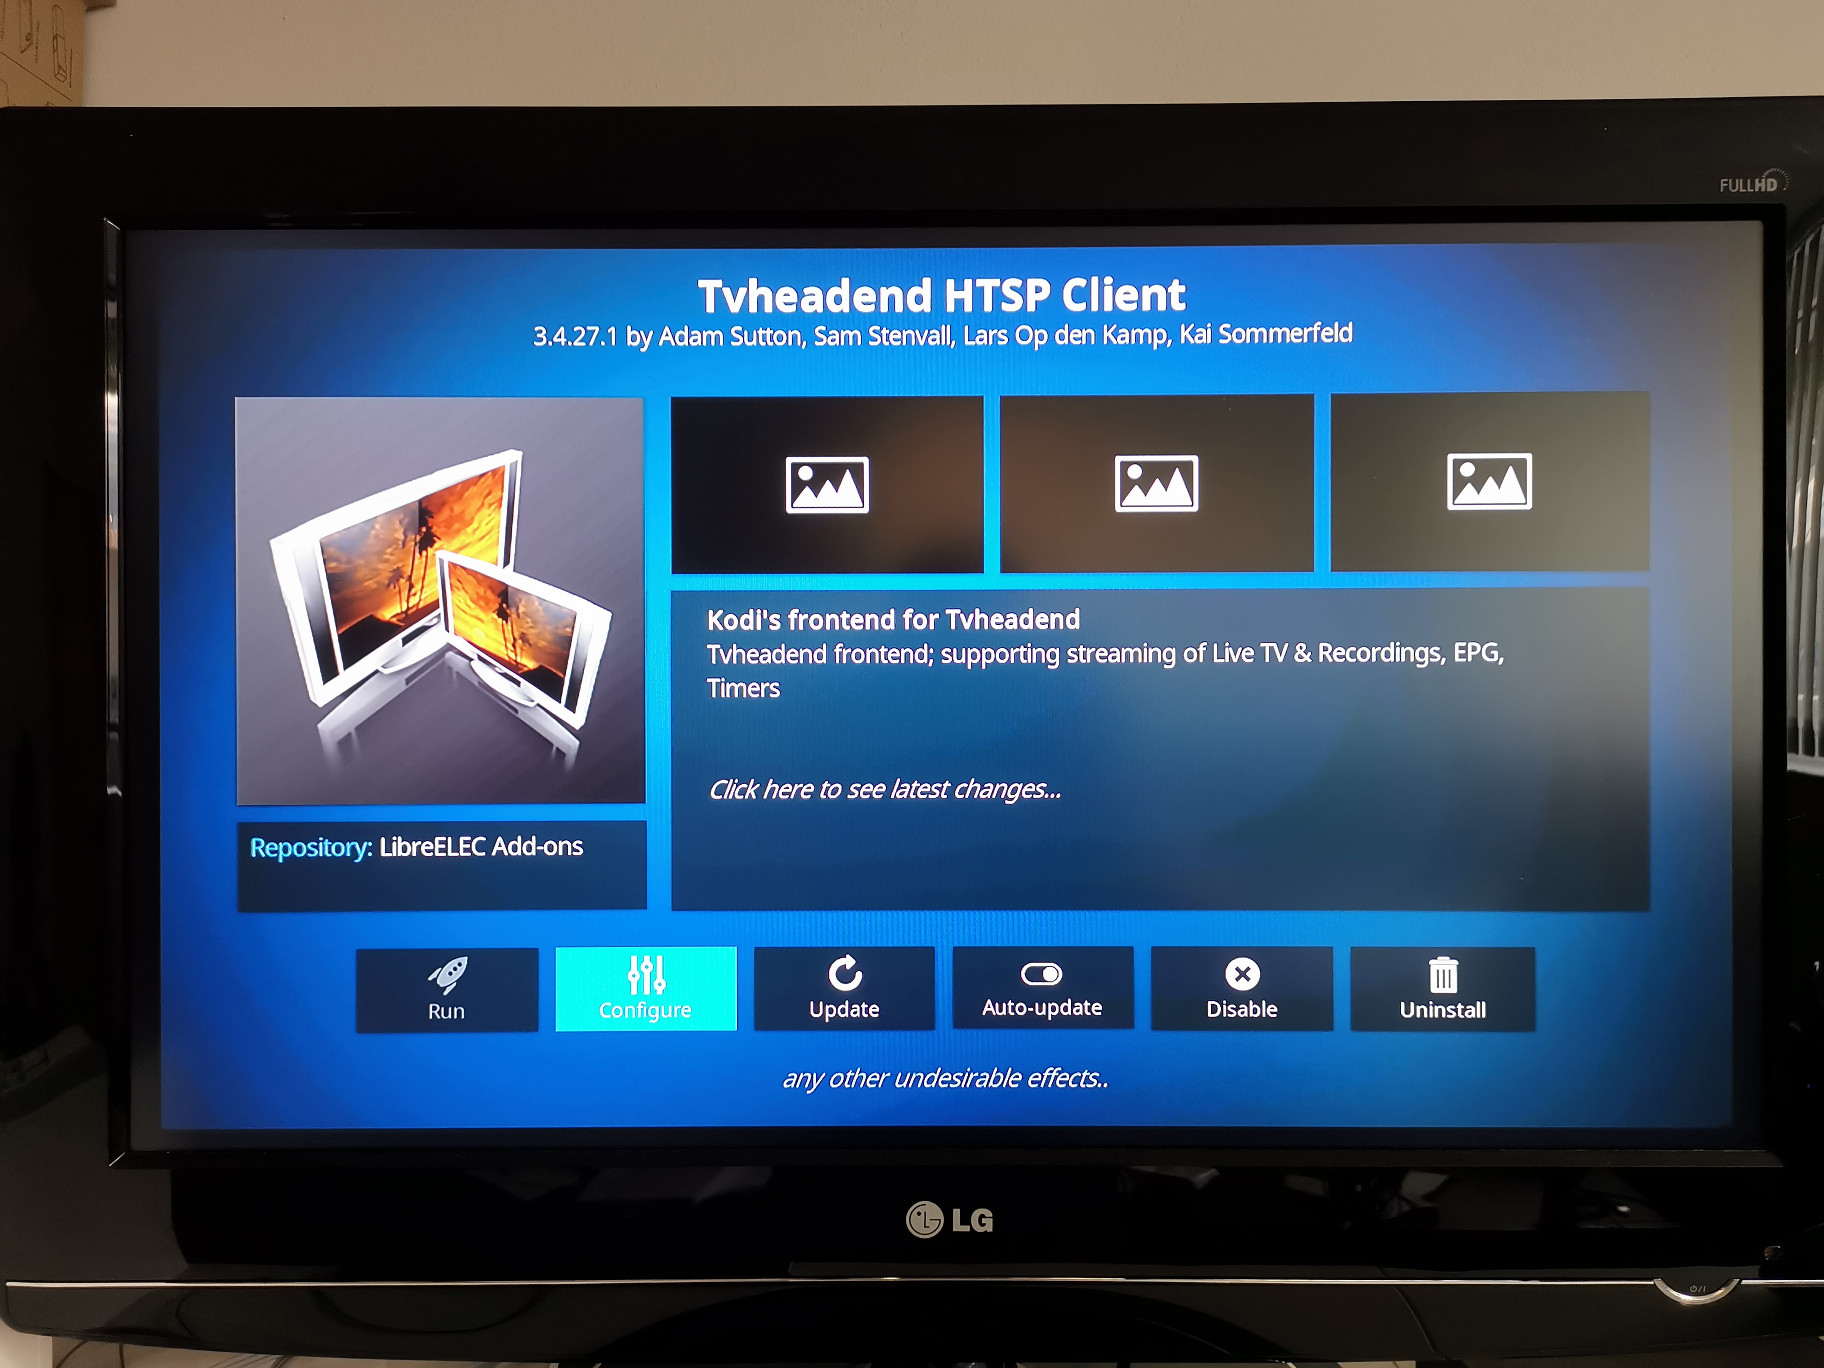
Something important here can be found in the settings of the HTSP Client. Open Configure inside the Tvheadend HTSP Client and you should see this:
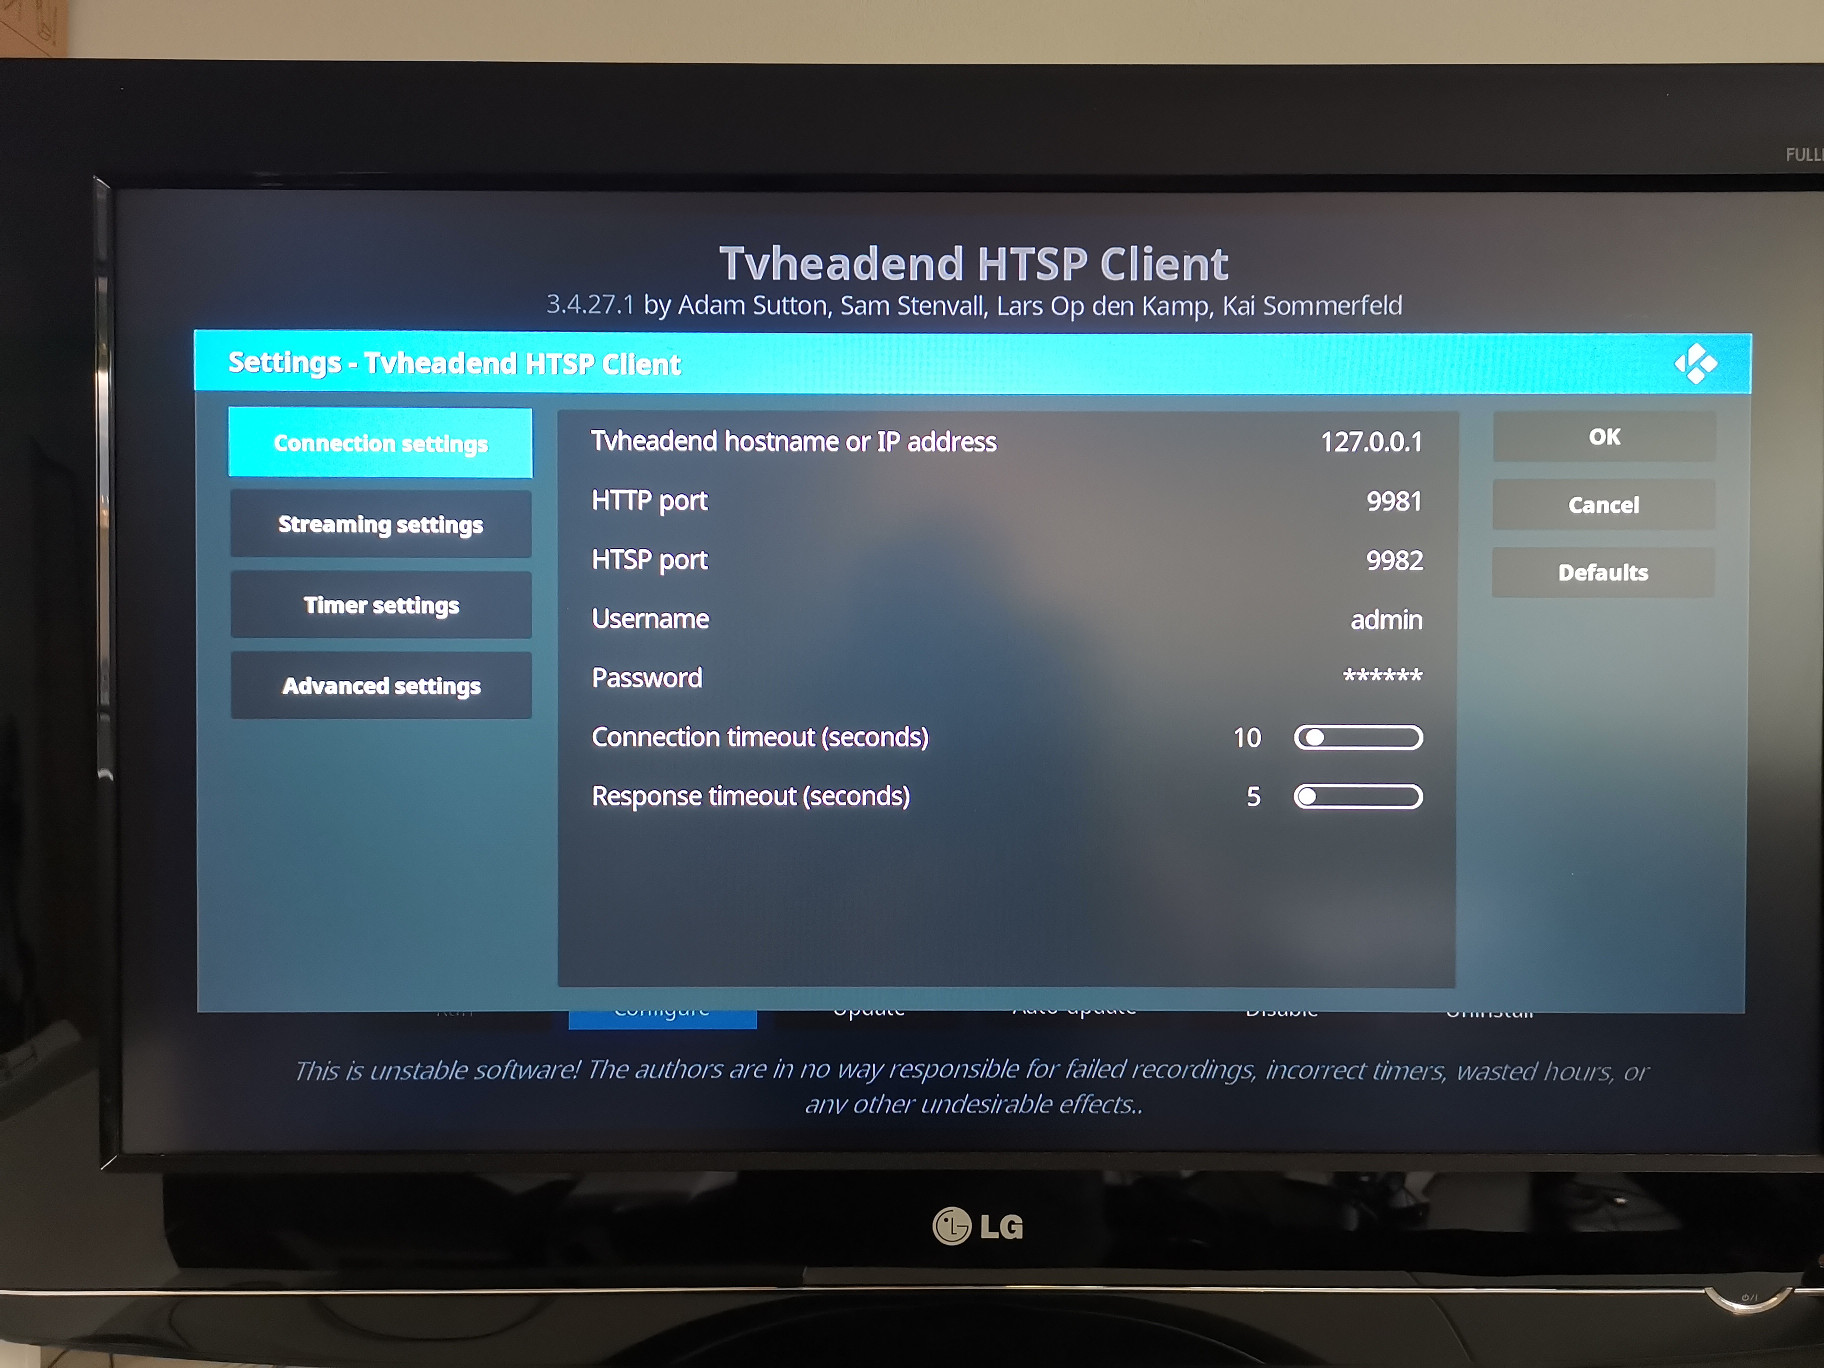
Here the HTTP port is set to 9981. This information (and the username/password credentials if defined) we need for the next step.
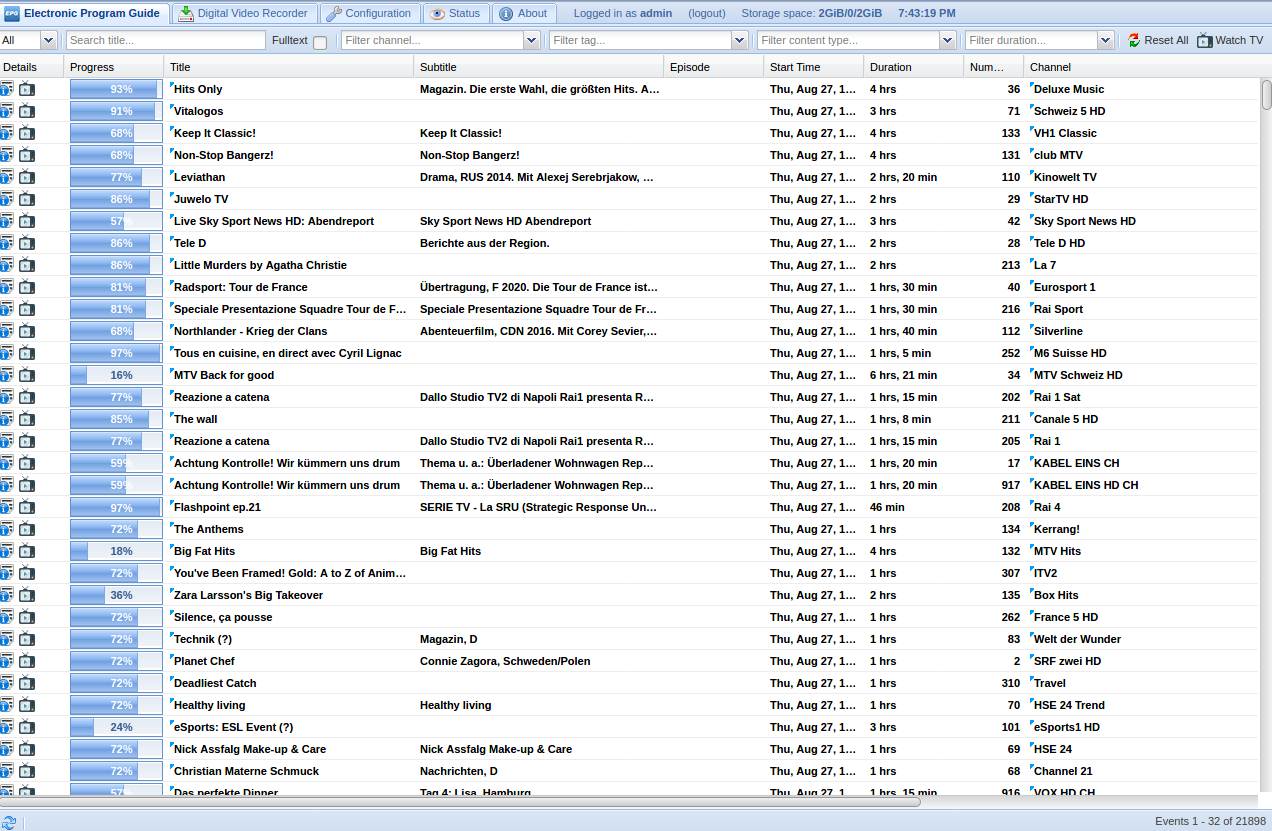
Using a browser, the Tvheadend HTSP Client can be accessed using the IP address of the Kodi box and port 9981. The browser will ask for (basic auth) credentials if these were set in the addon configuration. Once logged in, a user interface should appear, showing the current tab Electronic Program Guide (EPG):
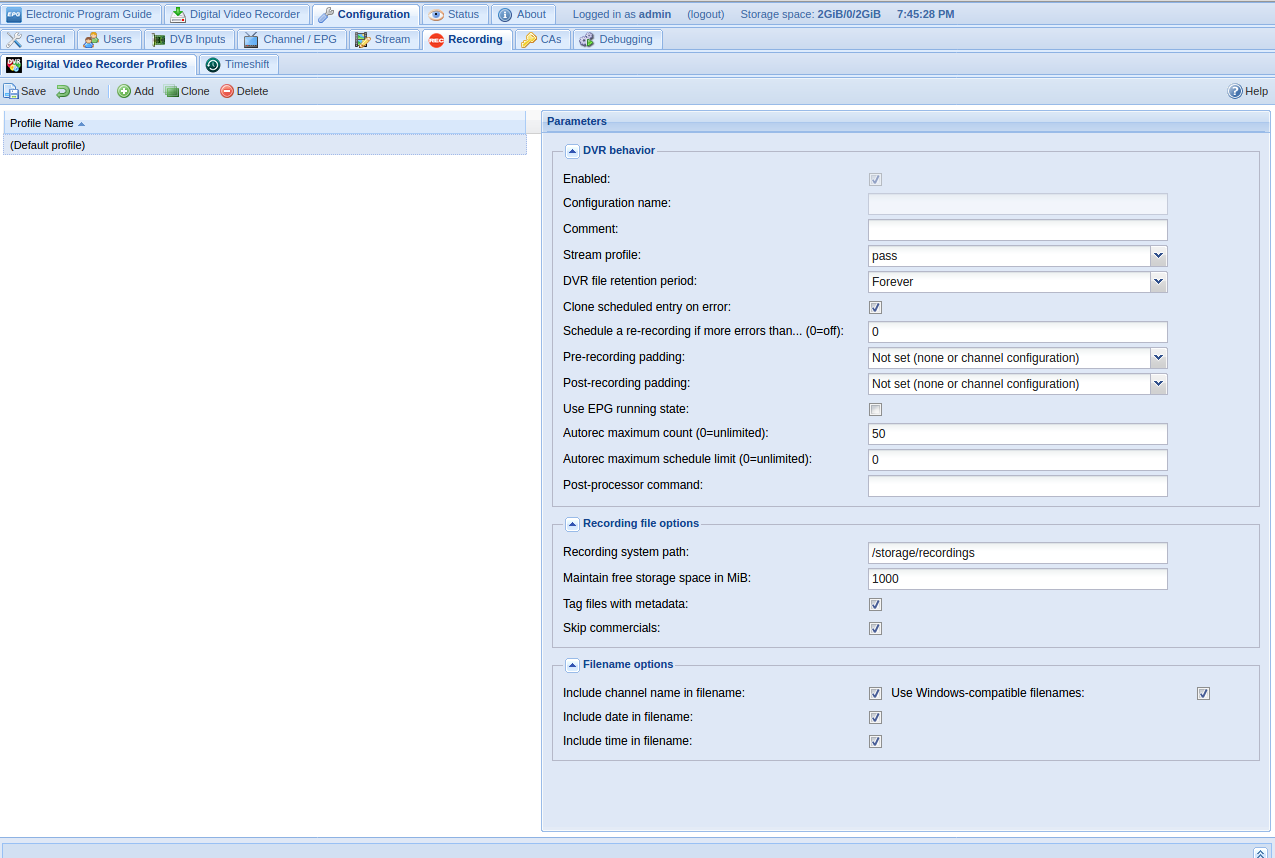
Clicking on the Configuration tab and then Recording, allows to configure settings for the Digital Video Recorder (DVR). A default profile should already exist. Important here is to look at the path, where Tvheadend should store the recordings (Recording system path). By default this is set to /storage/recordings but depending on your setup, this path may only have a very limited space.
LibreELEC:~ # df -h /storage/recordings/
Filesystem Size Used Available Use% Mounted on
/dev/data 2.9G 840.1M 2.1G 28% /storage
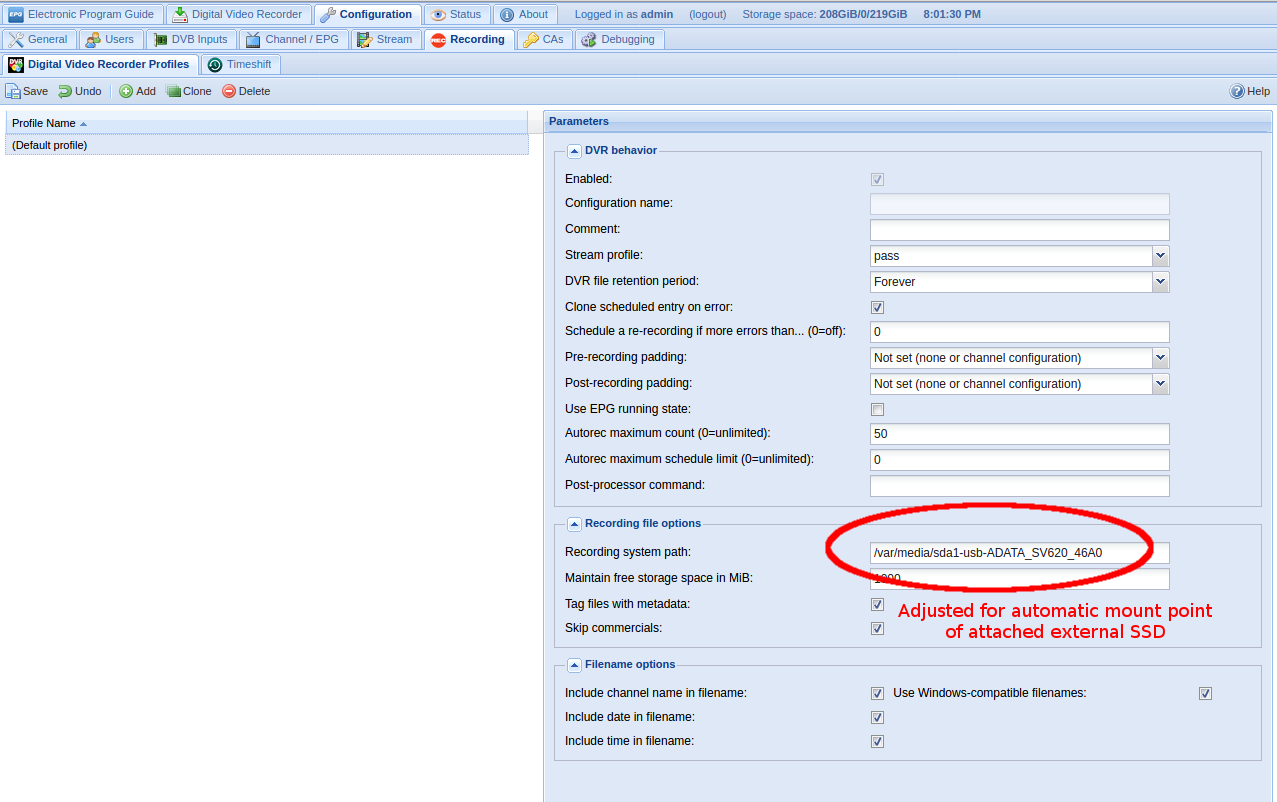
You could either attach a physical drive to the Kodi box and mount it to /storage/recordings or you can attach a physical drive and adjust the system path. In my case I attached an external SSD drive via USB and Libreelec mounted it automatically on /var/media/sda1-usb-ADATA_SV620_46A0.
LibreELEC:~ # df -h
Filesystem Size Used Available Use% Mounted on
devtmpfs 426.4M 0 426.4M 0% /dev
/dev/ubi0_0 200.5M 125.9M 69.9M 64% /flash
/dev/data 2.9G 840.1M 2.1G 28% /storage
/dev/loop0 124.9M 124.9M 0 100% /
tmpfs 428.2M 0 428.2M 0% /dev/shm
tmpfs 428.2M 7.9M 420.2M 2% /run
tmpfs 428.2M 0 428.2M 0% /sys/fs/cgroup
tmpfs 428.2M 1.9M 426.2M 0% /var
tmpfs 428.2M 0 428.2M 0% /tmp
/dev/sda1 219.9G 59.2M 208.7G 0% /var/media/sda1-usb-ADATA_SV620_46A0
I simply adjusted the recording path in the settings:
Once the settings were saved to the default profile, go back to the Electronic Program Guide (EPG).
By clicking the information icon in the details column in the EPG, a broadcast details window pops up. At the bottom of this window you will find recording options. This also allows to select a DVR profile, in case you have configured multiple profiles. Otherwise just the default profile will be able for selection:

By clicking on Record program, the selected program will start recording immediately. A round record button should now appear in the EPG.

You can also double-check this when changing into the tab Digital Video Recorder -> Upcoming / Current Recordings.
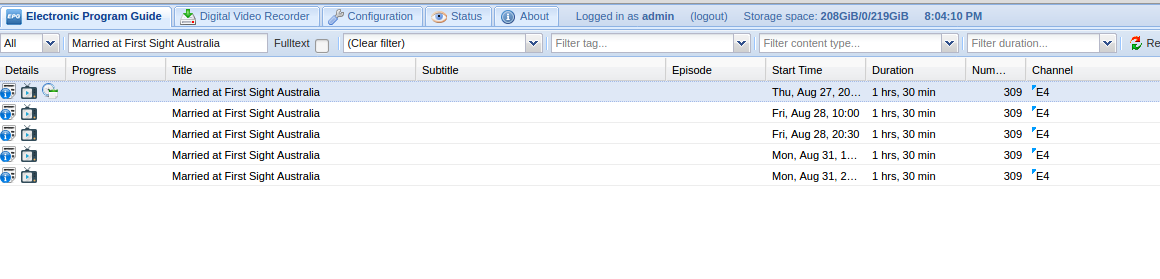
More interestingly however is the scheduled recording. The EPG also allows to search for programs in the future (as long as the EPG contains this data). In this case I searched for the term "married" and a couple of upcoming episodes of "Married at First Sight Australia" showed up in the EPG.

The same steps happen here again: Click on the information button on the left side and then click on Record program. Back in the search, a "scheduled recording" icon should appear in the EPG:
This can also be verified by changing into the Digital Video Recorder tab in the Upcoming / Current Recordings:

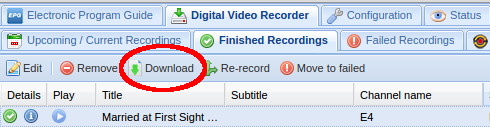
Once a recording was completed, you should be able to find them again under the Digital Video Recorder tab -> Finished Recordings. The Tvheadend user interface allows to directly download the recorded video in the browser. Simply select the finished recording, then click on Download:
Another alternative (for the Linux people like me) is to download the recording using scp (via SSH):
ckadm@mintp ~/Videos $ scp root@libreelecbox:/var/media/sda1-ata-CT1000MX500SSD1_/*/* .
root@192.168.15.8's password: **********
Married at First Sight Australia-E42020-08-2820-30.mkv 100% 2064MB 9.9MB/s 03:29
Note: When enabled SSH on LibreELEC, the default SSH access credentials are: root:libreelec
In the default DVR profile, the stream profile is set to "pass". This creates a video file with a ".ts" suffix and the following media information:
ckadm@mintp ~/Videos $ mediainfo Meteo-SRF\ 1\ HD2020-08-2719-55.ts
General
ID : 826 (0x33A)
Complete name : Meteo-SRF 1 HD2020-08-2719-55.ts
Format : MPEG-TS
File size : 39.4 MiB
Duration : 27s 861ms
Overall bit rate mode : Variable
Overall bit rate : 11.7 Mbps
Video
ID : 502 (0x1F6)
Menu ID : 10091 (0x276B)
Format : AVC
Format/Info : Advanced Video Codec
Format profile : High@L4
Format settings, CABAC : Yes
Format settings, ReFrames : 3 frames
Format settings, GOP : M=2, N=24
Codec ID : 27
Duration : 27s 820ms
Bit rate : 10.3 Mbps
Width : 1 280 pixels
Height : 720 pixels
Display aspect ratio : 16:9
Frame rate : 50.000 fps
Standard : Component
Color space : YUV
Chroma subsampling : 4:2:0
Bit depth : 8 bits
Scan type : Progressive
Bits/(Pixel*Frame) : 0.222
Stream size : 34.0 MiB (86%)
Color range : Limited
Color primaries : BT.709
Transfer characteristics : BT.709
Matrix coefficients : BT.709
Audio #1
ID : 503 (0x1F7)
Menu ID : 10091 (0x276B)
Format : MPEG Audio
Format version : Version 1
Format profile : Layer 2
Mode : Joint stereo
Mode extension : Intensity Stereo + MS Stereo
Codec ID : 3
Duration : 27s 792ms
Bit rate mode : Constant
Bit rate : 192 Kbps
Channel(s) : 2 channels
Sampling rate : 48.0 KHz
Compression mode : Lossy
[...]
In the settings there are other stream profiles available. A very widely used one is matroska, the codec used behind videos with the ".mkv" suffix:
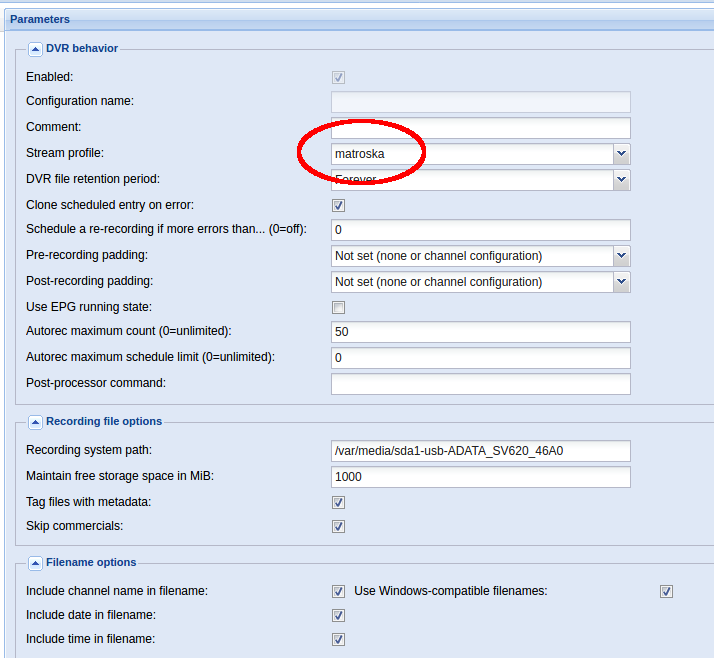
I finally ended up using matroska as stream profile for all the recordings - mainly for compatibility but also for quality reasons. This gives the following media information on video recordings:
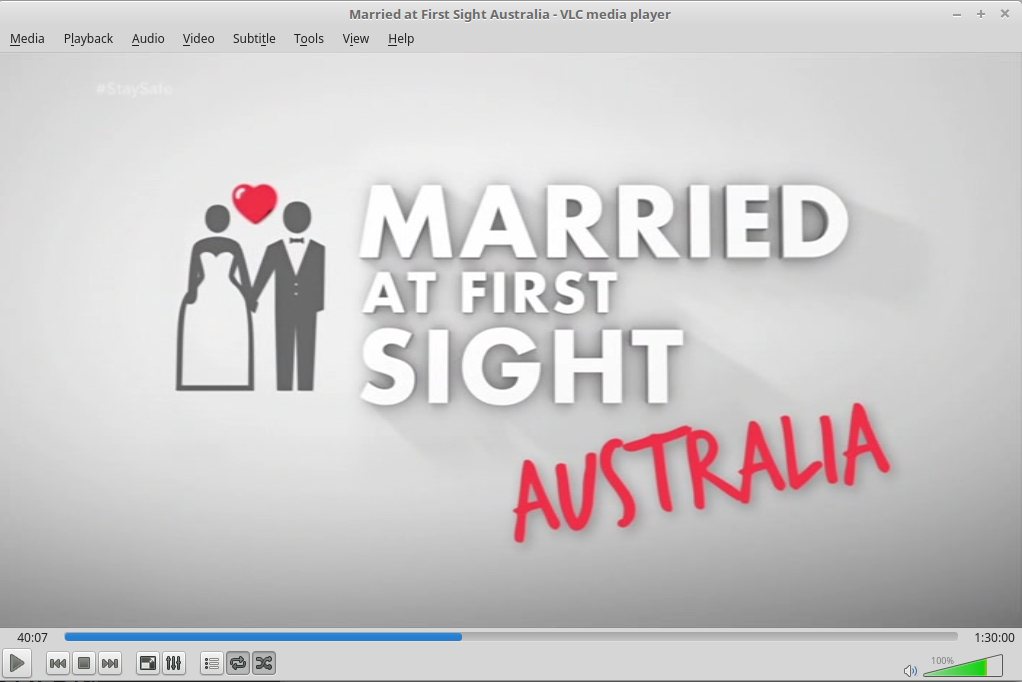
ckadm@mintp ~/Videos $ mediainfo Married\ at\ First\ Sight\ Australia-E42020-08-2720-30.mkv
General
Unique ID : 230650956114061214620600552541735332711 (0xAD85C2207BD2A8C6B3D1CC260407AB67)
Complete name : Married at First Sight Australia-E42020-08-2720-30.mkv
Format : Matroska
Format version : Version 2
File size : 2.02 GiB
Duration : 1h 30mn
Overall bit rate mode : Variable
Overall bit rate : 3 206 Kbps
Movie name : Married at First Sight Australia
Writing application : Tvheadend 4.2.6-7 ~ LibreELEC Tvh-addon v8.2.113
Writing library : Tvheadend Matroska muxer
Original source form : TV
DATE_BROADCASTED : 2020-08-27 20:30:00
SUMMARY : As the end of the grooms' homestays nears, the wives take every opportunity to immerse themselves in their husbands' worlds - experiencing everything their lives have to offer.
TVCHANNEL : E4
Video
ID : 1
Format : MPEG Video
Format version : Version 2
Format profile : Main@Main
Format settings, BVOP : Yes
Format settings, Matrix : Custom
Format settings, GOP : Variable
Format settings, picture structure : Frame
Codec ID : V_MPEG2
Codec ID/Info : MPEG 1 or 2 Video
Duration : 1h 30mn
Bit rate mode : Variable
Bit rate : 2 950 Kbps
Maximum bit rate : 15.0 Mbps
Width : 704 pixels
Height : 576 pixels
Display aspect ratio : 16:9
Active Format Description : Letterbox 16:9 image
Frame rate mode : Constant
Frame rate : 25.000 fps
Standard : PAL
Color space : YUV
Chroma subsampling : 4:2:0
Bit depth : 8 bits
Scan type : Interlaced
Scan order : Top Field First
Compression mode : Lossy
Bits/(Pixel*Frame) : 0.291
Stream size : 1.85 GiB (92%)
Language : English
Default : Yes
Forced : No
Audio
ID : 2
Format : MPEG Audio
Format version : Version 1
Format profile : Layer 2
Codec ID : A_MPEG/L2
Codec ID/Hint : MP2
Duration : 1h 30mn
Bit rate mode : Constant
Bit rate : 192 Kbps
Channel(s) : 2 channels
Sampling rate : 48.0 KHz
Compression mode : Lossy
Delay relative to video : -29ms
Stream size : 124 MiB (6%)
Language : English
Default : Yes
Forced : No
To be honest: I expected digital video recording as something much more complicated. However it turned out pretty easy and straightforward!
All you need is:
Bruno Briner from wrote on Oct 9th, 2022:
In Switzerland you can also record in TVHeadend a Zattoo, Teleboy or Wilmaa internet feed, so there is no need for a tuner, only the internet is sufficient.
This is what I have been doing for the "free-to-air" channels. In my case I use a TVHeadend docker container in my unRAID server and a RPi4 running Libreelec as a TVHeadend Client.
t from wrote on May 31st, 2021:
Alternatives:
On hw side a raspberry pi4 with a TV hat (unfortunately only single tuner) can be used.
Better is To use a Dualtuner usb dongle with the raspberry pi 4 (this is the config I use)
On software side the program VDR can be used alternatively. It can be installed from the libreelec repos. Big advantage of VDR it's his easy configurability via config files (no mess up with databases like e.g.Mythtv) and for those who need mobility just copy you recording to your 2nd VDR system restart it and the recordings are listed.
Further I have to say that I don't have a deeper experience with tvheadend, and first tries were messed up in chaos.

AI AWS Android Ansible Apache Apple Atlassian BSD Backup Bash Bluecoat CMS Chef Cloud Coding Consul Containers CouchDB DB DNS Databases Docker ELK Elasticsearch Filebeat FreeBSD Galera Git GlusterFS Grafana Graphics HAProxy HTML Hacks Hardware Icinga Influx Internet Java KVM Kibana Kodi Kubernetes LVM LXC Linux Logstash Mac Macintosh Mail MariaDB Minio MongoDB Monitoring Multimedia MySQL NFS Nagios Network Nginx OSSEC OTRS Observability Office OpenSearch PHP Perl Personal PostgreSQL PowerDNS Proxmox Proxy Python Rancher Rant Redis Roundcube SSL Samba Seafile Security Shell SmartOS Solaris Surveillance Systemd TLS Tomcat Ubuntu Unix VMware Varnish Virtualization Windows Wireless Wordpress Wyse ZFS Znuny Zoneminder