
Linux has great capabilities to increase (aka extend or expand) the file system without a downtime. Especially if you're dealing with virtual machines or containers, extending the file system from an expanded "virtual disk" is pretty straightforward.
But what about machines in the cloud? Does this apply to them as well? As most cloud instances are basically also virtual machines, it should, in theory work. This article focuses on extending an additional EBS (Elastic Block Storage) volume assigned to an EC2 instance in Amazon Web Services (AWS).
Note: This is done on an additional EBS volume, not on the primary EBS volume of an EC2 instance.
The machine in question is part of a Kubernetes cluster. And if you've dealt with Kubernetes, you know how picky Kubernetes is about disk usage and quickly causes a node pressure situation when certain thresholds are reached. This may cause havoc in the cluster - you want to avoid that.
In this situation one of the cluster nodes is just about to reach the 85% (default) threshold:
root@onl-radoaie26-p:~# df -h /var/lib/docker/
Filesystem Type Size Used Avail Use% Mounted on
/dev/mapper/vgdocker-lvdocker ext4 49G 39G 7.6G 84% /var/lib/docker
It was a wise choice from us to have used a separate/additional EBS volume for this partition. The additional EBS volume is seen as /dev/nvme1n1 and a LVM Physical Volume (PV) was created from that virtual disk:
root@onl-radoaie26-p:~# pvs
PV VG Fmt Attr PSize PFree
/dev/nvme1n1 vgdocker lvm2 a-- <50.00g 0
In a virtual machine world, you would expand the virtual disk and then resize the PV to then finally extend the file system. But here we're dealing with EBS volumes.
Don't worry. As it turns out, this is just about the same procedure.
In AWS Console, select the EC2 instance you want to work on. In this case this is our instance named onl-radoaie26-p. Select the instance, then click on the "Storage" tab and find your assigned EBS volumes.
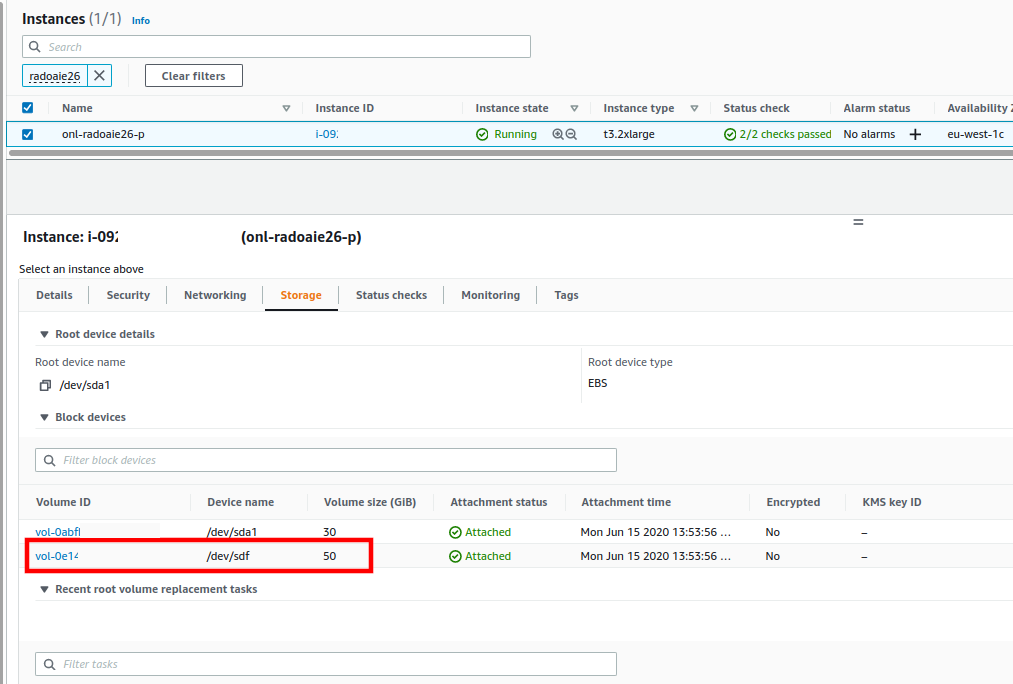
And here we can spot our additional volume (vol-0e14...) with the size of 50 GB. Ignore the "Device name" which mentions /dev/sdf here. The OS actually detects the EBS drive differently as /dev/nvme1n1 (see above).
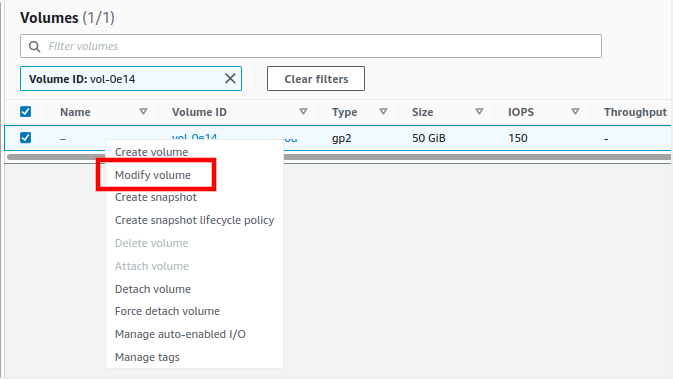
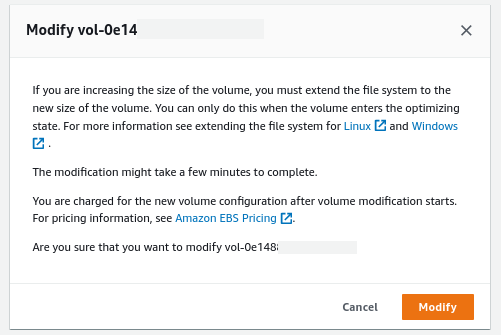
Click on that volume ID. This leads you to the "Volumes" section in the AWS Console. Right-click on the volume and click on "Modify":
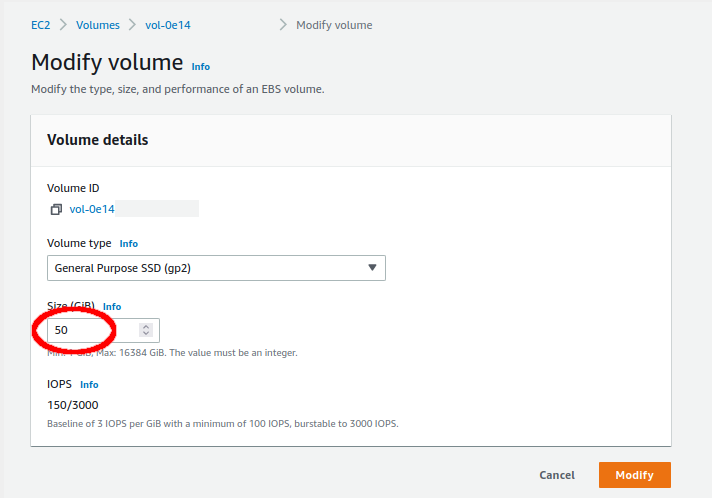
The selected volume can now be modified. You can change the type (and therefore the performance ... and the prize!) of the EBS volume and the size of it.
In this situation, we expanded the volume from 50 GB to 75 GB:
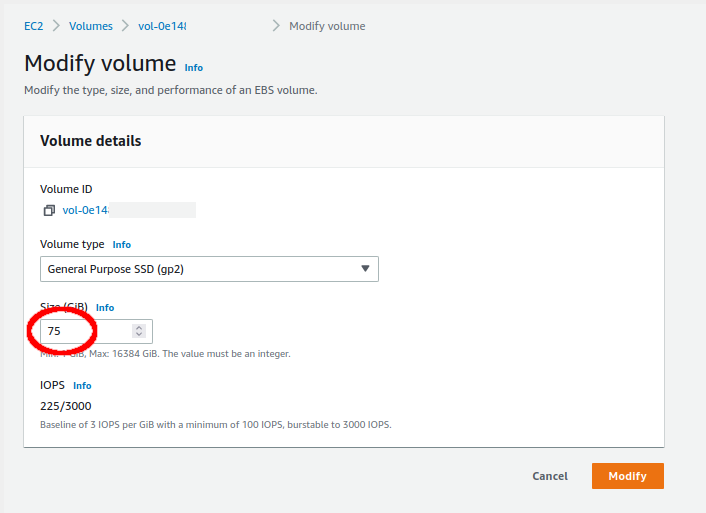
After a click on the "Modify" button, the volume is expanded to the specified size. An additional information pops up saying that you need to make adjustments in the OS as well. And that this modification has an effect on the volume price (of course!).
Obviously an EBS volume can also be increased by using the aws command, which uses the AWS API in the background.
Note: If you are using MFA / 2-way factor authentication you may want to read this article, how to use AWS command line (CLI) with Google Authenticator as MFA device.
First you need to know the volume id of the EBS volume. You can find this information by showing the attached volumes of the affected EC2 instance (id-09d...) with the describe-instances sub-command:
ck@mintp ~ $ aws ec2 describe-instances --instance-id i-09dXXXXXXXXXXXXXX | jq ".Reservations[].Instances[].BlockDeviceMappings"
[
{
"DeviceName": "/dev/sda1",
"Ebs": {
"AttachTime": "2020-06-15T11:46:41.000Z",
"DeleteOnTermination": true,
"Status": "attached",
"VolumeId": "vol-08cdXXXXXXXXXXXXX"
}
},
{
"DeviceName": "/dev/sdf",
"Ebs": {
"AttachTime": "2020-06-15T11:46:41.000Z",
"DeleteOnTermination": true,
"Status": "attached",
"VolumeId": "vol-0e14XXXXXXXXXXXXX"
}
}
]
Note: If you don't know the instance ID of the affected EC2 instance yet, you can use a filter to list only a specific EC2 instance based on a tag.
Here the jq command was used to filter the JSON output to only show the attached EBS volumes of that EC2 instance.
Now that we know the volume id (vol-0e14XXXXXXXXXXXXX), we can modify the volume using the modify-volume sub command. The aws modify-volume help output shows the following parameters:
ck@mintp ~ $ aws ec2 modify-volume help
[...]
SYNOPSIS
modify-volume
[--dry-run | --no-dry-run]
--volume-id <value>
[--size <value>]
[--volume-type <value>]
[--iops <value>]
[--throughput <value>]
[--multi-attach-enabled | --no-multi-attach-enabled]
[--cli-input-json <value>]
[--generate-cli-skeleton <value>]
[...]
The --dry-run parameter is certainly helpful, however the output only shows whether the command would succeed or not:
ck@mintp ~ $ aws ec2 modify-volume --dry-run --volume-id vol-0e14XXXXXXXXXXXXX --size 75
An error occurred (DryRunOperation) when calling the ModifyVolume operation: Request would have succeeded, but DryRun flag is set.
Without the dry-run parameter, the volume is modified and the new size is showing up in the response:
ck@mintp ~ $ aws ec2 modify-volume --volume-id vol-0e14XXXXXXXXXXXXX --size 75
{
"VolumeModification": {
"VolumeId": "vol-0e14XXXXXXXXXXXXX",
"ModificationState": "modifying",
"TargetSize": 75,
"TargetIops": 225,
"TargetVolumeType": "gp2",
"TargetMultiAttachEnabled": false,
"OriginalSize": 50,
"OriginalIops": 150,
"OriginalVolumeType": "gp2",
"OriginalMultiAttachEnabled": false,
"Progress": 0,
"StartTime": "2022-04-25T13:05:30.000Z"
}
}
Inside the EC2 instance, the (automatic) growth of /dev/nvme1n1 can be seen a few moments later.
root@onl-radoaie26-p:~# dmesg|tail
[...]
[12548760.917413] nvme nvme1: rescanning namespaces.
[12548760.952443] nvme1n1: detected capacity change from 104857600 to 157286400
With fdisk or a similar command, the new size can be verified:
root@onl-radoaie26-p:~# fdisk -l /dev/nvme1n1
Disk /dev/nvme1n1: 75 GiB, 80530636800 bytes, 157286400 sectors
Disk model: Amazon Elastic Block Store
Units: sectors of 1 * 512 = 512 bytes
Sector size (logical/physical): 512 bytes / 512 bytes
I/O size (minimum/optimal): 4096 bytes / 4096 bytes
The disk is now 25 GB larger than before.
Now all is left to do, is to resize the physical volume (PV):
root@onl-radoaie26-p:~# pvresize /dev/nvme1n1
Physical volume "/dev/nvme1n1" changed
1 physical volume(s) resized or updated / 0 physical volume(s) not resized
root@onl-radoaie26-p:~# pvs
PV VG Fmt Attr PSize PFree
/dev/nvme1n1 vgdocker lvm2 a-- <75.00g 25.00g
Extend the Logical Volume (LV):
root@onl-radoaie26-p:~# lvextend -l+100%FREE /dev/vgdocker/lvdocker
Size of logical volume vgdocker/lvdocker changed from <50.00 GiB (12799 extents) to <75.00 GiB (19199 extents).
Logical volume vgdocker/lvdocker successfully resized.
And grow the file system:
root@onl-radoaie26-p:~# resize2fs /dev/vgdocker/lvdocker
resize2fs 1.45.5 (07-Jan-2020)
Filesystem at /dev/vgdocker/lvdocker is mounted on /var/lib/docker; on-line resizing required
old_desc_blocks = 7, new_desc_blocks = 10
The filesystem on /dev/vgdocker/lvdocker is now 19659776 (4k) blocks long.
Voilà, the file system usage looks good again and Kubernetes is happy:
root@onl-radoaie26-p:~# df -h /var/lib/docker/
Filesystem Type Size Used Avail Use% Mounted on
/dev/mapper/vgdocker-lvdocker ext4 74G 40G 32G 56% /var/lib/docker
No comments yet.

AI AWS Android Ansible Apache Apple Atlassian BSD Backup Bash Bluecoat CMS Chef Cloud Coding Consul Containers CouchDB DB DNS Databases Docker ELK Elasticsearch Filebeat FreeBSD Galera Git GlusterFS Grafana Graphics HAProxy HTML Hacks Hardware Icinga Influx Internet Java KVM Kibana Kodi Kubernetes LVM LXC Linux Logstash Mac Macintosh Mail MariaDB Minio MongoDB Monitoring Multimedia MySQL NFS Nagios Network Nginx OSSEC OTRS Observability Office OpenSearch PHP Perl Personal PostgreSQL PowerDNS Proxmox Proxy Python Rancher Rant Redis Roundcube SSL Samba Seafile Security Shell SmartOS Solaris Surveillance Systemd TLS Tomcat Ubuntu Unix VMware Varnish Virtualization Windows Wireless Wordpress Wyse ZFS Znuny Zoneminder