
Six years ago I bought my first tablet: A Sony Xperia Tablet Z LTE. I even wrote an article about it, see Remote SSH work on Android tablet with ConnectBot and physical keyboard. Six years have passed and meanwhile the tablet's usage is reduced to entertain the kids. As long as the tablet still works fine, it still reacts relatively fast for the tasks it has to do and the battery life is still OK, I continued to use it. However one major issue was bugging me for a while: The Android OS is heavily outdated, running Android 5.1 (Lollipop). Newer releases were not pushed by Sony anymore (end of life product) and since Android 5.1's release a lot of vulnerabilities, including major ones (BlueBorne for example), were discovered. Using the device in public would be a risk. Time to see if a custom Android ROM can be installed.
As it turns out, the LineageOS project (a fork of the now dead CyanogenMod project) officially supports this tablet. And Sony allows to unlock the bootloader of the tablet (kudos to Sony!). So it's not only possible, in my eyes it's encouraged!
This article is a step by step guide how to install a custom recovery image (TWRP) and a custom Android ROM (LineageOS) on the Sony Xperia Tablet Z.
I've already done a couple of guides for other Android devices (see Android tag) so this step-by-step guide follows the same procedure as the others.
Although this article was written in 2019 and seems quite old, there are still people out there with a Xperia Tablet Z and want to update the tablet (and are using this article as a guide). The download links mentioned in the article however are broken, at least some of them. To cope with that, I uploaded the used files - luckily I still had them!
Locate to /downloads/XperiaTabletZ/ to find the files for LineageOS, Open GApps, TWRP Recovery.
Warning: Installing a custom recovery image on the Sony Xperia Tablet Z will void the warranty.
A custom Android ROM is not officially supported by Sony and there can be bugs.
You will lose all your data on the phone. Make a backup of your pictures, videos, etc.
You're doing this at your own risk, this tutorial is only showing
how it is possible. I'm not encouraging anyone to take these steps.
You're responsible for this and in case something breaks then you're on
your own.
This may sound like a stupid question, but it's very important that the correct model of the tablet is known. There are two different versions available:
This guide applies to both device types, however downloads for TWRP and LineageOS must be adjusted. In my case I own the LTE edition; therefore I downloaded the packages for the pollux device.
adb and fastboot are programs used on the command line to access and manipulate an Android phone/device. They exist on multiple OS. I personally use Linux Mint on my desktop computer and both programs can simply be installed using apt:
ckadm@mintp ~ $ sudo apt-cache search ^adb
adb - Android Debug Bridge
ckadm@mintp ~ $ sudo apt-cache search ^fastboot
fastboot - Android fastboot tool
ckadm@mintp ~ $ sudo apt-get install adb fastboot
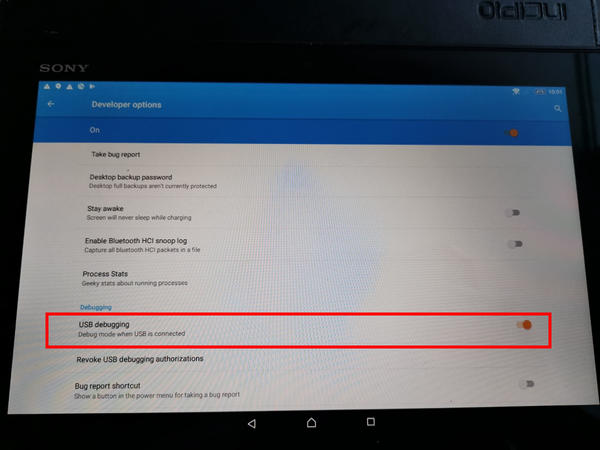
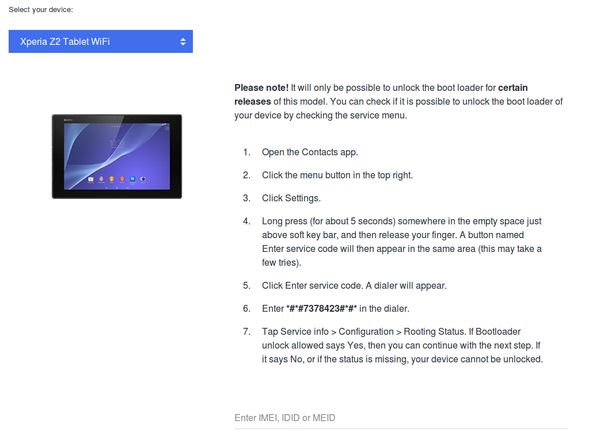
Make sure the "USB debugging" is enabled. Check Settings -> Developer tools -> Enable USB Debugging.
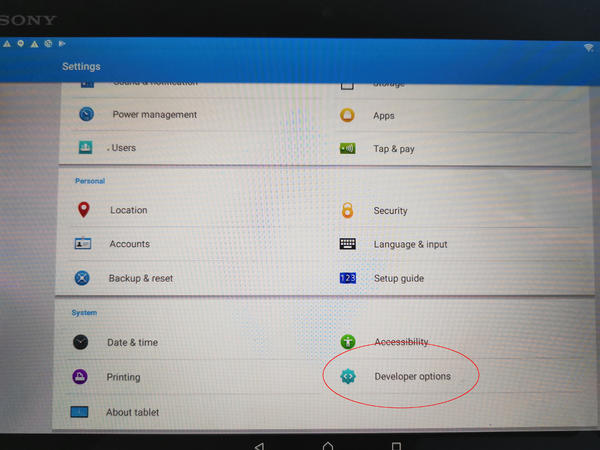
In case "Developer options" is not shown in the Settings, open Settings -> About tablet. Tap several times on the "Build number" to enable the developer mode. The "Developer options" should now show up in the settings.
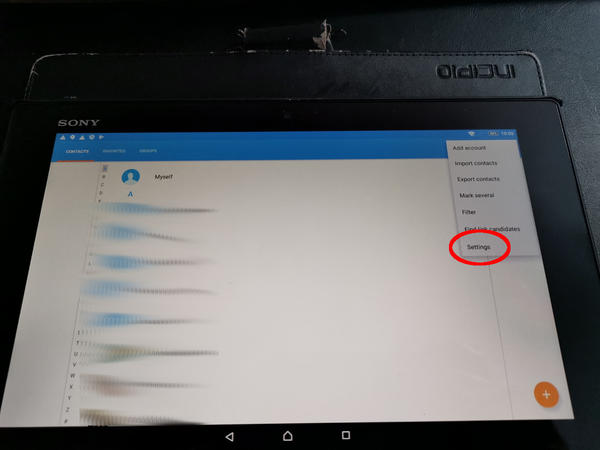
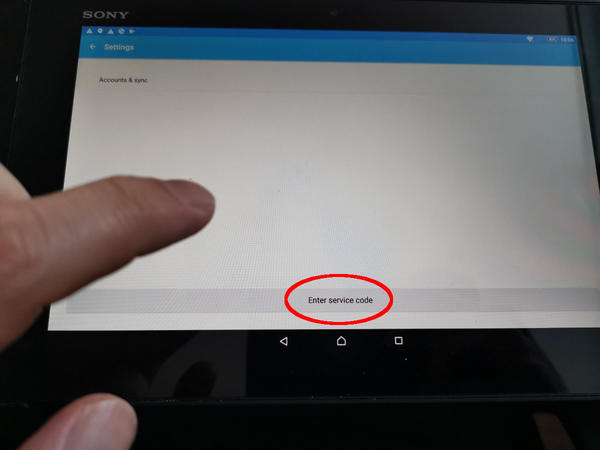
Open the Contacts app and open the app's Settings.
With your finger tap and hold for about 5 seconds just above the navigation menu (at the bottom):
When you release your finger, a field with "Enter service code" should appear:
By tapping on this "Enter service code" field, a dialer (num pad) will show up:
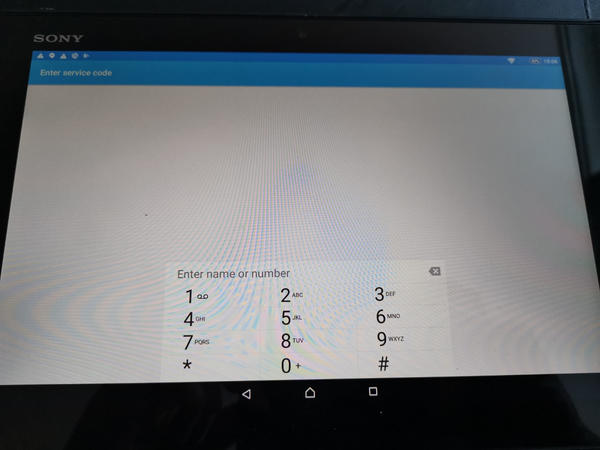
Enter the following code: *#*#7378423#*#* . A service menu will appear.
In this service menu open Service info -> Configuration and check the "Rooting status".
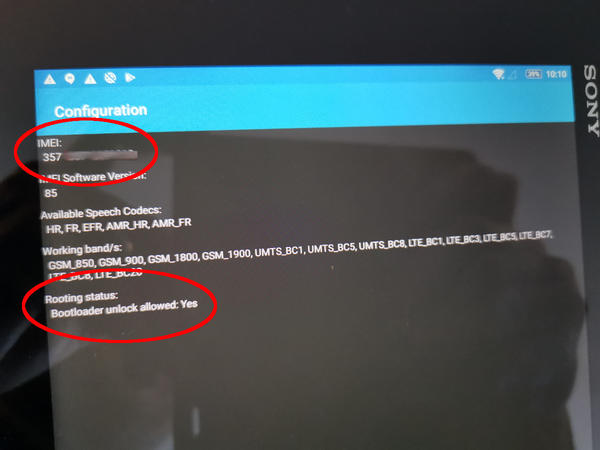
The value of "Bootloader unlock allowed" should be set to Yes. If this is set to no, you cannot proceed. While you're here, take a picture of this screen or note down the IMEI number - you will need this later to unlock the bootloader.
Now connect the tablet to your computer using a microUSB cable.
The tablet should now be seen using the adb command. Make sure adb is able to detect your tablet:
ckadm@mintp ~ $ adb devices -l
List of devices attached
CB5A1TMNH8 device usb:1-1.6 product:SGP321 model:SGP321 device:SGP321
Note: It may be necessary to disable the "USB Debugging" in Settings -> Developer options and then re-enable them again. I had to do this on my tablet, otherwise adb was not able to detect any device.
Now that adb is able to see the tablet, launch adb reboot bootloader to reboot the tablet and to boot directly into the bootloader:
ckadm@mintp ~ $ adb reboot bootloader
Looking at the tablet, there is no hint that it has booted into the bootloader. The screen is just plain dark. Only the blue LED next to the power button indicates the tablet is running. To verify if the bootloader is correctly loaded, use fastboot to find the device:
ckadm@mintp ~ $ sudo fastboot devices
CB5A1TMNH8 fastboot
With the tablet still connected to the computer and detectable with fastboot, go to the Unlock Bootloader page on the Sony developer website. At the bottom of the page, select your device (Xperia Z Tablet) and then enter your IMEI code.
Accept the acknowledgements and submit. You will receive an unlock code:

This unlock code can now be used with fastboot:
ckadm@mintp ~ $ sudo fastboot oem unlock 0x
...
OKAY [ 24.205s]
finished. total time: 24.205s
Obviously replace
To install a custom recovery, TWRP is recommended. You can download the image from "TWRP for pollux" or "TWRP for pollux_windy" (again: Chose the correct version for your device or it won't boot anymore if you install the wrong version!).
Note: Download the img file in the browser, do not use a command line tool like wget. I did that and only got a ~7KB file, resulting in an invalid file.
Once downloaded, use fastboot to flash the "boot" partition and overwrite it with the just downloaded TWRP image:
ckadm@mintp ~/Downloads/Android $ sudo fastboot flash boot twrp-3.3.1-0-pollux.img
sending 'boot' (11802 KB)...
OKAY [ 0.376s]
writing 'boot'...
OKAY [ 0.576s]
finished. total time: 0.952s
Now reboot the device using fastboot. The tablet should now reboot and launch TWRP:
ckadm@mintp ~/Downloads/Android $ sudo fastboot reboot
rebooting...
finished. total time: 0.101s
Now booted in TWRP and still connected to the computer, adb should see the device:
ckadm@mintp ~ $ adb devices -l
List of devices attached
CB5A1TMNH8 recovery usb:1-1.6 product:SGP321 model:Xperia_Tablet_Z_LTE device:pollux
Push the recovery image to the tablet's memory:
ckadm@mintp ~ $ adb push Downloads/Android/twrp-3.3.1-0-pollux.img /sdcard
2749 KB/s (12085248 bytes in 4.292s)
Use dd to overwrite the tablet's own internal recovery:
ckadm@mintp ~ $ adb shell
~ # dd if=/sdcard/twrp-3.3.1-0-pollux.img of=/dev/block/platform/msm_sdcc.1/by-name/FOTAKernel
23604+0 records in
23604+0 records out
12085248 bytes (11.5MB) copied, 2.075409 seconds, 5.6MB/s
~ # exit
The tablet is still booted in the TWRP recovery and still connected to the computer at this point. Now it's time to download the LineageOS for your Sony Xperia Tablet Z!
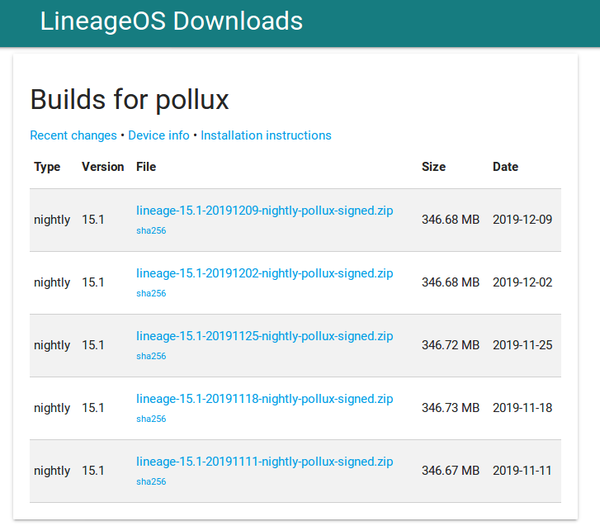
As of this writing I downloaded LineageOS 15.1 (= Android 8.1), nightly build from 2019-12-09. It's also a wise idea to download all the Google Apps which include important packages such as Google Play. The bundle can be downloaded in several variants using OpenGapps.
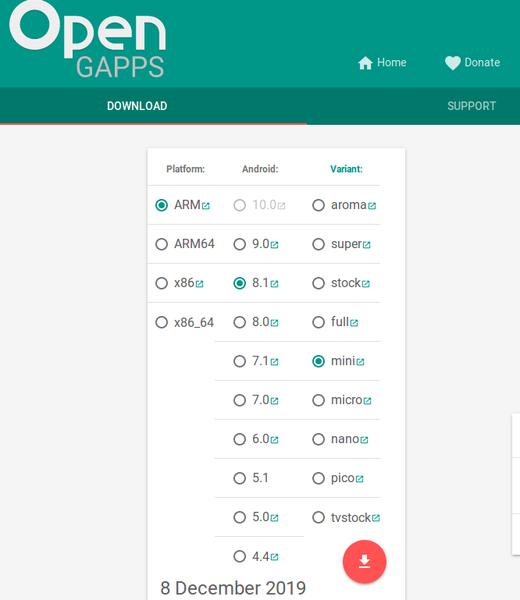
I selected the ARM platform (important for this tablet device!), Android 8.1 and the mini variant.
Once downloaded, there should be two zip files:
ckadm@mintp ~ $ ls Downloads/Android/*zip
Downloads/Android/lineage-15.1-20191209-nightly-pollux-signed.zip
Downloads/Android/open_gapps-arm-8.1-mini-20191208.zip
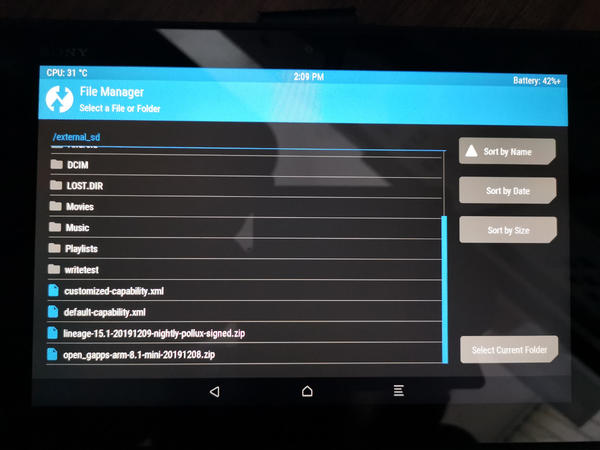
These files can now be copied to your tablet's SD card (which should appear in your file explorer):

In TWRP make sure you are able to see the now copied zip files. Use Advanced -> File Manager and select "external_sd" from the list. The zip files should be shown:
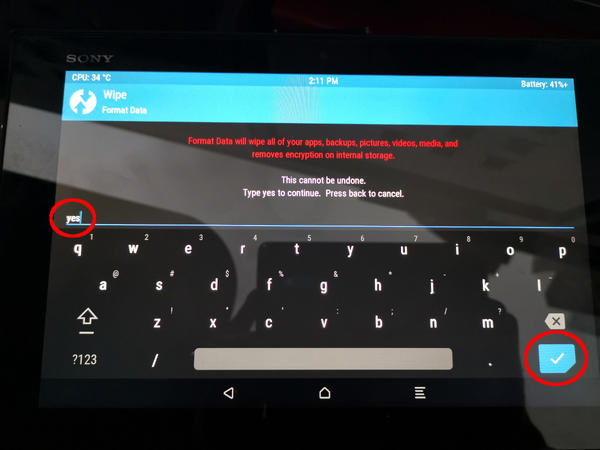
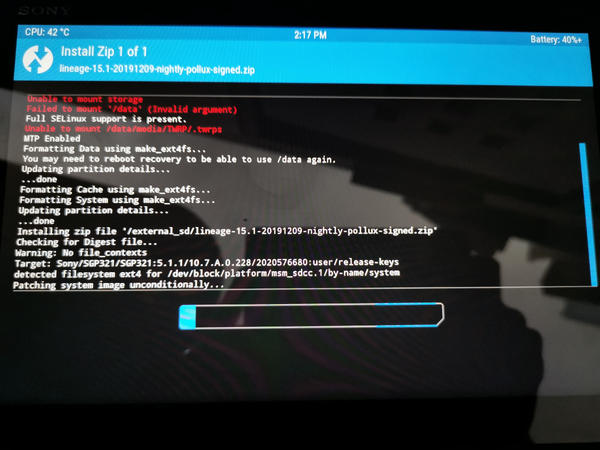
Back in the main menu of TWRP, select Wipe -> Format Data. This will erase the internal memory including the stock Android version from Sony. Type "yes" to confirm data wiping:
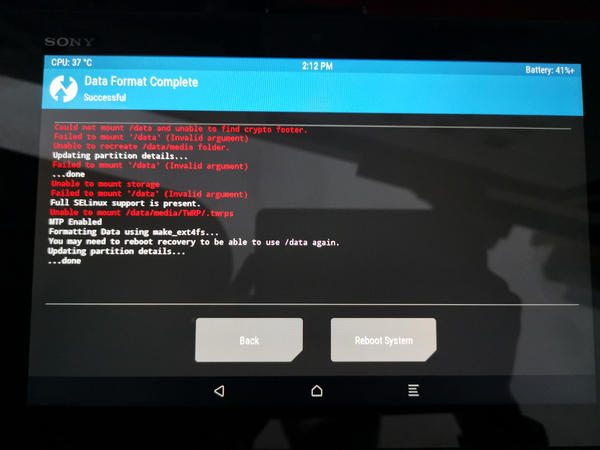
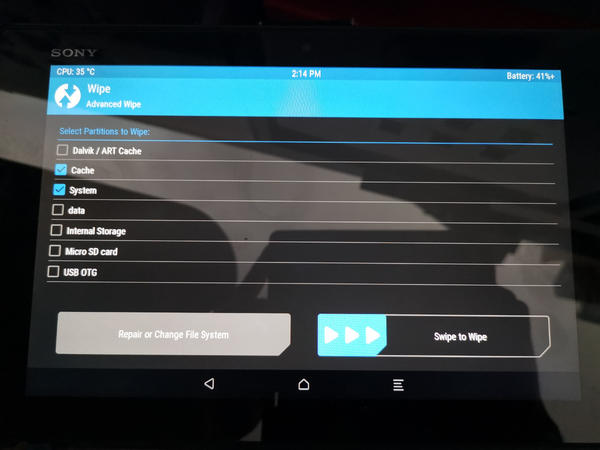
Once completed, use "Back" and use the navigation "back" key to return to the "Wipe" menu. This time tap on "Advanced Wipe". Select "Cache" and "System" partitions and then use your finger to swipe the bar "Swipe to Wipe" to the right.
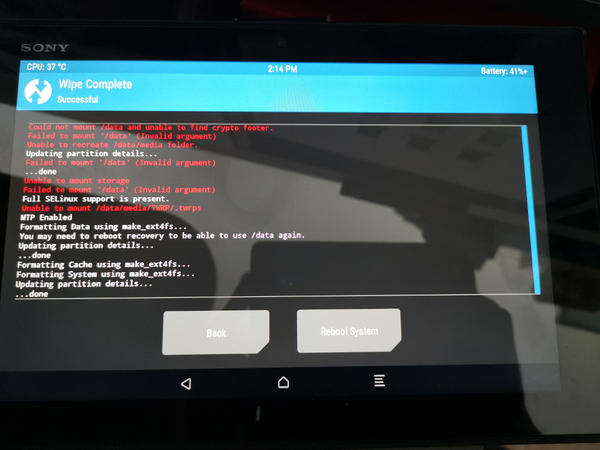
Once completed, return to the main menu of TWRP.
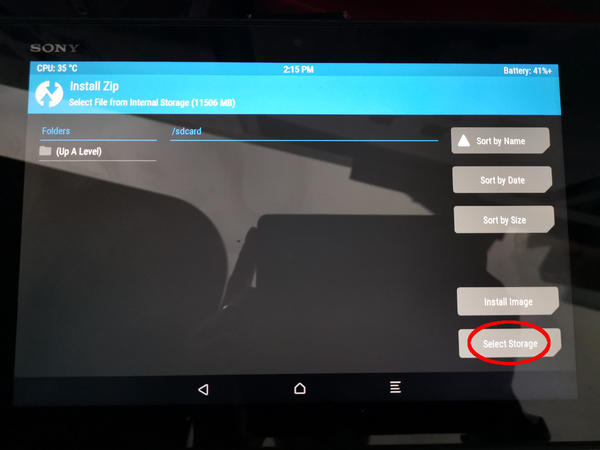
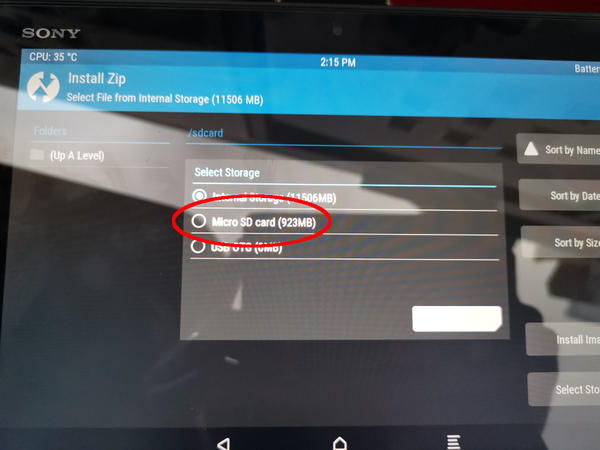
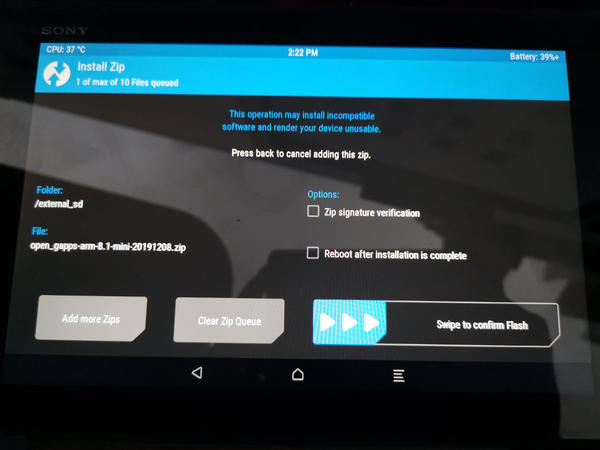
Back in the main menu of TWRP, tap on "Install". To select the external SD card, tap on "Select Storage" and choose the microSD card.
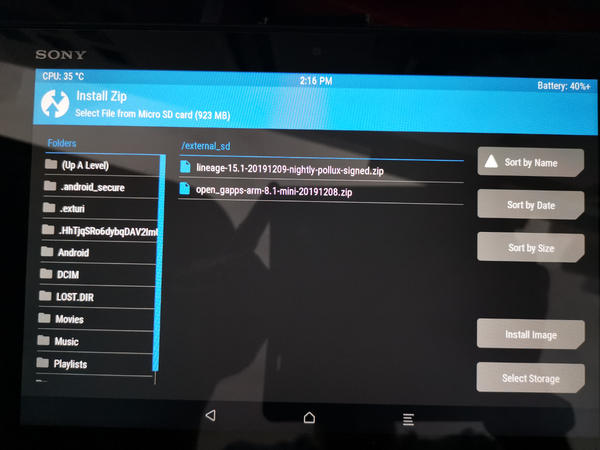
The two zip files (LineageOS and GApps) should now be shown:
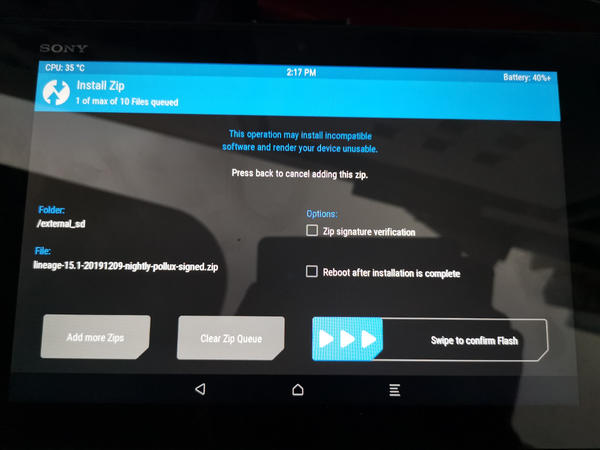
Tap on the linage zip file, TWRP will ask if you want to install this file. Swipe the bar to the right to confirm:
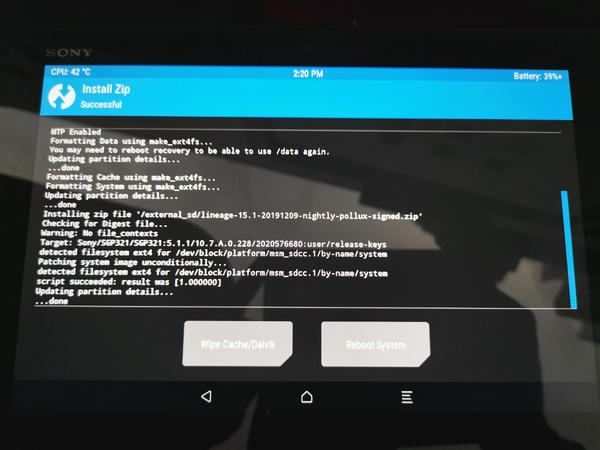
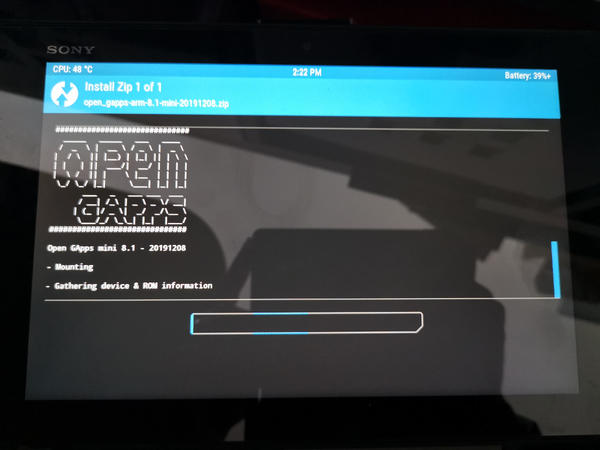
After the installation, tap on "Wipe Cache/Dalvik" and confirm. Afterwards use the back button in the navigation menu at the bottom to go back to the file explorer (Install Zip) and this time select the open_gapps zip file. As with the previous zip file, swipe to confirm the installation.
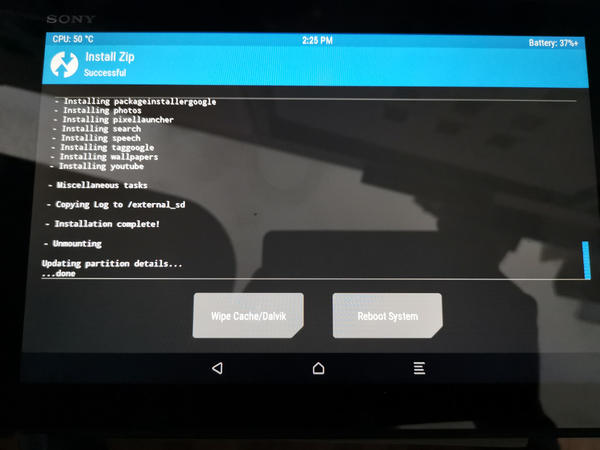
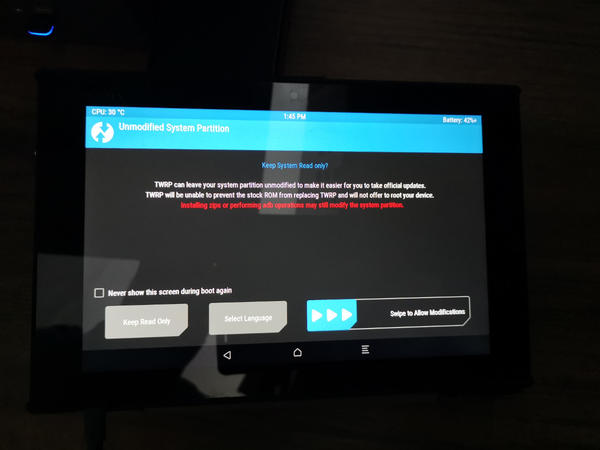
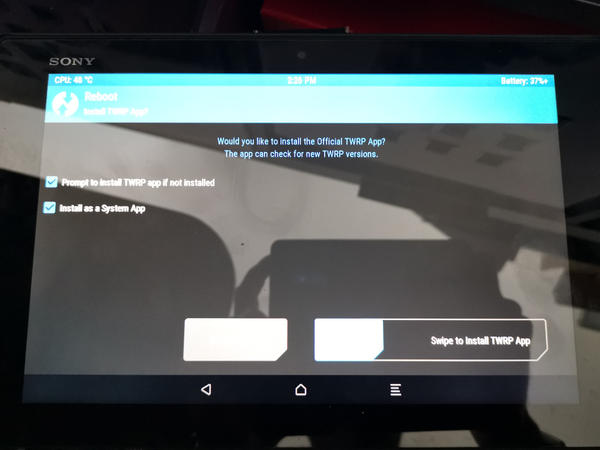
When the installation completes, tap on "Reboot System". TWRP asks if it should be installed as an official app. Swipe to the right to do so.
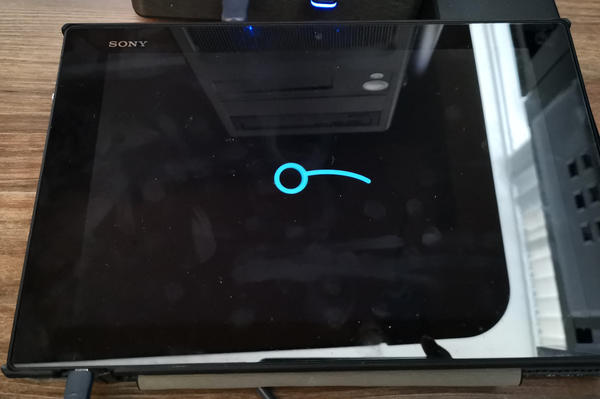
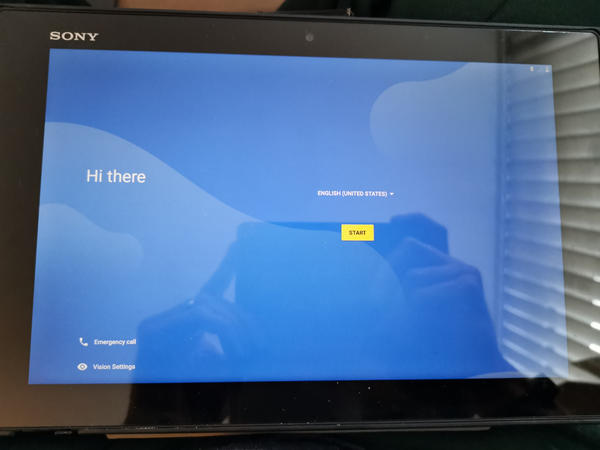
The tablet should now reboot and LineageOS should start.
The first start did not boot LineageOS successfully. The loading animation kept on going for over 30 minutes. I forced a restart of the tablet (see How to force a hard reboot your Sony Xperia tablet or phone) to then start the device again. This time the LineageOS startup worked.
Marius G from wrote on Feb 23rd, 2026:
Thank you again Claudio,
I managed to finalise the process based on your guidance. Once starting using the Tablet I am facing “ghost touch”, which is so frustrating. Maybe it’s time to start digging for a newer update
Thank you once again for your answers and guidance, very helpful
CK from Switzerland wrote on Feb 22nd, 2026:
Marius, if you need Pollux_Windy, then have a look at the other comment from Leo Hulstein.
Marius G from wrote on Feb 22nd, 2026:
Thank you for your quick answer,
I have downloaded the pollux_windy and the tablet is booted in the TWRP recovery and now I need the LineageOS but the link is not available anymore, this is where I get stuck
ck from Switzerland wrote on Feb 22nd, 2026:
Marius check out /downloads/SonyXperiaTabletZ/. This is the original file I had used back then.
Marius G from wrote on Feb 22nd, 2026:
Hello Claudio,
I see that on LineageOS Downloads is not available anymore for Sony Xperia Tablet Z. Do you have any other recommendation? Thank you in advance
Leo Hulstein from NL wrote on Feb 12th, 2026:
Hello Claudio, I had high hopes that my Boss Waza Air headphones were going to work, but unfortunately they don´t. I could install the app, but the headphones refuse to connect to the app. Probably due to a vintage bluetooth implementation in the 2013 tablet. Anyways, thanks for the interaction. Greetings, Leo
CK from Switzerland wrote on Feb 12th, 2026:
Hey Leo that's great to hear! Happy it worked out for you!
Leo Hulstein from NL wrote on Feb 12th, 2026:
Hello Claudio,
First of all thanks for your quick response. Unfortunately pollux is not pollux-windy, as sgp321 is not sgp311. I found another unofficial build here: https://androidfilehost.com/?fid=7161016148664809376 which is lineage-16.0-20210916-UNOFFICIAL-pollux_windy.zip and this works. It is an Android 9 build, so it needs another opengap package. I found one on sourceforge: https://androidfilehost.com/?fid=7161016148664809376 which is open_gapps-arm-9.0-pico-20220215.zip. Now I could complete the process and my 13 year old € 600,- tablet now runs on Android 9. I can now use my Boss Waza Air headphones and playalong on the guitar. I am happy. Thanks, Leo.
ck from Switzerland wrote on Feb 12th, 2026:
Hi Leo, try it with the files under /downloads/SonyXperiaTabletZ/. There should be all needed files. I suppose you can use the lineage zip file for both pollux and pollux-windy. As always, no guarantee ;-)
Leo Hulstein from NL wrote on Feb 12th, 2026:
Hello Claudio, The Lineage OS builds for pollux and pollux-windy are not available for download anymore. Do you now other resources where to find windy? Everything in your guide worked fine until I came to the point of downloading the LineageOS zip file under "Download and copy LineageOS using TWRP recovery". On the lineageos site the device does not exist !! Can I also use an unofficial build?
Kind regards,Leo
CK from Switzerland wrote on Dec 24th, 2025:
Hi Ralph. That's unfortunate. Not sure how you could proceed here without the Sony code...
Ralph from wrote on Dec 23rd, 2025:
Hello,
still running this nice old tablet and trying to follow your instruction.
Unfortunately I'm struggling on the Sony webpage to get the unlock code. Tried both Tablet Z and Tablet Z Wifi (it should be the later one). The page seem to look slightly different, it has a captcha now, unfortunately it always comes back with a failure message "unknown reason". The IDID shoul be ok, tried it several times. Any idea?
David Mora from wrote on Mar 11th, 2024:
Hello. I was still using the tablet with android 5 and today I decided to update it because some apps were not working. Now, with android 8 it works perfectly, I have tablet for a few more years.
I tried to do it from windows but I had problems (some errors) so finally I did it with a linux virtual machine and I got it without problems.
Thank you very much.
Deepak from wrote on Jun 15th, 2022:
Thank you for writing this guide. Every step worked perfectly with my SGP311, down to the never-ending logo animation during first boot that required a hard reboot :)
The tablet feels smoother now and I can finally install a bunch of apps that target Android 8 API as minimum!
Martijn from The Netherlands wrote on May 13th, 2021:
Great guide to do this - I successfully performed it on my favorite "old" tablet (Tablet Z Wifi only), which I mainly use to play music via Spotify, but also control my Sony television etc. The tablet runs much smoother now.
There was one step which gave me a bit of trouble. The copying of the zip files: Linux wouldn't do it as there somehow was no filesystem mounted. After some twiddling/tweaking I discovered I had to go into the ' Mount' menu and opted to mount 'cahce', 'system' and 'microSD'. Not sure if the first two of those are needed to be mounted, but then the microSD showed up on my Linux file explorer and I was set to continue. As I have the Tablet Z Wifi, this might just be related to this particular model or it has something do to with my Linux version (Ubuntu 20.04.2 LTS). Also had the same small issue on the first reboot as you had, in the final step.
Thanks a ton for this!
ck from Switzerland wrote on Aug 17th, 2020:
Hello Dan. The error message you get could be related to a bug in a certain version of fastboot - at least that is what I found online so far. See also cannot flash boot partition with fastboot on 96boards and Error using fastboot flash... on reddit. Maybe try it, as suggested on the first link, using fastboot flash boot_a twrp-3.3.1-0-pollux.img. If that does not work, maybe try a different version of fastboot or give a Linux Live CD (such as Linux Mint) a shot.
Dan from wrote on Aug 17th, 2020:
HI, this is a really great guide but I'm stuck on the install of twrp. I'm using Windows, and when I try to fastboot flash boot twrp-3.3.1-0-pollux.img I keep getting an error message
"fastboot: error: Couldn't parse partition size '0x'."
I can't work out why this is happening, would you be able to help?
Julien from wrote on Apr 17th, 2020:
Good tuto ! Tested with a macOS 10.14.6 work well !
It was my first time to install another ROM for my Tablet Z.
My Tablet Z is like 7 years ago, and even better ! ;)

AI AWS Android Ansible Apache Apple Atlassian BSD Backup Bash Bluecoat CMS Chef Cloud Coding Consul Containers CouchDB DB DNS Databases Docker ELK Elasticsearch Filebeat FreeBSD Galera Git GlusterFS Grafana Graphics HAProxy HTML Hacks Hardware Icinga Influx Internet Java KVM Kibana Kodi Kubernetes LVM LXC Linux Logstash Mac Macintosh Mail MariaDB Minio MongoDB Monitoring Multimedia MySQL NFS Nagios Network Nginx OSSEC OTRS Observability Office OpenSearch PHP Perl Personal PostgreSQL PowerDNS Proxmox Proxy Python Rancher Rant Redis Roundcube SSL Samba Seafile Security Shell SmartOS Solaris Surveillance Systemd TLS Tomcat Ubuntu Unix VMware Varnish Virtualization Windows Wireless Wordpress Wyse ZFS Znuny Zoneminder