
It has been a while since I wrote an Android article. Because it has been a while since I saw there was an update for the Samsung Galaxy S5 Plus (model number G901F). Back in July 2015 I wrote two articles for this device:
Since July 2015 I kept using CM12.0 (Android 5.0) on the G901F. The CM 12.1 turned out to be a battery burner and 12.0, although without any updates anymore, still was much better than the original stock Android (Touchwiz) from Samsung.
Out of curiousity I checked, if there was a recent version and, to my big surprise, someone really cared about that device and created new CM versions (see this XDA forums thread).
So this article describes how you can install CyanogenMod 14 (Android 7) - now called LineAge - on your Samsung Galaxy S5 Plus (G901F). But first some preparations need to be done. As it turns out, the newer Android versions require a newer bootloader and modem driver. I had to fall on my nose myself to figure that out. Please read and follow the following steps carefully.
1. You understand that you most likely void your warranty of your Samsung device. As with all other tutorials, you are responsible for your own actions etc bla bla. If you brick/destroy your device it's your own fault.
2. Download the newest version of Odin from http://odindownload.com/download. Odin is a tool to install/flash firmware to Samsung devices. As of this writing I downloaded and installed Odin 3.12.3.
3. Download newer bootloader and modem driver for this phone with version CPE1. Original links were given to me in the XDA forums by user ruchern:
Some notes on the Bootloader (BL) and Modem (CP) versions: Besides CPE1 I also tried versions BOH4 (always rebooted the phone during the Wifi screen in Android setup) and CPHA (which never completely booted Android).
4. Download a new Recovery ROM. I chose TWRP which can be downloaded here: http://teamw.in/devices/samsunggalaxys5plus.html . Download the "tar" package. During this writing the current version was twrp-3.0.2-0-kccat6.img.tar. Note: In my older article I used CWM recovery. TWRP offers to mount the phone as USB drive when in Recovery, which is very helpful for the installation of zip files.
5. Download and install the Samsung USB drivers (SAMSUNG_USB_Driver_for_Mobile_Phones.zip) if you haven't already. You can download this from http://developer.samsung.com/technical-doc/view.do?v=T000000117.
6. Power off the Galaxy S5.
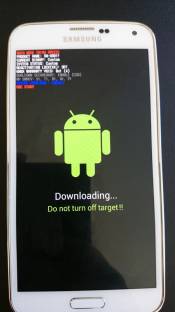
7. Boot your phone into the Download Mode by pressing the following buttons altogether: [Volume Down] + [Home] + [Power] until you see a warning triangle. Accept the warning by pressing the [Volume Up] button.
8. Start the Odin executable. You might have to unzip/unpack the downloaded Odin version first.
9. Connect the phone to the computer with the phone's USB cable. In Odin one of the ID:COM fields should now show a connection. In the "Log" field you should see an entry like "Added!!".
10. Let's start by installing TWRP recovery. In Odin click on the "AP" button and select the tar file from twrp (twrp-3.0.2-0-kccat6.img.tar).

Then click on Start. The phone will reboot (unless you have unticked auto-reboot in the Odin options). Let the phone finish boot your existing OS and then power off the phone again. Exit Odin and disconnect the USB cable.
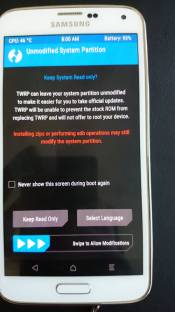
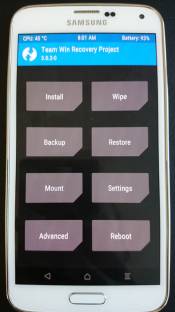
11. This is for verification: Boot the phone into Recovery mode by pressing the following buttons altogether: [Volume Up] + [Home] + [Power] until you see a blue text at the top. You should now see the TWRP Recovery. If this was working for you - great, we can proceed. If not, you can try it again or try to install another Recovery (check out Samsung Galaxy S5 (G901F): Pain to install custom recovery or Cyanogenmod again). Power off the Galaxy S5.
12. Boot your phone into the Download Mode again by pressing the following buttons altogether: [Volume Down] + [Home] + [Power] until you see a warning triangle. Accept the warning by pressing the [Volume Up] button.
13. Start Odin again and connect your phone with the USB cable. This time we're going to flash the new Bootloader (BL) and Modem (CP) versions. Click on the "BL" button and select the bootloader file (G901FXXU1CPE1_bootloader.tar.md5). Click on the "CP" button and select the modem file (G901FXXU1CPE1_modem.tar.md5).
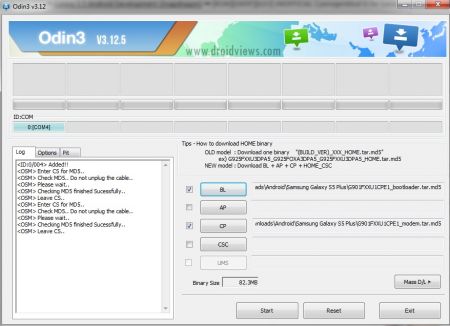
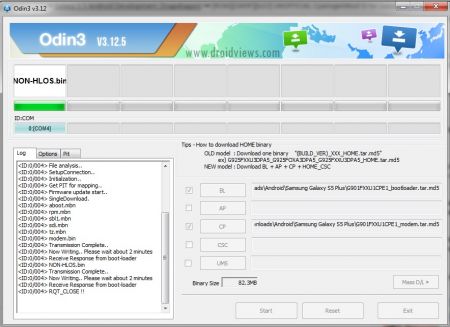
Then click on the "Start" button. The phone will reboot again, once done.
14. Now I'm not sure whether your old Android installation will still boot with the new bootloader or not. If it doesn't even after several minutes and it is stuck showing the same screen, just power off the phone (in the worst case by pulling the battery). If it does still boot your old Android OS, do a normal power off of the phone. Disconnect the USB cable. Exit Odin if you haven't already.
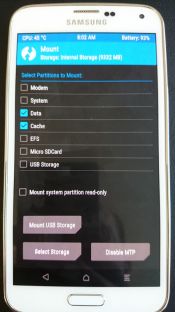
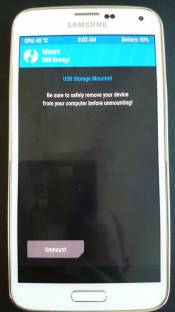
15. Boot the phone into Recovery mode by pressing the following buttons altogether: [Volume Up] + [Home] + [Power] until you see a blue text at the top. Connect the USB cable. In TWRP tap on "Mount". In the next window tap on "Mount USB Storage". Your phone should now be appearing as USB storage on your computer and you can simply transfer files to the phone.
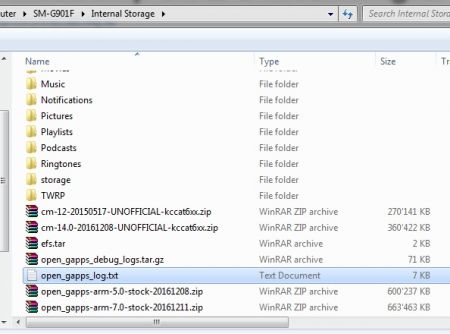
16. On your computer download CM14 from http://ionkiwi.nl/archive/view/4/samsung-galaxy-s5--g901f--kccat6xx. In my case, I downloaded the currently latest CM14.0 (cm-14.0-20161208-UNOFFICIAL-kccat6xx.zip). Once download is complete, transfer the file to your phone using the mounted USB storage.
17. On your computer download the Google Apps (GApps) using http://opengapps.org/. Select Platform: ARM, Android: 7.0, Variant: mini (Note: The default "stock" didn't work for me, it has caused a crash of "Google Play Services" in the Android setup after initial boot of the phone). This should give you a file like this: open_gapps-arm-7.0-mini-20161211.zip. Once download is complete, transfer the file to your phone using the mounted USB storage.
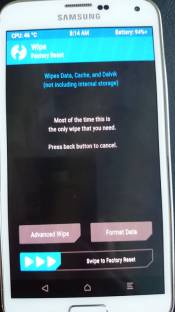
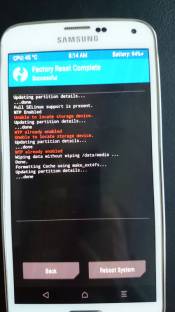
18. On your phone in TWRP go back to the main screen and tap on "Wipe". Swipe the blue bar to the right for a Factory Reset.
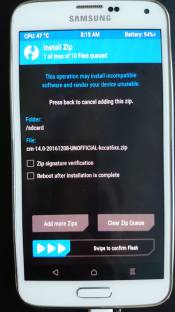
19. In TWRP go back to the main screen and tap on "Install". Cool in TWRP: You can select several zip files to install one after another. So first select the cm-14 zip file, then tap on "Add more Zips" and then select the open_gapps zip file. After you selected the open_gapps zip file, tick the "Reboot after installation is complete" checkbox. Then swipe the blue bar to the right to install the zip files ("Swipe to confirm Flash").

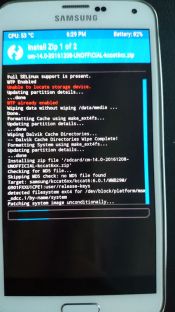
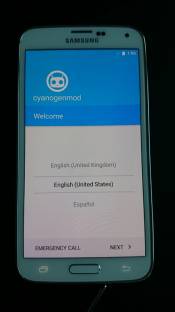
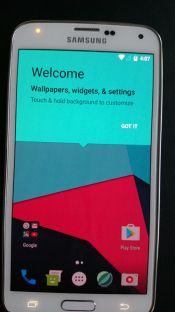
20. After the installation the phone reboots and the CyanogenMod robo logo should appear. Give the phone some time to boot, it took my phone around 3 mins for the first boot. Then the Android setup starts up. This I really don't need to explain.

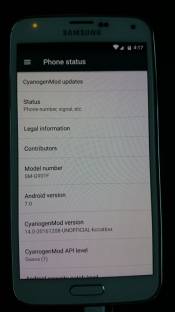
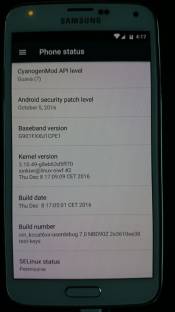
21. After the Android setup you can check out your phone's version in Settings -> About.
Enjoy your phone not being dead :D
PS: I created a stale mirror of the mentioned files in case the original links don't work in the future: https://www.claudiokuenzler.com/downloads/G901F-CM14/
Update January 3rd 2017: As you may have heard, the CyanogenMod project is dead. A fork of CM, called Lineage, is available though. This howto of course also works for the newer Lineage zip files. I changed the title of this howto accordingly.
Update February 9th 2017: Yesterday I installed Lineage 14.1 20170202-UNOFFICIAL-kccat6xx.zip and great results so far:
- No battery drain
- Camera correctly working (I sometimes experienced issues with CM 14)
- The sudden "phone off" issue seems gone. See comments below.
Update August 22nd 2017: Today I installed the latest available Linage 14.1-20170227 and OpenGapps 7.1-full-20170822. I've made these zip files downloadable in https://www.claudiokuenzler.com/downloads/G901F-CM14/ .
Update October 5th 2017: I experienced boot issues today - unable to boot Android. I used that to install the newest available Lineage 14.1-20171004 (from https://download.lineageos.org/kccat6) and OpenGapps 7.1-stock-20171005.
Renato from Zurich wrote on May 6th, 2018:
I was looking or a guide to install a custom ROM on my Galaxy S5. This guide was the only one which worked for me. It`s very detailed, clear, and helpful. Thank you.
ck from Switzerland wrote on Sep 14th, 2017:
Hi Ollie. Where does it say that? Bootloader version CQA2 is obviously newer than what I have installed (CPE1). However I was able to install the latest version 14.1-20170227 recently.
Ollie from Uk wrote on Sep 14th, 2017:
It says to use this bootloader
For kccat6, use bootloader CQA2 or later.
Which one do I do
Bernhard from Thailand wrote on May 17th, 2017:
Hi Claudio, Thanks a lot!!!
I first tried to install a newer Rom with newer bootloader, modem and so on using the descripton off the official g901f LOS xda dev forum. That resulted in a bootloop and on second try in an endless LOS boot startup.
So i downloaded the same files you have used.
And then it worked with the latest LOS rom.
Later i tried it again with having all this new knowledge from here and other websites/forum pages, using the latest TWRP image, the latest Samsung bootloader and latest Samsung modem that i created from Samsung image
G901FXXS1CQD2_G901FNEE1CPJ1_G901FXXU1CPJ1_HOME.tar.md5
I downloaded them all together in one step with Odin.
BL = bootloader
AP = recovery
CP = modem
Then rebooted the smartphone to recovery mode to wipe all (Dalvik, System, Data, Cache, Internal SD and additionally did a factory reset) as i had a backup of everything already.
Next you can either "Mount USB storage" or "Enable MTP", and then connect the USB cable back to the computer to access the empty Internal SD. Then copy the zip files of LOS rom, Super SU app and Gapps mini to it.
Then unmount USB or disable MTP.
Then went to Terminal to enter "echo SYSTEMLESS=true > /data/.supersu" because some guys had problem with Super SU installation otherwise, which led to another bootloop.
After that install zips of LOS rom, Super SU and finally Gapps.
Reboot...
After approx 30 to 40 seconds the LOS moving circle (Waitcursor) should change to the LOS droid.
If not, you're stuck again and can wait probably forever.
If not, then after maybe 10 to 20 more seconds you'll see the welcome configuration screen - as i finally did :-)
Hope this also will help some guys.
Cheers and Greetings from Samui.
Claudio from Switzerland wrote on Apr 28th, 2017:
oetzi, those links I used are working fine.
oetzi from wrote on Apr 28th, 2017:
Thank you very much for this tutorial!!
I got stuck with this reboot problem.
A question:
I am not sure whether I can do anything wrong when I update the Modem and Bootloader?!?
Are the 2 linked files definitely working or do I have to check anything first?
a from france wrote on Mar 5th, 2017:
Today, I sucessfully installed lineage-14.1-20170227-UNOFFICIAL-kccat6xx.zip.md5sum with open_gapps-arm-7.0-mini-20170305.zip. I had to install open_gapps twice to make it work.
The root mode is not activated by default. To activate it, download 2 files and install them with the TWRP recovery : addonsu-remove-arm-signed.zip and then addonsu-arm-signed.zip. Finally, enable the developper mode and switch the root to "applications only". Use this official link to activate root on lineage-14.1-20170227-UNOFFICIAL-kccat6xx :
http://www.lineageosrom.com/2016/12/how-to-enable-root-in-lineage-os-using.html
To force 4g instead of 3g, and to have a better internet speed, use the app called 'Any Cut'. This works for almost any ROM, included lineage-14.1-20170227-UNOFFICIAL-kccat6xx.
The 4g seems to work better.
Screenshot :
https://drive.google.com/file/d/0B08OYS7z8Q8JcGFTNkNSTkk5MU0/view?usp=sharing
https://drive.google.com/file/d/0B08OYS7z8Q8JTUJOb280ZG9iUUE/view?usp=sharing
As you can see, this is now Android 7.1.1 instead of Android 7.0 ;)
André from Germany wrote on Feb 22nd, 2017:
Hi Claidio,
nice article. The device is working propperly and i'm really happy to stay on Android Nougat!
Thanks a lot
André
ck from Switzerland wrote on Jan 14th, 2017:
Hi Adam. I still have the problem with the phone. However it always happens when the phone is in my backpack. Never when the phone is on my desk. So I assume there's something pressing against some phone button causing the phone to shut off. I could never reproduce it on the desk.
Other than that, the phone seems stable.
Adam from Uk wrote on Jan 14th, 2017:
Hi CK,
Thanks great tutorial. Have you experienced the battery/reboot issue again since December?
Thanks,
Adam
a from france wrote on Jan 6th, 2017:
Awosome : there is a new update almost each day
The official xda forum is here https://forum.xda-developers.com/galaxy-s5/development/rom-unofficial-cyanogenmod-13-galaxy-s5-t3281502/page165
Like the associated git to get more updates :
https://github.com/sktjdgns1189
a from France wrote on Dec 29th, 2016:
Nice tutorial, probably the best since 2014.
I would add that all official last roms for the g901f can be found at http://www.sammobile.com/firmwares/database/SM-G901F/
And yes you have to manually install the bootloader AND the modem before beeing able to install any other rom on the G901f.
ck from Switzerland wrote on Dec 28th, 2016:
Hello Gabriele. Yes, I'm happy with the new CM14 installation on my G901F. However there's one strange thing I experienced a few times: Suddenly the phone is off. I haven't figured out yet, if suddenly the battery drops. I only experienced it when the phone was in my bag. So it might have been something pressing against the phone, too.
Gabriele from wrote on Dec 26th, 2016:
Thanks for this tutorial Claudio! I just bought a used Galaxy S5+ and have a few questions: Are you happy with the CM 14 installation, does everything work ok and is it stable? Does your procedure require that the phone has been rooted previously? And do you have to activate USB Debugging for this? I am a bit insecure coming from an SGS2 - rooting and flashing custom roms was much easier on my old phone.

AI AWS Android Ansible Apache Apple Atlassian BSD Backup Bash Bluecoat CMS Chef Cloud Coding Consul Containers CouchDB DB DNS Databases Docker ELK Elasticsearch Filebeat FreeBSD Galera Git GlusterFS Grafana Graphics HAProxy HTML Hacks Hardware Icinga Influx Internet Java KVM Kibana Kodi Kubernetes LVM LXC Linux Logstash Mac Macintosh Mail MariaDB Minio MongoDB Monitoring Multimedia MySQL NFS Nagios Network Nginx OSSEC OTRS Observability Office OpenSearch PHP Perl Personal PostgreSQL PowerDNS Proxmox Proxy Python Rancher Rant Redis Roundcube SSL Samba Seafile Security Shell SmartOS Solaris Surveillance Systemd TLS Tomcat Ubuntu Unix VMware Varnish Virtualization Windows Wireless Wordpress Wyse ZFS Znuny Zoneminder