
Today I needed to set up a new LXC environment running on Ubuntu 18.04. This is basically the same setup as I did in the past few years, but there have been quite a lot of changes in Ubuntu 18.04. Also this new setup runs within a VMware ESXi virtual machine environment, which has some additional gotchas.
This article is supposed to cover the preparations and tweaks to properly run LXC containers on a VM.
When setting up and running a LXC host in a VMware ESXi managed virtual machine environment, some requirements are necessary:
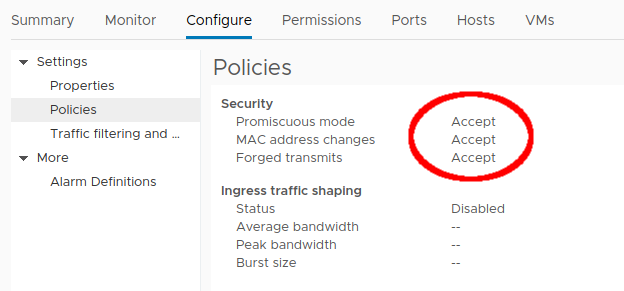
1) Adjust the virtual switches security settings, see Problems on LXC in same network as its host which is a VMware VM.
2) Make sure you're using macvlan virtual interfaces for the containers, not veth. See Network connectivity problems when running LXC (with veth) in VMware VM.
This is actually something which is not necessary to adapt but in our environment I have created an Ansible playbook to get rid of systemd-resolved which sets up a local DNS resolving service. It should not harm an LXC installation, but I got into huge problems in our Docker environment. As I (still) cannot see an advantage versus the older static resolv.conf file (or even dynamically created using resolvconf) I am in general disabling this service on all new Ubuntu 18.04 installations:
# systemctl stop systemd-resolved.service
# systemctl disable systemd-resolved.service
# systemctl mask systemd-resolved.service
# rm -f /etc/resolv.conf
# vi /etc/resolv.conf -> enter the relevant nameservers and search domains
As you can guess, this is an automated task in my environment.
Again this might be something unique to our network, but I have seen in the past and in these days that DNS lookups sometimes fail when mdns is enabled in /etc/nsswitch.conf. Before Ubuntu 18.04 I've actually never seen mdns being enabled on a server distribution, only on Linux desktop distributions as Linux Mint. See Ubuntu Desktop: Error resolving, name or service not known (but DNS works!) for further information.
Because of these experiences, I remove the mdns relevant options in nsswitch.conf.
Before:
# cat /etc/nsswitch.conf | grep hosts
hosts: files mdns4_minimal [NOTFOUND=return] dns
After:
# cat /etc/nsswitch.conf | grep hosts
hosts: files dns
Ubuntu 18.04 ships with netplan. This is a new way of configuring the network interfaces. In older LTS versions the network interface config was always in /etc/network/interfaces. When this changed I was quite surprised. The new network config is now in /etc/netplan/ and consists of one or more yaml files. By default this is /etc/netplan/01-netcfg.yaml .
A plain 01-netcfg.yaml after a new OS installation looks like this:
# cat /etc/netplan/01-netcfg.yaml
# This file describes the network interfaces available on your system
# For more information, see netplan(5).
network:
version: 2
renderer: networkd
ethernets:
ens160:
addresses: [ 10.150.66.141/25 ]
gateway4: 10.150.66.129
nameservers:
search: [ localdomain.local ]
addresses:
- "10.150.66.253"
When LXC is installed, it also installs a default virtual bridge called lxcbr0 and a default subnet of 10.0.3.1/24.
# ip a
1: lo:
link/loopback 00:00:00:00:00:00 brd 00:00:00:00:00:00
inet 127.0.0.1/8 scope host lo
valid_lft forever preferred_lft forever
inet6 ::1/128 scope host
valid_lft forever preferred_lft forever
2: ens160:
link/ether 00:50:56:8d:e6:96 brd ff:ff:ff:ff:ff:ff
inet 10.150.66.141/25 brd 10.150.66.255 scope global ens160
valid_lft forever preferred_lft forever
inet6 fe80::250:56ff:fe8d:e696/64 scope link
valid_lft forever preferred_lft forever
3: lxcbr0:
link/ether 00:16:3e:00:00:00 brd ff:ff:ff:ff:ff:ff
inet 10.0.3.1/24 scope global lxcbr0
valid_lft forever preferred_lft forever
This is not what I want as I want my own virtual network adapters and a specific virtual bridge configuration. So the first thing to do in this case is to disable the lxcbr0, which is launched as a SystemD service:
# systemctl list-units|grep lxc-net
lxc-net.service loaded active exited LXC network bridge setup
To disable this completely including after reboot and future modifications, the service is disabled and masked:
# systemctl stop lxc-net.service
# systemctl disable lxc-net.service
Removed /etc/systemd/system/multi-user.target.wants/lxc-net.service.
# systemctl mask lxc-net.service
Created symlink /etc/systemd/system/lxc-net.service -> /dev/null.
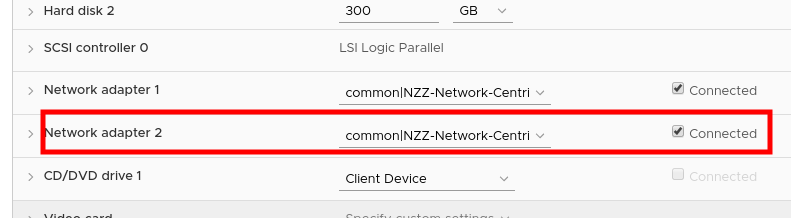
To create my own bridge with a new VNIC, I first added the additional network adapter in vSphere client:
The new adapter was discovered as ens192:
# dmesg | tail
[ 102.529248] pcieport 0000:00:16.0: bridge window [mem 0xe7a00000-0xe7afffff 64bit pref]
[ 102.530907] vmxnet3 0000:0b:00.0: # of Tx queues : 4, # of Rx queues : 4
[ 102.530979] vmxnet3 0000:0b:00.0: enabling device (0000 -> 0003)
[ 102.544456] vmxnet3 0000:0b:00.0 eth0: NIC Link is Up 10000 Mbps
[ 102.549777] vmxnet3 0000:0b:00.0 ens192: renamed from eth0
Now this interface can be configured /etc/netplan/01-netcfg.yaml in the following way:
# cat /etc/netplan/01-netcfg.yaml
# This file describes the network interfaces available on your system
# For more information, see netplan(5).
network:
version: 2
renderer: networkd
ethernets:
ens160:
addresses: [ 10.150.66.141/25 ]
gateway4: 10.150.66.129
nameservers:
search: [ localdomain.local ]
addresses:
- "10.150.66.253"
ens192:
addresses: [ ]
dhcp4: false
bridges:
virbr1:
interfaces: [ ens192 ]
Now netplan needs to be told to reload the config:
# netplan generate
# netplan apply
Can the new bridge be seen?
# ip a
1: lo:
link/loopback 00:00:00:00:00:00 brd 00:00:00:00:00:00
inet 127.0.0.1/8 scope host lo
valid_lft forever preferred_lft forever
inet6 ::1/128 scope host
valid_lft forever preferred_lft forever
2: ens160:
link/ether 00:50:56:8d:e6:96 brd ff:ff:ff:ff:ff:ff
inet 10.150.66.141/25 brd 10.150.66.255 scope global ens160
valid_lft forever preferred_lft forever
inet6 fe80::250:56ff:fe8d:e696/64 scope link
valid_lft forever preferred_lft forever
3: ens192:
link/ether 00:50:56:8d:d6:e0 brd ff:ff:ff:ff:ff:ff
4: virbr1:
link/ether 86:8d:05:92:dd:e7 brd ff:ff:ff:ff:ff:ff
inet6 fe80::848d:5ff:fe92:dde7/64 scope link
valid_lft forever preferred_lft forever
Yes, the bridge is configured and up! It can now be used by the containers.
The LXC host and the virtual network bridge (virbr1 in this case) running on that host acts as a router between the "real" network and the LXC containers. Hence the Kernel needs to be told to allow IP routing/forwarding.
The lxc-net service is handy for that thing as it would easily be forgotten: It sets the correct Kernel parameter to allow IP routing/forwarding. This is done through the start script /usr/lib/x86_64-linux-gnu/lxc/lxc-net, which is executed by SystemD, and can be seen in the start() function:
# set up the lxc network
[ ! -d /sys/class/net/${LXC_BRIDGE} ] && ip link add dev ${LXC_BRIDGE} type bridge
echo 1 > /proc/sys/net/ipv4/ip_forward
echo 0 > /proc/sys/net/ipv6/conf/${LXC_BRIDGE}/accept_dad || true
Further down in the same function is also the IP forwarding for IPv6:
LXC_IPV6_ARG=""
if [ -n "$LXC_IPV6_ADDR" ] && [ -n "$LXC_IPV6_MASK" ] && [ -n "$LXC_IPV6_NETWORK" ]; then
echo 1 > /proc/sys/net/ipv6/conf/all/forwarding
echo 0 > /proc/sys/net/ipv6/conf/${LXC_BRIDGE}/autoconf
But now that this service is disabled, the IP forwarding needs to be enabled, preferably right at boot time. In Ubuntu 18.04 this is already prepared in /etc/sysctl.conf but is by default commented/disabled:
# grep ip_forward /etc/sysctl.conf
#net.ipv4.ip_forward=1
So all you need to do is to remove the hash to enable it:
# sed -i "/net.ipv4.ip_forward/s/#//g" /etc/sysctl.conf
# grep ip_forward /etc/sysctl.conf
net.ipv4.ip_forward=1
Of course you need to do the same for net.ipv6.conf.all.forwarding if you use IPv6.
My best practice is to use a dedicated virtual hard drive for all the LXC containers and use LVM on this additional drive. In this setup, an additional drive of 300 GB was added to the VM:

The new drive was detected as /dev/sdb in Ubuntu. I don't set up a partition on that drive but rather use the full drive as a physical volume (PV) for the logical volume manager (LVM). Check out article Dynamically increase physical volume (PV) in a LVM setup on a VM to see why this is really helpful.
# pvcreate /dev/sdb
Physical volume "/dev/sdb" successfully created.
# vgcreate vglxc /dev/sdb
Volume group "vglxc" successfully created
The new volume group for the containers is now ready:
# vgs
VG #PV #LV #SN Attr VSize VFree
vglxc 1 0 0 wz--n- <300.00g <300.00g
vgsystem 1 2 0 wz--n- 7.64g 2.99g
And more importantly, it can be increased without downtime (see mentioned article above).
The default installation of LXC relies on the (now disabled) lxcbr0 bridge and also adds certain pre-defined config options for each container. This is prepared in the config file /etc/lxc/default.conf and can be considered like a template for the final container config. After a new installation, this file looks like this:
# cat /etc/lxc/default.conf
lxc.net.0.type = veth
lxc.net.0.link = lxcbr0
lxc.net.0.flags = up
lxc.net.0.hwaddr = 00:16:3e:xx:xx:xx
Clearly in our case we don't want veth interfaces because we're in a VMware environment and lxcbr0 doesn't even exist. I usually get rid of all these predefined settings and just add one setting:
# cat /etc/lxc/default.conf
# Autostart container
lxc.start.auto = 1
This will add a setting to automatically start the container after a system boot of the LXC host.
In previous versions, a distribution template was used to create the container with a specific distribution (and optional release version):
# lxc-create -n mycontainer -B lvm --vgname=vglxc --fstype=ext4 --fssize=3G -t ubuntu
But in Ubuntu 18.04 this works differently. There are the following templates available:
# ll /usr/share/lxc/templates/
total 52
-rwxr-xr-x 1 root root 8370 Nov 23 05:49 lxc-busybox
-rwxr-xr-x 1 root root 18155 Nov 23 05:49 lxc-download
-rwxr-xr-x 1 root root 7175 Nov 23 05:49 lxc-local
-rwxr-xr-x 1 root root 10649 Nov 23 05:49 lxc-oci
The lxc-download template is basically the template which replaces all the different distribution templates from the previous versions. It has a lot of options which can be seen when appending "-- --help":
# lxc-create -n mycontainer -B lvm --vgname=vglxc --fssize=20G -t download -- --help
LXC container image downloader
Special arguments:
[ -h | --help ]: Print this help message and exit
[ -l | --list ]: List all available images and exit
Required arguments:
[ -d | --dist
[ -r | --release
[ -a | --arch
Optional arguments:
[ --variant
[ --server
[ --keyid
[ --keyserver
[ --no-validate ]: Disable GPG validation (not recommended)
[ --flush-cache ]: Flush the local copy (if present)
[ --force-cache ]: Force the use of the local copy even if expired
LXC internal arguments (do not pass manually!):
[ --name
[ --path
[ --rootfs
[ --mapped-uid
So if I want the container to run with Ubuntu 18.04 Bionic, I can run:
# lxc-create -n mycontainer -B lvm --vgname=vglxc --fssize=20G -t download -- -d ubuntu -r bionic -a amd64
# lxc-create -n mycontainer -B lvm --vgname=vglxc --fssize=20G -t download -- -d ubuntu -r bionic -a amd64
Setting up the GPG keyring
ERROR: Unable to fetch GPG key from keyserver
lxc-create: mycontainer: lxccontainer.c: create_run_template: 1617 Failed to create container from template
lxc-create: mycontainer: storage/lvm.c: lvm_destroy: 604 Failed to destroy logical volume "/dev/vglxc/mycontainer": Logical volume vglxc/mycontainer contains a filesystem in use.
lxc-create: mycontainer: lxccontainer.c: container_destroy: 2974 Error destroying rootfs for mycontainer
lxc-create: mycontainer: tools/lxc_create.c: main: 327 Failed to create container mycontainer
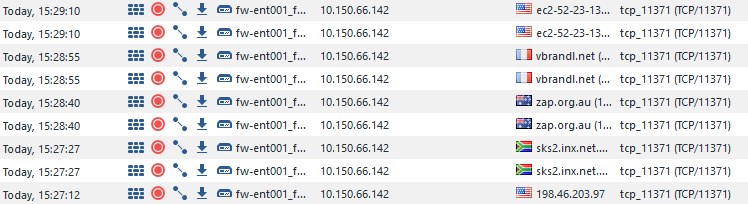
On my research why this happens I came across several discussions (worth to read this one and this one). Ultimately the issue in my environment was an outgoing firewall rule which blocked tcp/11371 which is used by the HKP protocol (found the relevant hint here).
Note: If your server must use a http forward proxy, it's not enough to define it in the shell. You also need to set it in /etc/wgetrc because debootstrap (which runs in the background when creating a container) reads that config file:
# export https_proxy=http://myproxy:8080
# export http_proxy=http://myproxy:8080
# tail -n3 /etc/wgetrc
use_proxy=yes
http_proxy=myproxy:8080
https_proxy=myproxy:8080
# lxc-create -n mycontainer -B lvm --vgname=vglxc --fssize=20G -t download -- -d ubuntu -r bionic -a amd64
Setting up the GPG keyring
Downloading the image index
WARNING: Failed to download the file over HTTPs
The file was instead download over HTTP
A server replay attack may be possible!
Downloading the rootfs
Downloading the metadata
The image cache is now ready
Unpacking the rootfs
---
You just created an Ubuntu bionic amd64 (20190521_07:42) container.
To enable SSH, run: apt install openssh-server
No default root or user password are set by LXC.
Once the container is created, its config looks like this:
# cat /var/lib/lxc/mycontainer/config
# Template used to create this container: /usr/share/lxc/templates/lxc-download
# Parameters passed to the template: -d ubuntu -r bionic -a amd64
# Template script checksum (SHA-1): 273c51343604eb85f7e294c8da0a5eb769d648f3
# For additional config options, please look at lxc.container.conf(5)
# Uncomment the following line to support nesting containers:
#lxc.include = /usr/share/lxc/config/nesting.conf
# (Be aware this has security implications)
# Autostart container
# Distribution configuration
lxc.include = /usr/share/lxc/config/common.conf
# For Ubuntu 14.04
lxc.mount.entry = /sys/kernel/debug sys/kernel/debug none bind,optional 0 0
lxc.mount.entry = /sys/kernel/security sys/kernel/security none bind,optional 0 0
lxc.mount.entry = /sys/fs/pstore sys/fs/pstore none bind,optional 0 0
lxc.mount.entry = mqueue dev/mqueue mqueue rw,relatime,create=dir,optional 0 0
lxc.arch = linux64
# Container specific configuration
lxc.start.auto = 1
lxc.rootfs.path = lvm:/dev/vglxc/mycontainer
lxc.uts.name = mycontainer
# Network configuration
Of course now the network settings are needed. Because Ubuntu 18.04 comes with the new LXC version 3.0, the syntax is a little bit different than in LXC 2.x.
# Network configuration
lxc.net.0.type = macvlan
lxc.net.0.macvlan.mode = bridge
lxc.net.0.flags = up
lxc.net.0.link = virbr1
lxc.net.0.ipv4.address = 10.150.66.152/25
lxc.net.0.hwaddr = 00:16:3e:66:01:52
lxc.net.0.ipv4.gateway = 10.150.66.129
Now let's see if this container starts up:
# lxc-start -n mycontainer -d
# lxc-ls -f
NAME STATE AUTOSTART GROUPS IPV4 IPV6 UNPRIVILEGED
mycontainer RUNNING 1 - 10.150.66.152 - false
And if all is set up correctly, you should be able to ping the container:
admck@WM2856l ~ $ ping 10.150.66.152
PING 10.150.66.152 (10.150.66.152) 56(84) bytes of data.
64 bytes from 10.150.66.152: icmp_seq=1 ttl=59 time=5.19 ms
64 bytes from 10.150.66.152: icmp_seq=2 ttl=59 time=3.06 ms
64 bytes from 10.150.66.152: icmp_seq=3 ttl=59 time=3.15 ms
64 bytes from 10.150.66.152: icmp_seq=4 ttl=59 time=3.05 ms
No comments yet.

AI AWS Android Ansible Apache Apple Atlassian BSD Backup Bash Bluecoat CMS Chef Cloud Coding Consul Containers CouchDB DB DNS Databases Docker ELK Elasticsearch Filebeat FreeBSD Galera Git GlusterFS Grafana Graphics HAProxy HTML Hacks Hardware Icinga Influx Internet Java KVM Kibana Kodi Kubernetes LVM LXC Linux Logstash Mac Macintosh Mail MariaDB Minio MongoDB Monitoring Multimedia MySQL NFS Nagios Network Nginx OSSEC OTRS Observability Office OpenSearch PHP Perl Personal PostgreSQL PowerDNS Proxmox Proxy Python Rancher Rant Redis Roundcube SSL Samba Seafile Security Shell SmartOS Solaris Surveillance Systemd TLS Tomcat Ubuntu Unix VMware Varnish Virtualization Windows Wireless Wordpress Wyse ZFS Znuny Zoneminder